


Hardware components | ||||||
| × | 1 | ||||
 |
| × | 1 | |||
Software apps and online services | ||||||
 |
| |||||
 |
| |||||
The Internet of Things is about merging the digital and the physical. If there's one thing we learned about the digital world in the past 15 years is that successful products and services were the ones that closed the loop.
That's right; Google built a fortune "closing the loop" by measuring clicks and views of ads, helping brands optimize their offerings; LinkedIn "closed the loop" because they allowed us to discover hidden relationships within our network, helping people get a new job or a new business deal; Amazon "closed the loop" by suggesting relevant products based on your browsing and buying habits.
In fact, there's a great quote from a known Silicon Valley investor that says:
"What I learned from Google is to only invest in things that close the loop" (Chris Sacca)
If we apply this concept to the physical world, the possibilities are enormous. Uber is a good example: the traditional process (ordering a cab) was disrupted by providing a feedback loop (a mobile app) to tell you where the car is and how much it might cost (see a Tim O'Reilly video about this).
This project is about closing the loop in the real world: being able to measure the interest in a product or shelf and having this data online using Ubidots, to help retailers and product manufacturers make decisions in real-time.
A Face Counter with Raspberry Pi + Web CameraIn this project we explore a face counter device using:
- Node.js wrapper for OpenCV
- A Raspberry Pi (w/ an SD card of least a 8GB!)
- A cheap Web Camera
- The Ubidots cloud
It could be applied to many things like:
- Measuring the interest in a particular product in a supermarket
- Measuring the interest of students in a particular book or topic in a library's bookshelf
- Do A/B testing of product features or packaging
And the best thing is - it will cost you less than $50 dollars.
1. Setup your Ubidots AccountLog in to Ubidots. Create a datasource and add a new variable called "Faces". To do this, go to the "Sources" tab and click on "Add new data source":
...then click on the data source and select "Add new variable":
Click on the "i" icon of the variable and copy the VARIABLE's ID. We'll need this later. Each variable have an ID:
Now go to "My profile" tab, click on "API Keys" and then on "Create Short Token". This will be your key to authenticate the Raspberry Pi to the Ubidots API. Copy it somewhere as we'll also need it for our code.
Be aware that this will take a while (at least 9 hours to build and install OpenCV!):
- Install Node.js in Raspberry Pi
- Install the Node.js wrapper for OpenCV:
$ npm install nodejs
Install other required libraries by Node:
$ npm install express
$ npm install ubidots
ubidotsCamera.js
This code requires an external XML file to detect the faces. Download it from the following link and place it on the same folder as the "ubidotsCamera.js" file: haarcascade_frontalface_alt2.xml
Finally, let's put an HTML in the same folder so we can access the camera from a browser: index.html. To run the project, access your Raspberry Pi through a terminal and run the .js file:
$ node ubidotsCamera.js
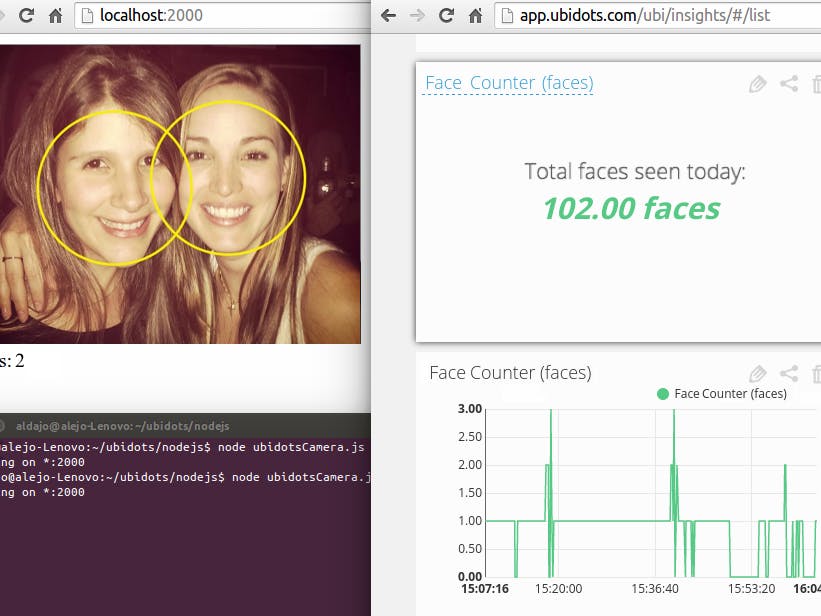
After that, open a web browser and write the following in the address bar: http://localhost:2000/
Great! Now you should see the faces being detected and their sum being send over to Ubidots.


Comments
Please log in or sign up to comment.