Considering drought in CA and even other places, measuring water flow/usage from each tap in the house and control it. May be shut it off. Show the usage per tap, per room and then some interesting scenarios like budget allocation per tap, auto shut off, may be gamification for kids room and some fancy chart for kitchen usage (drinking water vs. dishwasher usage) and last but not least in advance scenarios work with other devices like washing machines etc.
we leverage Azure for backend and may be use it
to compare to neighborhood average / county average / city average / national
average (like PG&E does for entire house).
Project Components
Raspberry Pi Model B – This runs Windows 10 IoT core and hosts a native application to accept commands from a push button to turn the tap On/Off
Xamarin Mobile App – The app can be used to send the commands to Azure web service to turn tap On/Off, and view reports of water consumption
Azure Web Service – Accepts inputs about the tap being turned On/Off and updates the Azure storage
Azure SQL Database – Stores all information about the valve such as date and time when each time tap was turned On/Off
Reporting Application – Web application hosted on Azure that displays reports on water consumption based on the data captured
How does it work?
Raspberry App Details
- The app maintains the current state of tap (On/Off)
The app takes input from a push button to flip the status of the tap on every push
Each time it gets an input to turn the tap On/Off, it performs 2 operations
Set the voltage on respective pins to low/high to turn the tap on/off respectively
Call Azure web service to log the on/off operation
It polls the Azure web service to check if there are any messages from the mobile app to turn the tap on/off, and performs respective operations
Azure Web Service Details
The Azure web service provides the following methods
- GetTapStatus – Returns the current status of the tap (On/Off)
- UpdateTapStatus – Updates the current status of the tap
- Analytics – Provides all data related to the tap to build the reports
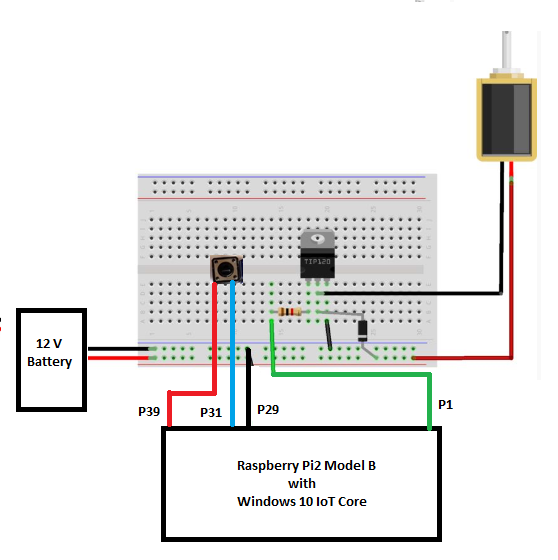
Circuit Details
- Output pin of the Raspberry is connected to the Base leg of the transistor through a 1K resistor
- The Collector leg of the transistor will be connected to the ground leg of the solenoid valve
- The Emitter leg is connected to the ground channel of our circuit
- The power goes to the high voltage power channel generated by one 9V + 2 x 1.5 V batteries to generate 12V required for solenoid valve
- The diode connects the power channel to the solenoid-ground-leg/transistor-collector-leg, preventing the kickback voltage from damaging the circuit


Comments
Please log in or sign up to comment.