


Hardware components | ||||||
 |
| × | 1 | |||
 |
| × | 1 | |||
 |
| × | 1 | |||
 |
| × | 1 | |||
Software apps and online services | ||||||
 |
| |||||
Story
Growing up, I was always fascinated by robot cars equipped with cameras. The idea of having a remote-controlled car that could stream live video and navigate obstacles was something I dreamt of, but I never got to own one. The thought of a spy robot car, quietly patrolling my room or other places, capturing everything without me physically being there, sparked my imagination. Now that I've grown up and developed the skills, I've decided to bring that childhood dream to life by building my own FPV (First-Person View) robot car.
IntroductionThis FPV robot car can stream live videos at high speeds, allowing for smooth remote control and navigation around obstacles—without needing to be present. It’s the realization of my childhood dream, combined with the advanced capabilities of modern technology.
Overview
The robot will be remotely operated over Wi-Fi using the ESP32-CAM module. We'll develop a web-based control interface that can be accessed from any device connected to your local network, allowing you to easily manage and direct the robot's movements and functions. This interface will enable seamless control from smartphones, tablets, or computers, providing a flexible and user-friendly experience for navigating and interacting with the robot.
For this project, I chose the Xiao ESP32S3 Sense as the brain of the robot. The Xiao ESP32S3 Sense is an incredibly versatile microcontroller that combines powerful AI capabilities, Wi-Fi and Bluetooth connectivity, and built-in camera support, making it the ideal choice for a project like this. Its compact size and low power consumption make it perfect for mobile applications, while its processing power ensures smooth video streaming and real-time control.
- Custom 4-Wheel Robot Car: Provides the mobility and stability needed for remote navigation.
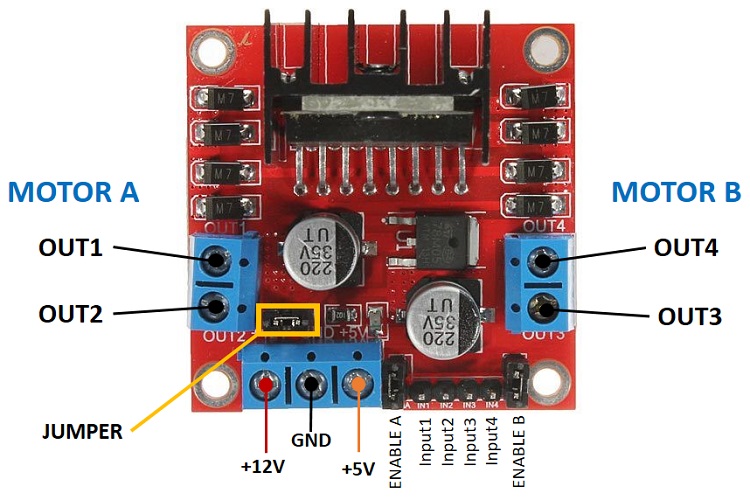
- L298N Motor Driver: Controls the motors that drive the robot, allowing for precise movement.
- LED for Light: Adds visibility for the camera, especially in low-light conditions.
- Female-to-Female Jumper Wires: Used for making the necessary electrical connections.
- Antenna: Enhances the Wi-Fi range, ensuring a stable connection for video streaming.
- Power Input:Connect the positive terminal of the battery to the
12Vinput terminal on the L298N motor driver.Connect the negative terminal of the battery to theGNDinput terminal on the motor driver.
Motor Connections:
- Connect the two output terminals (
OUT1andOUT2) on the motor driver to the terminals of one motor. - Repeat the same connection for the second motor using
OUT3andOUT4.
Control Inputs:
- Connect
IN1,IN2,IN3andIN4on the motor driver to GPIOD1,D2,D3andD4on the Xiao ESP32S3 Sense respectively. - Enable Pins:
- Connect the
EN1pin to pinD0on the Xiao ESP32S3 Sense to control the speed of the first motor. - Connect the
EN2pin to another GPIO pin D5 to control the speed of the second motor
Refer to this pinout when connecting
Ground Connection:
- Connect the
GNDof the motor driver to theGNDpin on the Xiao ESP32S3 Sense. - Ground Connection:Connect the
GNDof the motor driver to theGNDpin on the Xiao ESP32S3 Sense.
- Power Supply to Xiao ESP32S3 Sense:Connect the positive terminal of the battery to the
VCCpin on the Xiao ESP32S3 Sense using a 5V voltage regulator (if necessary) to ensure the correct voltage input.Connect the negative terminal of the battery directly to theGNDpin on the Xiao ESP32S3 Sense.
LED Anode (Longer Leg):
- Connect the anode of the LED to a current-limiting resistor (e.g., 220Ω).
- Connect the other end of the resistor to GPIO pin D6 on the Xiao ESP32S3 Sense.
- LED Anode (Longer Leg):Connect the anode of the LED to a current-limiting resistor (e.g., 220Ω).Connect the other end of the resistor to GPIO pin D6 on the Xiao ESP32S3 Sense.
- Cathode (Shorter Leg):Connect the cathode directly to the
D7pin on the Xiao ESP32S3 Sense.
Verify Connections:Double-check all connections, ensuring that each wire is properly connected to the correct pins.
- Power Up:Power the system by connecting the battery, and ensure that the Xiao ESP32S3 Sense and motor driver are receiving power.
- Test:Run a basic test code to ensure the motors and LED are functioning correctly with the Xiao ESP32S3 Sense.
The board is programmed using the Arduino IDE, a popular and user-friendly platform for developing IoT projects. The necessary libraries are automatically installed when you add the ESP32 core to your IDE, simplifying the setup process.
If you don't have the esp32 you can refer to this tutorial on how to install it.
Download the code from my repository and extract is to to the default Arduino sketchbook directory/folder.
Link to the project's GitHub repo
We will Xiao esp32s3 cam as an access point. This way, it wont need to connect to your router, it creates its own wi-fi network and nearby wi-fi devices like your smartphone can connect to it.
Change the following lines of code on the FPV-ROBOT-CAR.ino file to your desired preference, that is the name of the AP and the password for your Car
const char* ssid = "robotcar";   //Enter SSID for AP
const char* password = "robotcar";   //Enter Password for AP (Optional)
On line 54 of webpage.h file replace the place holder IP with your IP address, it will appear on the Serial Monitor after uploading code and pressing the reset button on the XIAO.
<img src="http://YOUR {IP ADDRESS}:81/stream" style="width:100%; object-fit:cover;">

//IT WILL CLOSE TO SOMETHING LIKE THE ONE BELOW

<img src="http://192.168.8.7:81/stream" style="width:100%; object-fit:cover;">
Usage
After uploading the code open scan for WIFI networks and you'll see a WIFI network with the name "robotcar", the password is "robotcar".
After connecting to it, open any browser in your device and paste or type the IP address from the serial monitor. You will see a page like this pop up.
WEBPAGE - Feel free to customize the webpage found in webpage.h to suit your desire preference of control, for me i decided to use a joystick rather than buttons
You should be able to see a live stream video on the page. Move the joystick around to move the robot care to your desired direction.
You can use the Lights button to turn on and off the LED, The capture button to capture images and the record button to record vides. Currently I haven't implemented that functionality but its coming soon with two options:
- To capture and save the images and video to your device
- To capture and save the images on the SD-card on the XIAO
Demo Time
Conclusion
In conclusion, this FPV robot car project brings together the thrill of remote vehicle operation with the power of real-time video streaming, all powered by the versatile Xiao ESP32S3 Sense. From concept to execution, this project not only fulfills a childhood fascination but also demonstrates the possibilities of IoT and robotics in a compact and accessible form. By integrating motor control, live video feed, and a user-friendly web interface, this project provides a solid foundation for anyone interested in building their own robotic systems. Whether you're looking to explore the world of robotics, improve your programming skills, or simply enjoy the excitement of remote exploration, this project offers an engaging and rewarding experience.
Contributions
While this FPV robot car project is already functional, it’s far from complete. There is immense potential for future enhancements, such as adding autonomous navigation, integrating advanced sensors, or refining the user interface. This project is just the beginning, and there’s so much more that can be achieved with further development. I encourage everyone who is interested to contribute, whether by adding new features, optimizing existing code, or sharing your own creative ideas.
Additionally, if anyone is willing to sponsor the project, I am open to collaborations that can help take this project to the next level. Let’s work together to unlock its full potential!


_3u05Tpwasz.png?auto=compress%2Cformat&w=40&h=40&fit=fillmax&bg=fff&dpr=2)
Comments
Please log in or sign up to comment.