The NodeMCU and GUI-Controlled LED project is a demonstration of an Internet of Things (IoT) application where a NodeMCU microcontroller is used to control LEDs remotely via a graphical user interface (GUI) developed in Python. This project allows users to interact with the NodeMCU board connected to LEDs over the internet, providing a simple yet effective example of IoT and remote device control.
Motivation for this ProjectThe decision to create this project stems from several motivations:
- Learning Opportunity: Building this project serves as an educational endeavor to understand the fundamentals of IoT, microcontroller programming, and GUI development.
- Practical Application: The project demonstrates a practical application of IoT technology, showcasing how everyday devices can be controlled remotely using internet connectivity
- Integration of Hardware and Software: The project involves both hardware (NodeMCU, LEDs) and software (Python GUI) components, offering a holistic learning experience in integrating different technologies.
- Accessibility: Remote control of devices is becoming increasingly relevant in various fields, from home automation to industrial applications. This project explores the concept of remote control using accessible and widely used technologies.
a. Hardware Setup:
- NodeMCU Microcontroller: The NodeMCU board, based on the ESP8266 Wi-Fi module, serves as the IoT device. It is programmed to control the LEDs based on signals received over the internet.
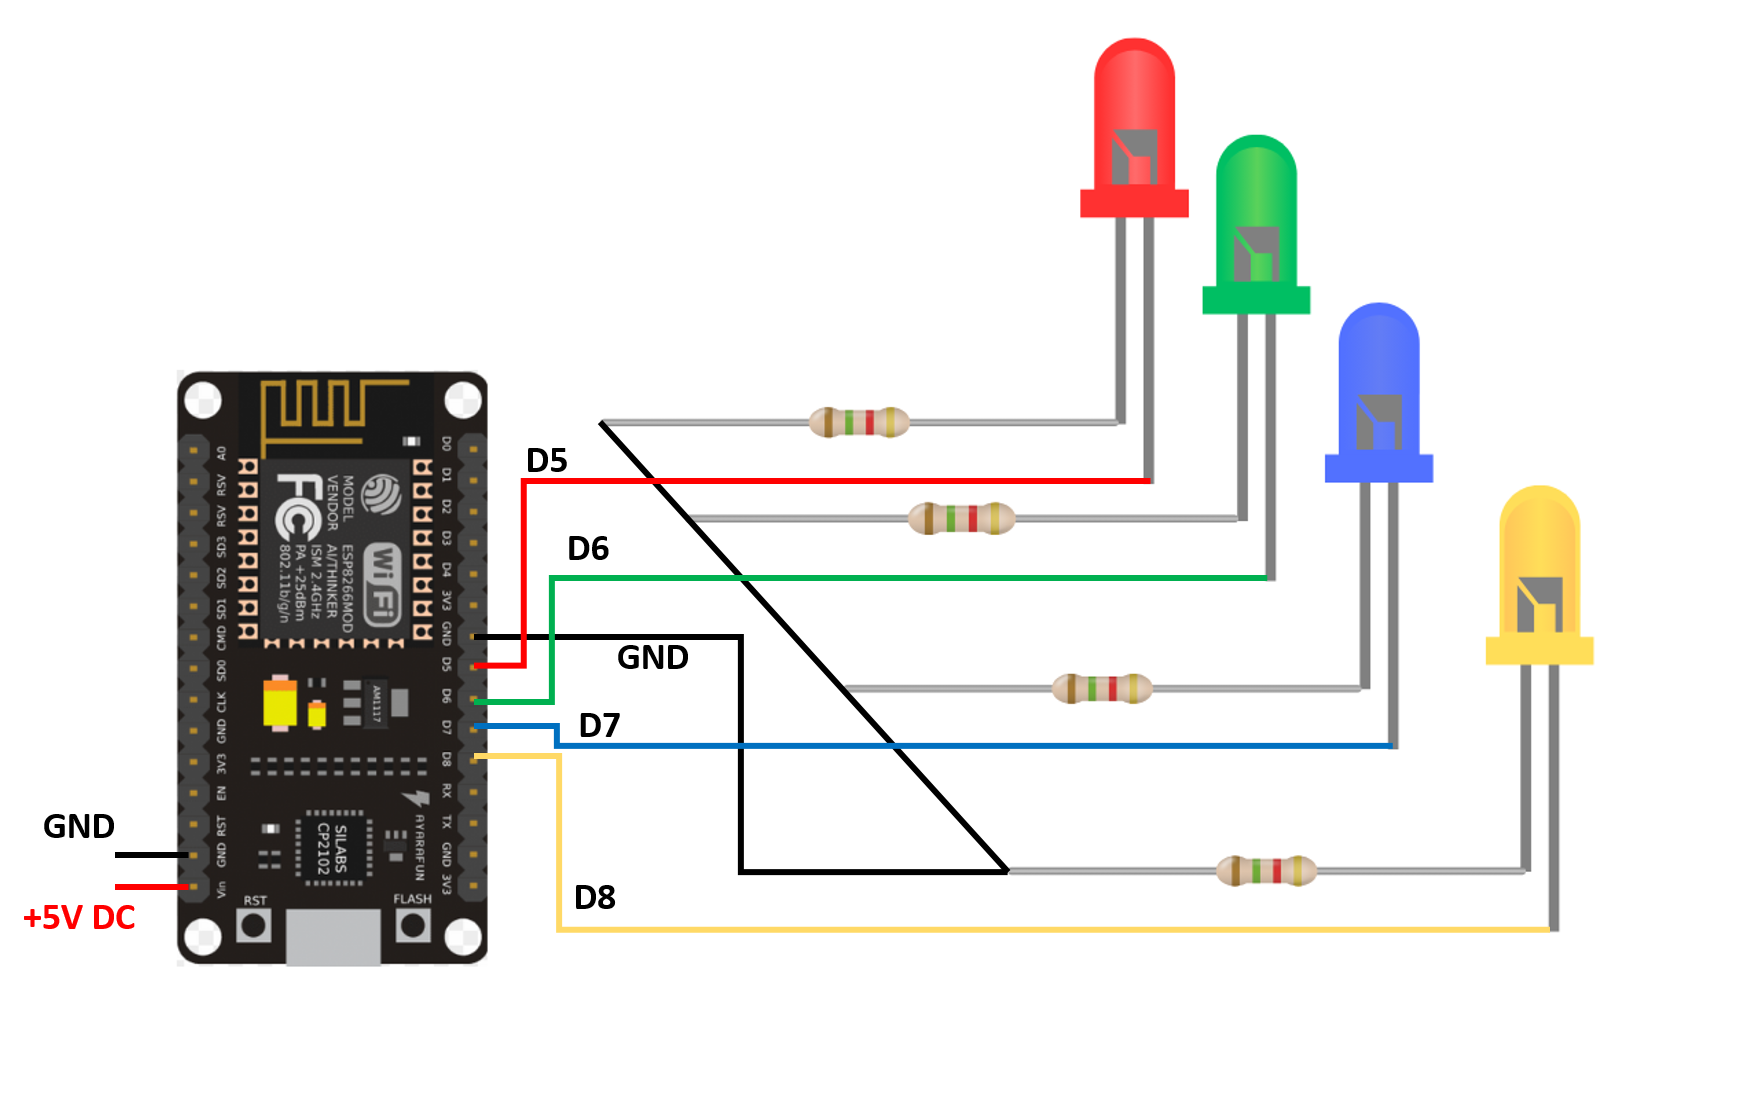
- LEDs: Four LEDs are connected to the NodeMCU board. These LEDs serve as indicators that can be remotely controlled through the NodeMCU.
- Circuit Connections: The LEDs are connected to the GPIO pins of the NodeMCU. The NodeMCU is powered and programmed to control these pins based on the signals it receives.
b. Software Components:
- NodeMCU Code: The NodeMCU is programmed using the Arduino IDE and the Arduino programming language. The code includes the setup for Wi-Fi connectivity and the necessary logic to respond to HTTP requests, toggling the LEDs accordingly.
- Python GUI: The GUI is created using the Tkinter library in Python. It provides a user-friendly interface for the user to input the NodeMCU's IP address and toggle the LEDs. The GUI communicates with the NodeMCU by sending HTTP requests based on user actions.
- Communication Protocol: The communication between the Python GUI and the NodeMCU is facilitated through HTTP requests. When the user interacts with the GUI (e.g., presses a button to toggle an LED), an HTTP request is sent to the NodeMCU's IP address with the corresponding command.
If you want to know the IP address of the NodeMCU, then it may be useful for you - https://www.techknowlab.com/2023/08/How to Know the NodeMCU IP Address.html
c. Work Flow
- NodeMCU Initialization: The NodeMCU initializes its Wi-Fi connection upon startup and waits for incoming HTTP requests.
- Python GUI Initialization: The Python GUI is launched on the user's computer. The user is prompted to enter the IP address of the NodeMCU.
- Connection Establishment: Upon entering the NodeMCU's IP address and pressing the connect button, the Python GUI sends an HTTP request to the NodeMCU to check the connection status. The NodeMCU responds, and the GUI updates the connection status accordingly.
- LED Control: The user can toggle the LEDs on or off by pressing the corresponding buttons on the GUI. When a button is pressed, the GUI sends an HTTP request to the NodeMCU, instructing it to change the state of the corresponding LED.
- Status Display: Instead of using pop-up notifications, the GUI dynamically updates the status of each LED just below the respective buttons, indicating whether the LED is on or off.
- Error Handling: The system is designed to handle errors gracefully. If there's an issue with the NodeMCU connection or LED control, appropriate messages are displayed on the GUI to inform the user.
- Security Considerations: The project can be extended to include security measures such as secure authentication for accessing the NodeMCU and encryption for data transmitted between the GUI and NodeMCU.
d. Scalability and Customization:
- Adding More LEDs: The project is scalable, and additional LEDs can be easily incorporated by extending the hardware setup and updating the NodeMCU code.
- Enhancing GUI Features: The Python GUI can be further enhanced with additional features such as real-time status updates, scheduling, and more advanced control options.
- Integrating Sensors: The project can be extended to include sensors (e.g., light sensors, temperature sensors) that provide data to the NodeMCU for more intelligent control based on environmental conditions.
the NodeMCU and GUI-Controlled LED project is a hands-on exploration of IoT principles, showcasing the integration of hardware and software components to enable remote control of devices. The project provides valuable insights into the practical implementation of IoT concepts and lays the foundation for more sophisticated IoT applications.


_3u05Tpwasz.png?auto=compress%2Cformat&w=40&h=40&fit=fillmax&bg=fff&dpr=2)
Comments
Please log in or sign up to comment.