

Hardware components | ||||||
 |
| × | 1 | |||
 |
| × | 1 | |||
Software apps and online services | ||||||
 |
| |||||
 |
| |||||
 |
| |||||
 |
| |||||
| ||||||
In this article, we show the system we have built using AWS IoT Buttons to automatically report broken devices. In the first part, we describe the (admittedly minor) problem which we were trying to solve, and show our result. The second part describes how we built the project. We have released all code, so everyone who is interested can try it for themselves
Use CaseModern electronics are great. They do have a disappointing downside however: they tend to break. A lot. Internally at de Volksbank, we are currently asking users of coffee machines, printers, etc. to report broken systems in a system or by calling support. While this generally works fine, the worst moment to ask someone to make a phone call is 9 in the morning when they didn't have their coffee yet. To make the process even simpler and quicker, we wanted to automate the process even further. Now coffee machines and printers can include a simple Amazon IoT Button which is connected via WiFi to AWS. Pushing it activates a function in the cloud which notifies the right people that a machine is defect, without ever needing to interact with a system or calling the help desk. This also helps the support staff who will no longer be flooded by complaints of sleepy employees who are unable to get their coffee: if a defect has been reported once, the buttons will automatically stop sending messages until the problem has been fixed. A fun little project and a win for everyone!
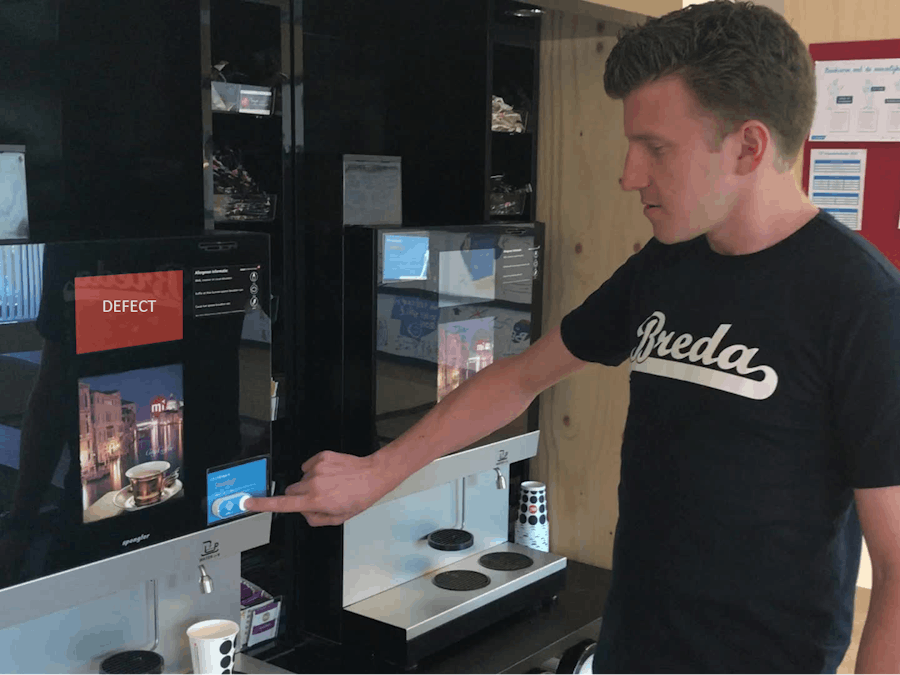
In the final version, we have created a system with three buttons, two on a printer and one on a coffee machine. When a button is pressed, a device will be marked as defect in the cloud and shown in the app. Users of the app receive push notifications and can mark a device as fixed once it has been repaired. The images below show how the app works and where the buttons are tactically placed.
In this part of the tutorial, we will connect the IoT Button to the internet and AWS so it can communicate information. For this, we first create a way for it to authenticate, and then provide it with Wi-Fi login credentials.
- Go to Amazon IoT Core (https://aws.amazon.com/iot-core/) and click manage.
- Press create and select Create a Single Device.
- Give the device a name and press next
- Click the button Create certificate and download
- d all files. These are required by the button to login. Then activate the certificates by pressing the button. Now we can press Done!
- These files allow the IoT Button to log in, but AWS does not know which rights the device should have. To solve this, click Secure>Policies>Create. Give the policy a name (e.g. iot-button-policy) and add statements about the actions which the IoT Button is allowed to take. The first one is:
iot:Connectand use*for the resource ARN. Then check Allow. Then add another statement with the same settings, but withiot:Publishas action. Next press create.
- Now we have to connect the policy to the certificate we created earlier. To do this, go back to Secure>Certificates and select the certificate which has been generated for the IoT device. Then, navigate to Policies, click Actions, and press Attach Policy. There we can select the newly created policy.
- Now go to Manage>Things and click on the new IoT button. Navigate to Interact and copy the HTTPS endpoint to a temporary file.
Now everything is set up on AWS can we can put the information on the IoT Buttons.
- By long pressing the button on the IoT device, it will create a Wi-Fi network to which you can connect. The password is the last eight digits of the serial number. Then browse to http://192.168.0.1/index.html. This will open a page with information which the IoT Button needs. First fill in the information about the Wi-Fi router to which the device should connect. Then upload the certificates which we have downloaded before by selecting them in the right fields. The endpoint we have copied in step 7 should be pasted in the Endpoint Subdomain text box. In the last drop down list, select the region in which the IoT Button is registered.
- If you agree with the terms and conditions, press Configure. The AWS device is now connected, pressing it will send a notification to AWS. If the LED blinks green, it connected successfully.
- The button can stop the WiFi hotspot while you are still in the configuration menu. Long press the button to start the process again. If at the end, the led is blinking red, consult the explanation at https://aws.amazon.com/iotbutton/faq/
When the IoT Button has been connected to AWS, it can be used for triggering services into action. We could directly send a message at each button press to the user of our app, but that could drive the users insane! Imagine if a coffee machine broke down just before work starts: many decaffeinated coworkers will have the opportunity to express their annoyance by hitting the button several times. A complete avalanche of notifications will incur! To prevent this obvious problem we will only send notifications if the state of the devices has changed from working to defect. Additional button presses could still be logged for future references, but won't bother our users.
To achieve this, we connect the IoT Button to a Lambda in AWS. This checks in a dynamo database what the current state of the device is. If it has changed, we update the state and send a notification to the app. We do this by notifying Pinpoint, which is capable of sending out push notifications via SNS.
This also means that we need a way to reset the state of a device: if it has been repaired the database should reflect this. This is where our app comes in handy: it is capable of updating the state of the device in the database. Newly triggered lambdas will then be able to detect the state change and send out new notifications when necessary. Below we describe how the architecture can be created.
To start off, we need to create a new project on Mobile Hub. This will contain the database and the ability to communicate with Android devices.
- Go to Mobile Hub (https://console.aws.amazon.com/mobilehub/home) and create a new project. Give it a memorable name and make sure that the preferred location is set correctly. In this project and in the links we will keep using EU-West-1 (Ireland); if you prefer another region please take this into account or parts might become invisible.
- As app platform we are going to use Android. We will create the config later on, so we can skip to the next step without downloading it.
- Now we need to add a new database. We are going to use a no-SQL DynamoDB since we do not require complex relationships. To add the database, press the plus symbol underneath NoSQL Database under Add More Backend Features.
- On the next screen, select Enable NoSQL and add a new custom table named
deviceStatus. Because this is only a small sample app, we are not going to add extensive permission structures. Therefore we can select Public for the permissions that we want.
- Remove the automatically created
userIdattribute, and add three new ones:
deviceIDof type number, which is our partition key
timestamp, of type number, which is the sort key
status, of type string
- Now press Create table, and confirm.
We have now created the necessary database, but we also have to to connect AWS to Google's Push Notification service:
- Go to Firebase console (https://console.firebase.google.com) and add a new project with a memorable name.
- In the overview of the project, select the gears icon next to Project Overview in the top-left corner. Then click Project settings>Cloud Messaging. Save the Server Key and Sender ID that is noted on this page.
- Now go back to the AWS Mobile Hub. On the project page, select the gear icon underneath Messaging and Analytics, select Messaging>Mobile Push>Android and put the API key and Sender ID which we saved from the previous step into their text fields. Finally, press enable. Now AWS and Google's push notification server have been connected.
Since we want to know which type of device a button represents, we will also create a table mapping id (which we will create below) to device type.
- In the MobileHub, create another custom public NoSQL table called
deviceTypes.
- The primary key is
deviceID, which is a number. Then press Create Table.
We also want to add an extra table which maps deviceIds to the individual buttons. This makes it easier to swap out the devices. For this we go to the DynamoDB Console (https://eu-west-1.console.aws.amazon.com/dynamodb/home).
- Press Create table on the dashboard.
- As table name, use
deviceIds. Chooseiot-serialNumberfor the primary key, and let it be a string. We do not need a sort key, so just press Create.
- Now we can manually add items to the table. Go to Tables>deviceIds>Items, and press Create item. First add the iot-serialNumber, which is the DSN denoted at the bottom of the IoT button.
- Press the plus sign>Insert>Number, under field enter
deviceIdand start numbering from one.
Now we have the deviceIds, we can also edit the previously created deviceTypes table. Use the Ids here to map deviceID to a deviceType. Currently, Printer and Coffee Machine are supported, though more could be added manually. Note that Mobile Hub creates prefixes for table names, so it will be listed as {MobileHubProjectName}-{mobilehub}-{id}-{tableName} in the DynamoDB table overview.
We also need to add permission for the newly created table to mobile hub. For this, go to the mobile hub project page, and click Resources. A card called AWS Identity and Access Management Rules contains a link to the AIM role for the mobile project. Click it, and then Attach policies. Search for the AmazonDynamoDBReadOnlyAccess policy and attach it. In the same screen, also attach
Now we need to set up an SNS topic to which we can publish messages that will be send as push notifications to the mobile device. For this to work, we need to create a new application which will be connected to the mobile devices. A subscription will forward all messages from the topic containing the messages to the application.
- Go to the SNS Dashboard (https://eu-west-1.console.aws.amazon.com/sns/v2/) and click Applications>Create Platform Application
- For the application name, insert something memorable (we chose StateCloudApp, the name of our app). Then select Google Cloud Messaging (GCM) as the push notification system. Use the API key from Firebase and click Create platform application. Save the ARN that is attached to the application.
- Now we need to create a new topic. Go to Topics>Create new topic, and use a memorable name for both the topic name and display name (we chose StateTopic). Save the ARN that has been created; we will need it later on.
Later we will connect the topic with the application, but we have to add specific clients to the application before this link can be made.
LambdaFinally we can combine all components of AWS and input logic using a Lambda function. This function will be triggered when the button is pressed, check if the state is changed, update the database and write a message to the SNS topic we just created. To add this lambda function:
- Go the the lambda page (https://eu-west-1.console.aws.amazon.com/lambda/home), then Functions>Create function. Keep the setting at Author from scratch, call the function logBrokenMachine, select Python 3.6 as Runtime. Then select Create a custom role.
- In the IAM Management Console which opens, select Create a new IAM Role as IAM role and lambda-iot-button as role name. Then press Create and Create function back in the lambda console.
- In the designer of the lambda console, now double click AWS IoT and configure the trigger by inserting the Device Serial Number and pressing Add. This will connect the IoT Button to the Lambda function.
- While the function is now created, the role does not yet have the right permissions. For this we open another tab and go to the IAM Management Console (https://console.aws.amazon.com/iam/home). Go to Roles and search for the
lambda-iot-buttonwhich we just created and click on it.
- Now choose Attach policies from the Permissions tab and select Create policy. This will open another tab in which we can specify the permissions of the lambda function.
- We are going to add two services: DynamoDB for reading and writing to the database, and SNS for sending messages. First choose DynamoDB as service, and check the boxes of
ListTables,GetItem,Query,Scan,PutItemand check Any under Resources>table. Note that it is advisable to put a stronger constraint on the resources when using AWS for other projects, but for the sake of simplicity we will omit that from this tutorial.
- Next click Add additional permissions and select SNS. Provide it with full access and under Resources>topic add the ARN of the topic we have created in step 3 of the SNS setup.
- Add one more additional policy: CloudWatch with All CloudWatch actions checked.
- Then press Review policy. Give the policy a new name like
iot-button-lambda-policyand press Create Policy.
- Go back to the tab from step 5, search for
iot-button-lambda, check the box and click Attach policy.
- When we go back to our lambda, we will see that the new resources have been added in the designer. Now we are ready to add the code. Complete the code below from the repo (AWS/lambda.py or from the code block below) and copy it to the Function code field. Now press save.
import boto3
import logging
from time import time
from boto3.dynamodb.conditions import Key
statusTableName = "<insert-device-status-table-here>"
deviceIdTableName = "deviceIds"
snsTopic = "<insert-topic-arn-here>"
logger = logging.getLogger()
ddb = boto3.resource('dynamodb')
def sendPushNotification(message):
   sns = boto3.client('sns')
   return sns.publish(TopicArn=snsTopic,Message=message, MessageStructure='string')
def getDeviceStatus(deviceId):
   statusTable = ddb.Table(statusTableName)
   result = statusTable.query(KeyConditionExpression=Key('deviceID').eq(deviceId), ScanIndexForward=False)["Items"]
   return(result[0]["status"] if result else "Working")
def getDeviceId(serialNumber):
   table = ddb.Table('deviceIds')
   result = table.get_item(Key = {'iot-serialNumber':serialNumber})
   if 'Item' not in result:
       logger.error("Device " + serialNumber + " could not be found.")
       return
   return(result['Item']['deviceId'])
def markAsDefect(deviceId):
   table = ddb.Table(statusTableName)
   item = {"deviceID":deviceId,
       "timestamp":round(time()*1000),
       "status":"Defect"}
   return(table.put_item(Item=item))
def lambda_handler(event, context):
   serialNumber = event['serialNumber']
   deviceId = getDeviceId(serialNumber)
   deviceStatus = getDeviceStatus(deviceId)
   markAsDefect(deviceId)
   if("Defect" not in deviceStatus):
       sendPushNotification("Device " + str(deviceId) + " has been marked as defect.")
- Check out the App repositoryfrom https://github.com/devolksbank/AWS-IoT-Fresh-Cloud-Coffee
- Load the project in Android Studio and let it install all the missing requirements.
- Now we need to connect the Google Firebase services to the app so it can receive the push notifications. To do this, log back in to Firebase, select the project, then Project Settings and click the Add Firebase to your Android app icon. Enter the name of your package (ours is
devolksbank.nl.statecloudby default), and click Register app. Now we can download the google-services.json file.
- Go back to Android studio and switch the project view from Android to Project Files. Right click the build.gradle file and select Show in explorer. Paste the just downloaded json file in this folder, and return to Android studio.
- Now we need to connect the app to AWS. This requires two steps. First, go to app/app/src/main/assets, make a copy of app.properties.example which is called app.properties, and fill in the three fields with the correct values. These are the table names of the DynamoDB tables and the region in which they are created. Note that mobile hub creates a slightly different table name than what we have defined ourselves, so it is best to copy the full table name from the DynamoDB overview page.
- The second step involves getting the AWS configuration file for logging in. To retrieve the file, go the the mobile hub, select our project and click Integrate under the android card. Then press the button Download Cloud Config and save the file to
app/app/src/main/res/raw.
The android app should now have all the information it requires, so we can start to build it! The app is already capable of showing the current state of the devices and setting an item to fixed. The IoT Button should also work, so the basic system has been completed! The only thing which remains is setting up the support for push notifications on the phone. Luckily, this is rather straight forward using the infrastructure we have already build.
To enable push notifications, we must add an identifier for each phone which we want to use to AWS. We can obtain the code by running the app in debug mode, and using the debug console, looking for the D/FCM/TOKEN debug tag. The code is listed behind it. We add this code to SNS AWS under Applications and then by clicking on the ARN of our application (StateCloudApp). Here we can press Create Application Endpoint and insert the code as Device token. Then we copy the ARN which is associated to the new endpoint and use it to create a subscription between this Application and the Topic we created earlier. That is all we need! Push notifications should now work!
Note that when looking for the D/FCM/TOKEN tag sometimes results in 'Could not get token'. To solve this, just try again by re-installing the app
Did you like this project, or did you spot any errors? Do you have advice for our future projects? We'd love to hear from you in the comments below.


Comments
Please log in or sign up to comment.