Nowadays, everybody wants to have a smart home and one of the most important hardware that a house needs is a thermostat with humidity control. So this project is about combining smartness and the thermostat. That means that the consumer will be able to see live the temperature and humidity of his house from an LCD and a local webserver. The thermostat is programmed so that if the humidity is not on a normal level in conformity with the outside temperature to notify the user and if connected to a smart humidifier or dehumidifier to start them depending on the situation. The same goes for room temperature with heating and air conditioning.
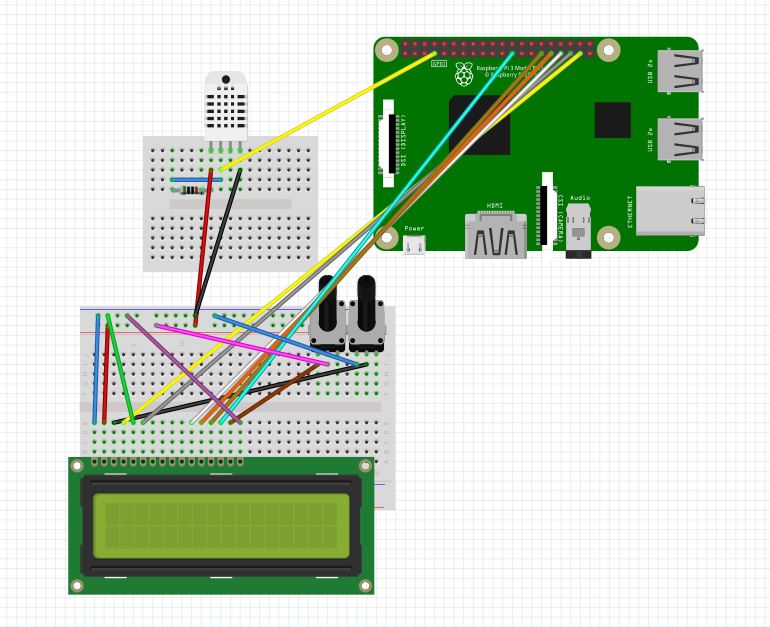
Images- The DHT22 sensor is connected to the Raspberry Pi and is sending data to it. The RPi receives the data and outputs it on the LCD and the local webserver using Python and Flask. If the program gets a humidity reading that is outside the normal parameters for the current outside temperature it will notify the user with an email. The user will set the desired room temperature and if the current room temperature will go 1 degree below or above the desired temperature will act depending on the outside temperature so for example if the outside temperature is lower than the desired temperature and the room temperature will go 1 degree below will start the heating. For each type of humidity notifications there is a limit of one email per day so that the user will not be spammed with emails and for the temperature notifications the limit is one email per hour.
- The potentiometers will help adjust the contrast and the backlight brightness.
We’ll be using the Adafruit DHT11 Python library. You can download the library using Git, so if you don’t have sudo apt-get install git-core
Note: If you get an error installing Git, run sudo apt-get update and try it again.
To install the Adafruit DHT11 library:
1. Enter this at the command prompt to download the library:
git clone https://github.com/adafruit/Adafruit_Python_DHT.git2. Change directories with:
cd Adafruit_Python_DHT3. Now enter this:
sudo apt-get install build-essential python-dev4. Then install the library with:
sudo python setup.py install5. To output the DHT22 readings to an LCD, we’ll need to install another Python library called RPLCD to drive the LCD. To install the RPLCD library, we first need to install the Python Package Index, or PIP. PIP might already be installed on your Pi, but if not, enter this at the command prompt to install it:
sudo apt-get install python-pip6. After you get PIP installed, install the RPLCD library by entering:
sudo pip install RPLCD7. For the outside temperature I used pyowm which is a client Python wrapper library for OpenWeatherMap web APIs. It allows quick and easy consumption of OWM data from Python applications via a simple object model and in a human-friendly fashion. To install it run:
sudo pip install pyowm8. For sending the email I used the smtplib python module with Gmail. To install it run:
sudo pip install smtplib9. For the webserver I used Flask which you can install with:
sudo pip install Flask10. Clone the github repository:
git clone https://github.com/TheGreatTeo/RPi_Temperature_HumidityBefore running the program you will need to change in lcd.py at
observation = owm.weather_at_place("Iasi, RO") Iasi, RO with your city followed by your country's 2 letter initials.
11. Run the server.py application first like this:
python server.py &12. After the server application is fully loaded run the lcd.py application:
python lcd.pyAfter that you will need to enter a Gmail account and password followed by the email that you want to get the notifications and the desired room temperature.
VideoHere is a video example of how it works


Comments
Please log in or sign up to comment.