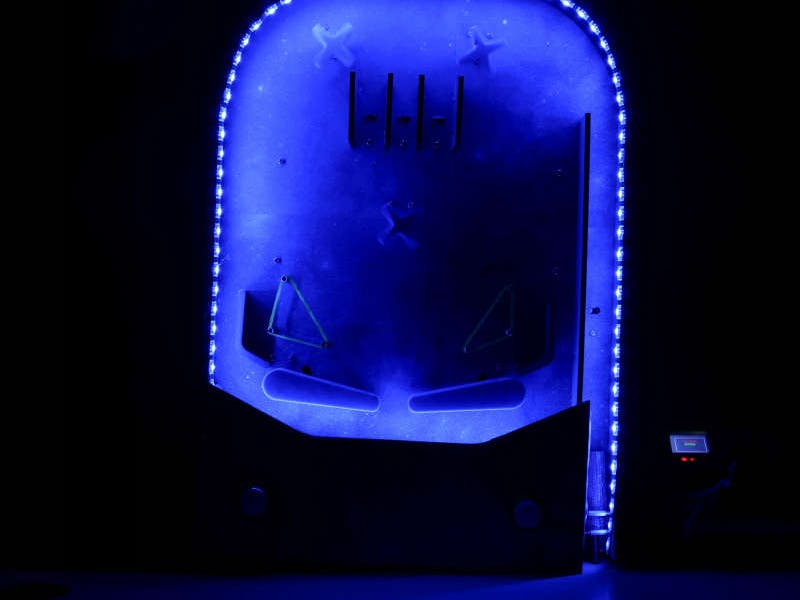
Another weekend, another exciting game! And this time, it’s none other than everybody’s favorite arcade game - Pinball! This project will show you how to make your very own Pinball machine easily at home. All you’d need are components from the evive Starter Kit, some laser-cut parts, colors and papers to decorate your machine, and a lot of DIY-ing! So, bring your mates along, put on your DIY-ing caps, and ready, set, DIY!
We’ve written the code in PictoBlox - our versatile graphical programming platform with advanced capabilities. You can download it from HERE.
Step 1: SuppliesHardware
Software
Most of the above electronic components can be found in evive Starter Kit.
Step 2: Understanding the DesignAs you already know there are a number of components in a pinball that makes the game interesting. Thus, let's understand the design of the structure that we will be preparing. Some of the components are MDF cutouts and some are 3D printed whose design you can find below.
Note: You can make the pinball out of cardboard sheet too but MDF will give it more durability.
We will need the following components for the Pinball Machine
Once you have these parts and the 3D printed let’s begin!
Step 3: Making the Playfield BeautifulPlayfield is the area where the entire game of Pinball is being played. Also, all the components will be placed on the playfield thus, it is suggested to decorate the base in the first step(only if you want to).
We are going with the space theme thus, have glued a beautiful space image on the base plate. Once you have glued the paper to the base, make sure that you make the holes on the paper that were on the base plate.
Take both the left boundary wall and the right boundary wall and attach it to the base plate using M3 nuts and bolts.
Once done, take the front wall and attach it to the base plate and left boundary wall(as shown in image 2). We will not be attaching the front wall to the right boundary as the space left here is to make the Launchpad. Launchpad is nothing but the corridor from where we will be launching or shooting our ball into the playfield.
Now, let’s make the launchpad and the drain. Launchpad as you already know is the place from where we launch the ball into the playfield. The drain is the place which ends the game i.e. once the ball reaches the drain, it can no longer return to the playfield in that chance. Also, the ball in the drain rolls down and ends up in the launchpad. Now, that we know what is what, let’s start their assembly.
Take the extra wall and attach it to the front wall and the base plate.
Now, take the drain wall and attach it to the extra wall and the left boundary. You may notice that the drain wall is a bit slant which makes it easy for the ball to roll down(as shown in the above image 2).
Once done, attach the launch wall parallelly to the right boundary wall on the base plate. Make sure you leave some space between the extra wall and the launch wall. This space will act as the gate between the drain and the launchpad.
The score wall or the target walls. These are the walls that will make you score better. Whenever the ball passes through the first and the third wall, 500 points are added into your total score. And if the ball passes through the center wall you’ll earn 1000 points.
Thus, attach the score walls on the base using M3 nuts and bolts.
Now, we need to secure the back wall so that the ball does not go off the playfield even when we shot the ball real hard. We have used a foam sheet to make the back wall.
Cut the thick foam sheet and glue it to the base plate and the boundaries using Hot Glue.
Now, the basic playfield is almost ready, it’s time to add support to the pinball machine. Take the two support plates and fix it on the base plate as shown in the above figure 1in using M3 nuts and bolts. Adding supports will give inclination to your pinball machine.
There is just one small thing remaining that is the corner. You may notice that a small corner is formed near the interaction of the left boundary wall and the drain wall. There are chances that the ball may get stuck here. Thus, we will be adding the incline wall, whenever the ball reaches this corner, it swiftly rolls to the drain.
With this, our playfield is ready.
Step 9: Adding the MotorsYou may notice that the playfield in pinball is never empty. There are tons of elements that are present on the playfield to make the game interesting. Out of which one is the flipper and the other is bumper.
Bumpers are the one that rotates continuously pushing the ball away in any random direction. Thus, attach 3 DC motors near the top boundary using M3 nuts of 20mm length and bolts.
Now, its time to add the flipper motors. Flipper motors will be attached towards the draining end. Will discuss what flippers are in the next step. Till then remember, they are the ones who can save you.
Note: Before mounting the motors, test them using
firmware. Open the firmware menu, select Controls, select motors, select M1 or M2 depending where you have attached the motors.Step 10: Attaching the Limit SwitchesFlippers are the ones that are under your control. They redirect the ball into the playfield after you press the corresponding button. Thus, we do not want the flippers to rotate 360degrees. We will restrict the flipper movements using limit switches. You may notice small curves near the drain area this is where we will be fixing our flippers. Now, we will two tactile switch for each flipper. Attach them to the end of the curve.
As soon as you press the button, the flipper DC motor will start rotating, as soon as the flipper touches the upper limit switch, the DC motor starts rotating in the opposite direction bringing the flipper down. Now, the motor stops rotating as soon as flipper touches the bottom limit switch until the control button is pressed again.
Repeat the same process for the other side too.
Step 11: Mounting the IR SensorsWe know why we call the small walls the score wall, but how will they know that the ball just passed through them. We will add IR sensors for the same. In total, we will be adding 5 IR sensors.
As soon as the ball passes through the IR sensor of the launchpad, the game begins.
Now, the IRs at the score walls is to notice the number of times the ball passes through the score walls.
Finally, the IR at the drain indicates that the game is over.
Note: Before mounting the IR sensors test the sensors using evive's firmware(Pin State Monitor). Also, if they aren't responding well try calibrating them.
Step 12: Adding the Control Buttons and the RGB StripFirst, let’s add the control buttons. Control buttons are the ones that will control the movement of flippers. We have two arcade switches and have attached them onto the control panel in the holes given.
Once done, take the RGB LED strip and attach it on the boundaries of the playfield. We will change the color of the RGB strip showing the status of the game. The RGB should turn green whenever a new game starts and should turn red when the game ends. Also, it should change each time the ball passes through the score walls.
Step 13: Adding the LauncherNow, its time to add the launcher or the plunger. The launcher will help you launch your ball into the playfield through the launchpad. We have 3d printed the launcher to which we have attached the rubber band. The end of the rubber is attached to the front wall and the left boundary wall. The more you pull the launcher, the more force will be transferred to the ball.
Once you have your plunger attached and wires to the sensors, attach the control panel on top of the playfield using M3 nuts and bolts.
Lets first add the side lane walls, these will direct your ball to the flipper if the ball enters the lane.
As we already know the use of the bumper. Fix them on the free shafts of the DC motors.
Time to add the flippers, fix the flippers on the shaft of the DC motor. Also, make sure that the flippers fit nicely in the curves given.
Once done, let's attach some kickers. Kickers are those that propel the ball horizontally into the playfield whenever ball touches it, Attach 3 standoffs each side and wrap rubbers around them.
With this, your entire assembly of the pinball is complete.
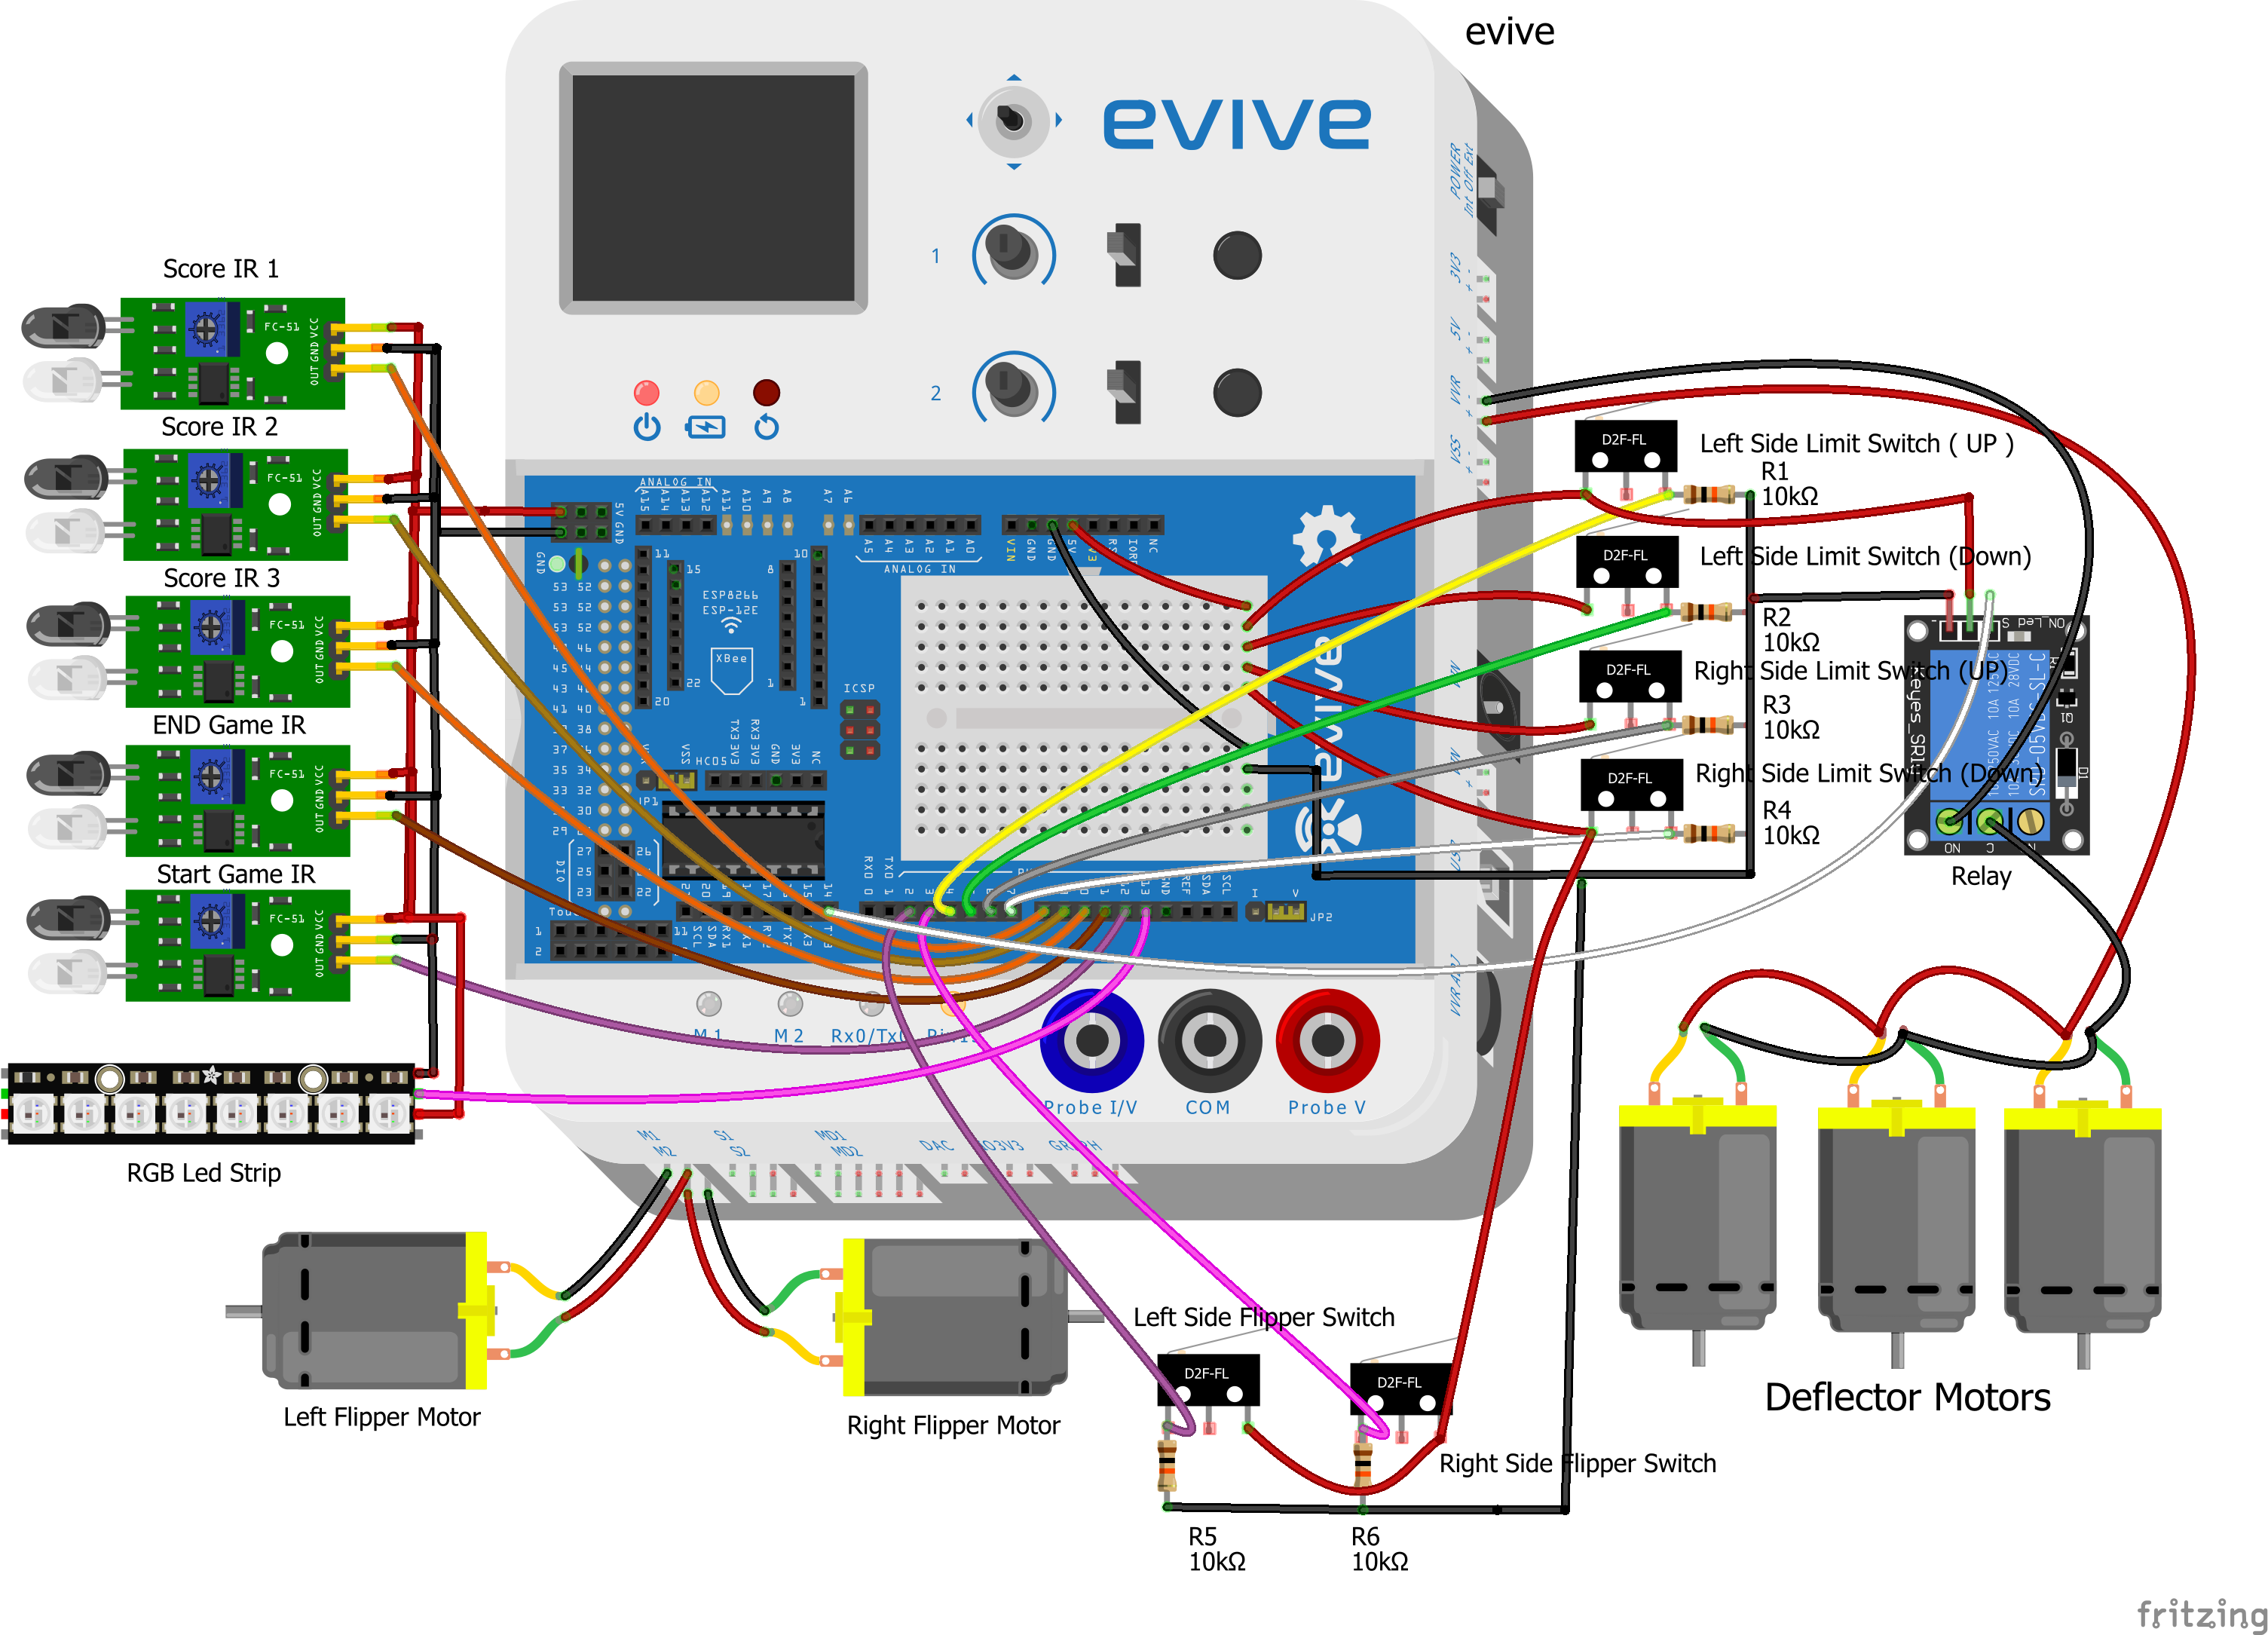
Step 16: Making the ConnectionConnecting the IR Sensors
Connecting the RGB Strip
Connecting Flipper Motors
Connecting the Flippers
Connecting the Bumper Motors
Connecting the Limit Switches
We are going to write code in PitoBlox, a Scratch 3.0 based programming software. Upload the following script to evive.
With this, your DIY Pinball machine is ready. Get. Set. Pinball!


_wzec989qrF.jpg?auto=compress%2Cformat&w=48&h=48&fit=fill&bg=ffffff)


Comments
Please log in or sign up to comment.