Some time ago I posted a couple of projects demonstrating how to get data from uECG device - but they had quite a lot of messy code and still were using only basic data from it. So finally I wrote an Arduino library that makes this way simpler and much more reliable, here it is: https://github.com/ultimaterobotics/uECG_library (please note that you also need to install RF24 library from Library Manager, and if you want to show data on OLED like in this project - also Adafruit's SSD1306 library).
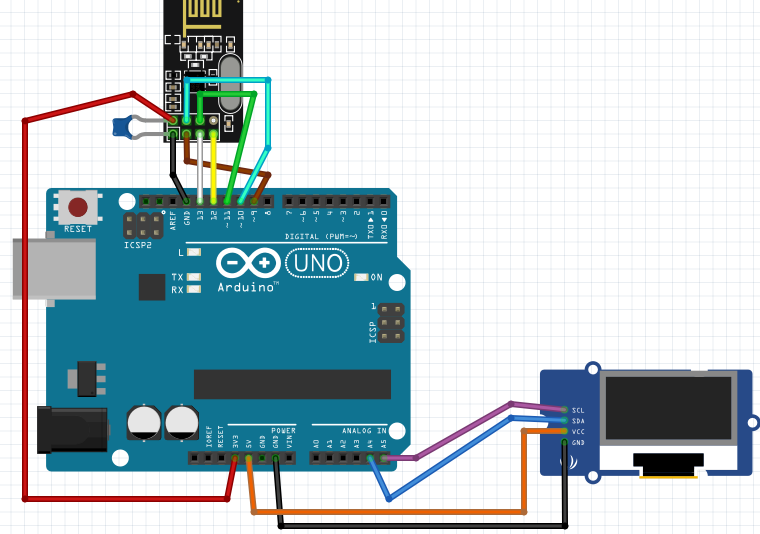
1. SchematicsSchematics is the same as for any other project using nRF24 module and OLED: nRF24 is connected to Arduino's SPI bus (D13, D12, D11) and two arbitrary pins for module CS and CE lines - I've chosen D10 and D9 for convenience. The only important point: nRF24 module must be connected to 3.3V line, not to 5V! It also helps a lot to add 1uF or 10uF capacitor between 3.3V and GND - those nRF24 modules require a stable voltage which Arduino can't always provide on its 3.3V line, capacitors help with that.
OLED is connected via I2C - SDA to A4, SCL to A5, and powered from 5V line. In my case, OLED module had in-built resistors for I2C protocol. In case if your module doesn't have them - you need to add 4.7k resistors from SDA to 3.3V and from SCL to 3.3V, although most modules I've seen recently have them already.
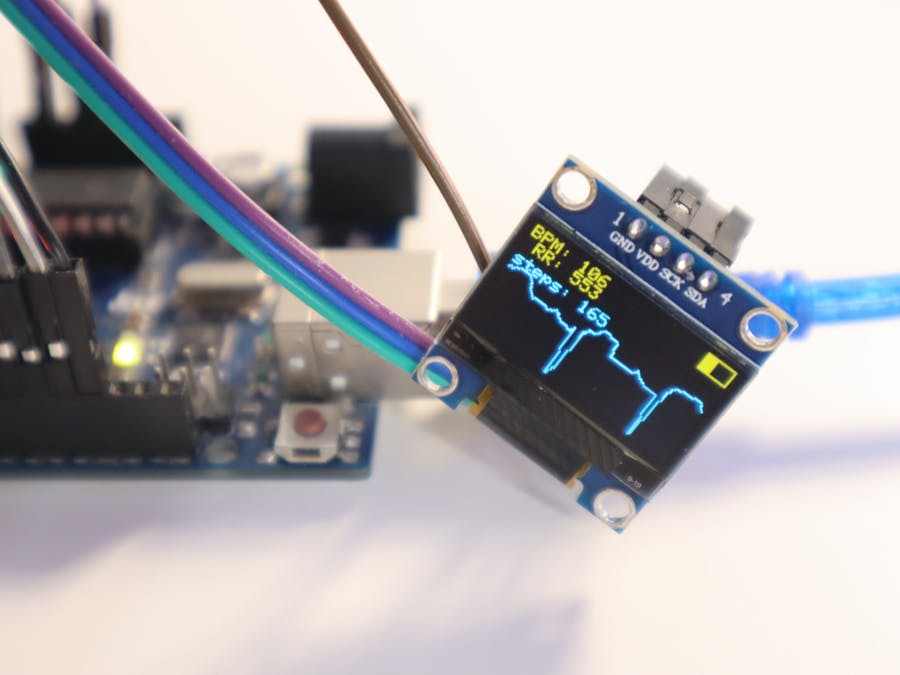
You can see schematics attached below, and here is a photo of assembled project:
uECG library takes quite a few lines of code for proper operation, namely:
in setup(), you need to call uECG.begin(pin_cs, pin_ce) - you need to tell it which pin numbers are used for nRF24 CS and CE lines, it will turn on the module and put it in the correct mode internally.
In loop(), you need to call uECG.run() as often as possible: uECG device sends a lot of data - one packet every few milliseconds - and if you won't call uECG.run() by the time when next packet arrives, its data will be lost. That means never calling delay() function inside the loop, and use millis() for tasks that require timing (I've added an example of that in library examples).
This project code is available as an example inside the library, and also is attached below (if it looks too complex - please keep in mind that here 95% of the code is dedicated to optimized display drawing, for simple printing values into serial monitor you need just a few lines):
#include <uECG.h>
#include <Wire.h>
#include <Adafruit_SSD1306.h>

#define SCREEN_WIDTH 128 // OLED display width, in pixels
#define SCREEN_HEIGHT 64 // OLED display height, in pixels

// Declaration for an SSD1306 display connected to I2C (SDA, SCL pins)
#define OLED_RESET     -1 // Reset pin # (or -1 if sharing Arduino reset pin)
Adafruit_SSD1306 display(SCREEN_WIDTH, SCREEN_HEIGHT, &Wire, OLED_RESET);

int rf_cen = 9; //nRF24 chip enable pin
int rf_cs = 10; //nRF24 CS pin

void setup() {
  Serial.begin(115200); //serial output - very useful for debugging
  while(!display.begin(SSD1306_SWITCHCAPVCC, 0x3C)) { // Address 0x3D for 128x64
    Serial.println(F("SSD1306 allocation failed"));
  }
  display.display();
  delay(100);
  uECG.begin(rf_cs, rf_cen);
  delay(100);

  // Clear the buffer
  display.clearDisplay();
  display.setTextSize(1);      // Normal 1:1 pixel scale
  display.setTextColor(WHITE); // Draw white text
  display.cp437(true);         // Use full 256 char 'Code Page 437' font
  display.display();
  delay(100);
  Serial.println("after display");
}

uint32_t prev_data_count = 0;
uint32_t prev_displ = 0;

uint8_t ecg_screen[128];
int ecg_screen_len = 128;
float ecg_avg = 0;
float ecg_max = 1;
float ecg_min = -1;
int ecg_size = 40;

int displ_phase = 0;

void loop()
{
  uECG.run();
  uint32_t data_count = uECG.getDataCount();
  int new_data = data_count - prev_data_count;
  prev_data_count = data_count;
  if(new_data > 0)
  {
    uint32_t ms = millis();
    int16_t ecg_data[8];
    uECG.getECG(ecg_data, new_data);
    for(int x = 0; x < new_data; x++)
      Serial.println(ecg_data[x]);

    for(int x = new_data; x < ecg_screen_len; x++)
      ecg_screen[x-new_data] = ecg_screen[x];
    for(int x = 0; x < new_data; x++)
    {
      ecg_avg *= 0.99;
      ecg_avg += 0.01*ecg_data[x];
      ecg_max = ecg_max*0.995 + ecg_avg*0.005;
      ecg_min = ecg_min*0.995 + ecg_avg*0.005;
      if(ecg_data[x] > ecg_max) ecg_max = ecg_data[x];
      if(ecg_data[x] < ecg_min) ecg_min = ecg_data[x];
      int ecg_y = 63-ecg_size*(ecg_data[x] - ecg_min) / (ecg_max - ecg_min + 1);
      ecg_screen[ecg_screen_len-1-new_data+x] = ecg_y;
    }

    if(ms - prev_displ > 30)
    {
      prev_displ = ms;
      if(displ_phase == 0)
      {
        display.clearDisplay();
        display.setCursor(0, 0);
        display.print("BPM: ");
        display.println(uECG.getBPM());
        display.print(" RR: ");
        display.println(uECG.getLastRR());
        display.print("steps: ");
        display.print(uECG.getSteps());
        int batt_mv = uECG.getBattery();
        int batt_perc = (batt_mv - 3300)/8;
        if(batt_perc < 0) batt_perc = 0;
        if(batt_perc > 100) batt_perc = 100;
        display.drawLine(110, 0, 127, 0, WHITE);
        display.drawLine(110, 10, 127, 10, WHITE);
        display.drawLine(110, 0, 110, 10, WHITE);
        display.drawLine(127, 0, 127, 10, WHITE);
        int bat_len = batt_perc / 6;
        for(int x = 1; x < 10; x++)
          display.drawLine(110, x, 110+bat_len, x, WHITE);
      }
      if(displ_phase == 1)
      {
        for(int x = 1; x < ecg_screen_len/2; x++)
          display.drawLine(x-1, ecg_screen[x-1], x, ecg_screen[x], WHITE);
      }
      if(displ_phase == 2)
      {
        for(int x = ecg_screen_len/2; x < ecg_screen_len-1; x++)
          display.drawLine(x-1, ecg_screen[x-1], x, ecg_screen[x], WHITE);
      }
      if(displ_phase == 3)
        display.display();
      displ_phase++;
      if(displ_phase > 3) displ_phase = 0;
    }
  }
}A lot of processing is performed on-board and you can get various stats calculated by the device: BPM, GSR, last RR interval, HRV parameter and 16 HRV bins (first bin represents amount of beats with variation <1%, second bin - variation between 1 and 2% etc), number of steps walked, accelerometer readings (although refresh rate is low so it's good only for pose estimation).
But you can get raw ECG readings as well - data stream is not perfect, every now and then some packets are lost, yet you still can get something usable:
Well, that's it - if you had this device collecting dust in a corner, now it actually works without too much trouble :)


_ztBMuBhMHo.jpg?auto=compress%2Cformat&w=48&h=48&fit=fill&bg=ffffff)


Comments
Please log in or sign up to comment.