


Hardware components | ||||||
 |
| × | 1 | |||
| × | 1 | ||||
| × | 1 | ||||
Software apps and online services | ||||||
 |
| |||||
| ||||||
This is my second project with Google Summer of Code (GSoC) under TensorFlow. There was no proper documentation on the internet to build a custom image recognition TinyML model, so my GSoC mentor, Paul Ruiz, suggested that I should try and solve it. Here's how you could also build an image recognition TinyML application. Happy Tinkering!
Click here to view my first GSoC project!The idea behind the project:
I wanted to work on a problem with fewer variables as the documentation for how to work with the camera module and process its data wasn't great. I choose to build an MNIST TinyML model as, in this case, I wouldn't need to worry about the training data set, and it would allow me to focus on the essential parts of the project to get things up and running. But, now that I have figured out all the parts to build a custom image recognition project, I have documented how to collect training data sets using the camera module.
The theme/tone for the blog?I want to warn you that this blog might get a bit complex to understand. There's a proper explanation for this: With an accelerometer-based application, it would be easy to do sanity checks by just printing out the accelerometer values of one axis on the serial monitor or plotter. In contrast, doing sanity checks for the image recognition application is at least 10x more tiresome because checking if a piece of code is doing the desired action cannot be visualized in real-time.
Some CommentsThis blog might be a bit hard to understand due to the complexity of unit testing. I want to address any gaps in explanation with feedback from the readers. So, comment below with your doubts and questions regarding anything related to image recognition on embedded systems.
Does TinyML make sense at all?I would recommend you to read through this fantastic article by Pete Warden, The author of the TinyML book, to understand why running machine learning models on microcontrollers makes sense and is the future of machine learning.
Even if TinyML makes sense, does image recognition make sense on TinyML?The full VGA (640×480 resolution) output from the OV7670 camera we'll be using here is too big for current TinyML applications. uTensor runs handwriting detection with MNIST that uses 28×28 images. The person detection example in the TensorFlow Lite for Microcontrollers example uses 96×96 which is more than enough. Even state-of-the-art 'Big ML' applications often only use 320×320 images. In conclusion, running image recognition applications on tiny microcontrollers makes a lot of sense
- Integrating the camera and LCD module
- Building the MNIST TinyML model
- Testing the TinyML model
- Conclusion
8.a TFT + OV7670: Display test
Github Link for this subsection
Code explanation:
tft.fillScreen(ST77XX_BLACK);This line of code fills the screen with black color.
for(int i =0; i<28;i++){
    for(int j =0;j<28;j++){
      tft.drawPixel(i,j,ST77XX_GREEN);
      delay(0);
    }
  }
  delay(1000);
These lines of code draw a 28x28 green colored block.
The sketch:
#include <Adafruit_GFX.h>    // Core graphics library
#include <Adafruit_ST7735.h> // Hardware-specific library for ST7735
#include <SPI.h>


  // For the breakout board, you can use any 2 or 3 pins.
  // These pins will also work for the 1.8" TFT shield.
  #define TFT_CS        A7
  #define TFT_RST        7 // Or set to -1 and connect to Arduino RESET pin
  #define TFT_DC         A6

// For 1.44" and 1.8" TFT with ST7735 use:
Adafruit_ST7735 tft = Adafruit_ST7735(TFT_CS, TFT_DC, TFT_RST);
#include <Arduino_OV767X.h>

uint16_t pixels[176 *144];
uint16_t color;
uint8_t red, blue, green;

void setup(void) {
  Serial.begin(9600);

  // Use this initializer if using a 1.8" TFT screen:
  tft.initR(INITR_BLACKTAB);
  delay(1000);// Init ST7735S chip, black tab
  Serial.println(F("Initialized"));

  if (!Camera.begin(QCIF, RGB565, 1)) {
    Serial.println("Failed to initialize camera!");
    while (1);
  }
  Serial.println(F("Initialized"));


  // large block of text
  tft.fillScreen(ST77XX_BLACK);


}

void loop() {
  for(int i =0; i<28;i++){
    for(int j =0;j<28;j++){
      tft.drawPixel(i,j,ST77XX_GREEN);
      delay(0);
    }
  }
  delay(1000);
 tft.fillScreen(ST77XX_BLACK);
}
8.b TFT + OV7670: Static image test
Github Link for this subsection.
Now that we've figured out how to display a green block, let's display an image from an array of stored HEX values.
Code explanation:
uint16_t pixels[176 * 144]= {0x0D2A,0xED29,0xED29,0xED29,.....0x95B5,0xB6B5,0xB6B5};This array stores the HEX values of all the pixels.
for(int i =0; i<50;i++){
    for(int j =0;j<50;j++){
       pixel = pixels[176*i +j];
       tft.drawPixel(i,j,pixel);
}
}
These lines of code loop through the array and draws the image on the TFT LCD display.
The sketch:
#include <Adafruit_GFX.h>    // Core graphics library
#include <Adafruit_ST7735.h> // Hardware-specific library for ST7735
#include <SPI.h>

  #define TFT_CS        A7
  #define TFT_RST        7 // Or set to -1 and connect to Arduino RESET pin
  #define TFT_DC         A6


Adafruit_ST7735 tft = Adafruit_ST7735(TFT_CS, TFT_DC, TFT_RST);

uint16_t pixels[176 * 144]= {0x0D2A,0xED29,0xED29,0xED29,.....0x95B5,0xB6B5,0xB6B5};

uint16_t color, pixel;
uint8_t red, blue, green;

void setup() {
  Serial.begin(9600);
  while (!Serial)
    delay(10);
 // Serial.print(F("Hello! ST77xx TFT Test"));
  tft.initR(INITR_BLACKTAB);
  delay(1000);
  // large block of text
  tft.fillScreen(ST77XX_BLACK);


}

void loop() {
  for(int i =0; i<50;i++){
    for(int j =0;j<50;j++){
       pixel = pixels[176*i +j];
        red   = ((pixel >> 11) & 0x1f) << 3;
        green = ((pixel >> 5) & 0x3f) << 2;
       blue  = ((pixel >> 0) & 0x1f) << 3;
      color = tft.color565(red+50, green+50, blue+50);
      Serial.print(red);
      Serial.print(", ");
      Serial.print(green);
      Serial.print(", ");
      Serial.println(blue);
      tft.drawPixel(i,j,color);
      delay(0);
    }
  }
  delay(100);
  //tft.fillScreen(ST77XX_BLACK);
}
8.c TFT + OV7670: Liveimagetest
Github Link for this subsection.
Now that we've figured out how to display an image from an array of stored HEX values, let's expand it to display live images.
Code explanation:
uint16_t pixels[176 * 144];This line of code declares an array to store the image captured from the camera.
Camera.readFrame(pixels);This line of code reads one frame from the camera and stores it in the pixels array.
for (int i = 0; i < 112; i++)
{
   for(int j = 0; j < 112; j++)
   {
      uint16_t pixel = pixels[176*i +j];
      tft.drawPixel(i,j,pixel);
   }
}
These lines of code loop through the pixels array and draws the image on the TFT LCD display.
The sketch:
/*
  OV767X - Camera Test Pattern

  This sketch waits for the letter 'c' on the Serial Monitor,
  it then reads a frame from the OmniVision OV7670 camera and
  prints the data to the Serial Monitor as a hex string.

  The website https://rawpixels.net - can be used the visualize the data:
    width: 176
    height: 144
    RGB565
    Little Endian

  Circuit:
    - Arduino Nano 33 BLE board
    - OV7670 camera module:
      - 3.3 connected to 3.3
      - GND connected GND
      - SIOC connected to A5
      - SIOD connected to A4
      - VSYNC connected to 8
      - HREF connected to A1
      - PCLK connected to A0
      - XCLK connected to 9
      - D7 connected to 4
      - D6 connected to 6
      - D5 connected to 5
      - D4 connected to 3
      - D3 connected to 2
      - D2 connected to 0 / RX
      - D1 connected to 1 / TX
      - D0 connected to 10

  This example code is in the public domain.
*/

#include <Arduino_OV767X.h>
#include <Adafruit_GFX.h>    // Core graphics library
#include <Adafruit_ST7735.h> // Hardware-specific library for ST7735
#include <SPI.h>

#define TFT_CS        A7
  #define TFT_RST        7 // Or set to -1 and connect to Arduino RESET pin
  #define TFT_DC         A6


Adafruit_ST7735 tft = Adafruit_ST7735(TFT_CS, TFT_DC, TFT_RST);

uint16_t pixels[176 * 144];
void setup() {
  Serial.begin(9600);
  while (!Serial);

  Serial.println("OV767X Camera Capture");
  Serial.println();

  tft.initR(INITR_BLACKTAB);
  delay(1000);

  if (!Camera.begin(QCIF, RGB565, 1)) {
    Serial.println("Failed to initialize camera!");
    while (1);
  }

  Serial.println("Camera settings:");
  Serial.print("\twidth = ");
  Serial.println(Camera.width());
  Serial.print("\theight = ");
  Serial.println(Camera.height());
  Serial.print("\tbits per pixel = ");
  Serial.println(Camera.bitsPerPixel());
  Serial.println();

  Serial.println("Send the 'c' character to read a frame ...");
  Serial.println();
}

void loop() {
    Serial.println("Reading frame");
    Serial.println();
    Camera.readFrame(pixels);
    tft.fillScreen(ST77XX_BLACK);
    for (int i = 0; i < 112; i++) {
      for(int j = 0; j < 112; j++){
       uint16_t pixel = pixels[176*i +j];
       int red   = ((pixel >> 11) & 0x1f) << 3;
       int green = ((pixel >> 5) & 0x3f) << 2;
       int blue  = ((pixel >> 0) & 0x1f) << 3;

      Serial.println(red);
      Serial.println(green);
      Serial.println(blue);
      tft.drawPixel(i,j,pixels[176*i+j]);
      }
    }
    delay(2000);
}Note: If you are new to TensorFlow or TinyML, I would highly recommend you to read through this Introduction to TinyMLblog to get a good grasp of the concepts before diving into this section.
Now that we've got the camera and display working and integrated, let's build the machine learning model to recognize the digits.
9.a Exploringthe Colab notebook
Github Link for this subsection.
Code explanation:
import numpy as np                   # advanced math library
import matplotlib.pyplot as plt      # MATLAB like plotting routines
import random                        # for generating random numbers

from keras.datasets import mnist     # MNIST dataset is included in Keras
from keras.models import Sequential  # Model type to be used

from keras.layers.core import Dense, Dropout, Activation # Types of layers to be used in our model
from keras.utils import np_utils                         # NumPy related tools
import tensorflow as tf

tf.config.run_functions_eagerly(True)
These lines of code import the necessary library to build and visualize our model.
(X_train, y_train), (X_test, y_test) = mnist.load_data()
print("X_train shape", X_train.shape)
print("y_train shape", y_train.shape)
print("X_test shape", X_test.shape)
print("y_test shape", y_test.shape)

>>X_train shape (60000, 28, 28)
>>y_train shape (60000,)
>>X_test shape (10000, 28, 28)
>>y_test shape (10000,)
These lines of code load the MNIST test and train images into the right variables.
plt.rcParams['figure.figsize'] = (9,9) # Make the figures a bit bigger

for i in range(9):
    plt.subplot(3,3,i+1)
    num = random.randint(0, len(X_train))
    plt.imshow(X_train[num], cmap='gray', interpolation='none')
    plt.title("Class {}".format(y_train[num]))

plt.tight_layout()These lines of code visualize nine different images from the training data of the MNIST data set.
def matprint(mat, fmt="g"):
    col_maxes = [max([len(("{:"+fmt+"}").format(x)) for x in col]) for col in mat.T]
    for x in mat:
        for i, y in enumerate(x):
            print(("{:"+str(col_maxes[i])+fmt+"}").format(y), end=",")
        print("")

matprint(X_train[num])
These lines of code display a random image from the training data as an array of values.
from keras.preprocessing.image import ImageDataGenerator
from keras.layers import Conv2D, MaxPooling2D, ZeroPadding2D, GlobalAveragePooling2D, Flatten
from keras.layers import BatchNormalization
These lines of code import the necessary layers to build the machine learning model.
# Again, do some formatting
# Except we do not flatten each image into a 784-length vector because we want to perform convolutions first

X_train = X_train.reshape(60000, 28, 28, 1) #add an additional dimension to represent the single-channel
X_test = X_test.reshape(10000, 28, 28, 1)

X_train = X_train.astype('float32')         # change integers to 32-bit floating point numbers
X_test = X_test.astype('float32')

#X_train /= 255                              # normalize each value for each pixel for the entire vector for each input
#X_test /= 255

print("Training matrix shape", X_train.shape)
print("Testing matrix shape", X_test.shape)
These lines of code pre-process the training and test data to work e.g: Normalization, Float64 to Float32 conversion, and reshaping.
# one-hot format classes

nb_classes = 10 # number of unique digits

Y_train = np_utils.to_categorical(y_train, nb_classes)
Y_test = np_utils.to_categorical(y_test, nb_classes)
These lines of code one-hot encode the labels of the training and testing images.
from keras.layers.convolutional import DepthwiseConv2D
from keras.backend import relu
from keras.activations import softmax
model = Sequential()                                 # Linear stacking of layers

model.add(DepthwiseConv2D((3,3),input_shape=(28,28,1)))
# Convolution Layer 1
model.add(Conv2D(2, (3, 3)))      # 2 different 3x3 kernels -- so 2 feature maps
model.add(BatchNormalization(axis=-1))               # normalize each feature map before activation
convLayer1 = Activation('relu')                     # activation
model.add(convLayer1)

# Convolution Layer 2
model.add(Conv2D(2, (3, 3)))                        # 2 different 3x3 kernels -- so 2 feature maps
model.add(BatchNormalization(axis=-1))               # normalize each feature map before activation
model.add(Activation('relu'))                        # activation
convLayer2 = MaxPooling2D(pool_size=(2,2))          # Pool the max values over a 2x2 kernel
model.add(convLayer2)

# Convolution Layer 3
model.add(Conv2D(4,(3, 3)))                         # 4 different 3x3 kernels -- so 4 feature maps
model.add(BatchNormalization(axis=-1))               # normalize each feature map before activation
convLayer3 = Activation('relu')                     # activation
model.add(convLayer3)

# Convolution Layer 4
model.add(Conv2D(4, (3, 3)))                        # 4 different 3x3 kernels -- so 64 feature maps
model.add(BatchNormalization(axis=-1))               # normalize each feature map before activation
model.add(Activation('relu'))                        # activation
convLayer4 = MaxPooling2D(pool_size=(2,2))          # Pool the max values over a 2x2 kernel
model.add(convLayer4)

model.add(Flatten())
model.add(Dense(5,activation = relu))
model.add(Dense(10, activation = softmax))
These lines of code define the actual layers that go in the machine learning model.
model.summary()This line of code displays information about the model architecture to the user.
model.compile(loss='categorical_crossentropy', optimizer='adam', metrics=['accuracy'])This line of code defines the loss, optimizer and other metrics to be used by the machine learning model while training.
history = model.fit(X_train,Y_train, steps_per_epoch=60000//128, epochs=3, verbose=1,
                    validation_data=(X_test,Y_test))
This line of code trains the machine learning model.
score = model.evaluate(X_test, Y_test)
print('Test score:', score[0])
print('Test accuracy:', score[1])
These lines of code evaluate the machine learning model and print the accuracy and score to the user.
!apt-get -qq install xxd
converter = tf.lite.TFLiteConverter.from_keras_model(model)
tflite_model = converter.convert()

# Save the model to disk
open("gesture_model.tflite", "wb").write(tflite_model)

import os
basic_model_size = os.path.getsize("gesture_model.tflite")
print("Model is %d bytes" % basic_model_size)
These lines of code convert the TensorFlow model into a TensorFlow Lite model.
!echo "const unsigned char model[] = {" > /content/model.h
!cat gesture_model.tflite | xxd -i      >> /content/model.h
!echo "};"                              >> /content/model.h

import os
model_h_size = os.path.getsize("model.h")
print(f"Header file, model.h, is {model_h_size:,} bytes.")
print("\nOpen the side panel (refresh if needed). Double click model.h to download the file.")
These lines of code convert the TensorFlow Lite model into a C file to be used by the microcontroller.
Now that we've built and trained our model, we now need to figure out how to send data from the camera into the TinyML model.
The camera's output is 176x144 in size and the model's input is 28x28 in size. There are two approaches we can try:
- 1. Cropping a 28x28 image from the camera's output.
- 2. Cropping a 128x128 image from the camera's output and reshaping it to 28x28
We'll try both approaches in the below sections.
9.b OV7670:Crop test
Github Link for this subsection.
Code explanation:
uint16_t pixels[176 * 144]= {0x0D2A,0xED29,0xED29,0xED29,....,0xB5AD,0x95B5,0xB6B5,0xB6B5};This line of code stores the HEX values in an array of size 176X144.
for(int a = 0; a< 112; a++)
   {
    for(int b = 0; b< 112; b++)
    {
      Serial.print( pixels[176*a +b]);
      Serial.print(", ");
    }
    Serial.println("");
   }
These lines of code loop through the array and print out the first 28x28 pixels of the image.
The sketch:
/*
  OV767X - Camera Test Pattern

  This sketch waits for the letter 'c' on the Serial Monitor,
  it then reads a frame from the OmniVision OV7670 camera and
  prints the data to the Serial Monitor as a hex string.

  The website https://rawpixels.net - can be used the visualize the data:
    width: 176
    height: 144
    RGB565
    Little Endian

  Circuit:
    - Arduino Nano 33 BLE board
    - OV7670 camera module:
      - 3.3 connected to 3.3
      - GND connected GND
      - SIOC connected to A5
      - SIOD connected to A4
      - VSYNC connected to 8
      - HREF connected to A1
      - PCLK connected to A0
      - XCLK connected to 9
      - D7 connected to 4
      - D6 connected to 6
      - D5 connected to 5
      - D4 connected to 3
      - D3 connected to 2
      - D2 connected to 0 / RX
      - D1 connected to 1 / TX
      - D0 connected to 10

  This example code is in the public domain.
*/

#include <Arduino_OV767X.h>

uint16_t pixels[176 * 144]= {0x0D2A,0xED29,0xED29,0xED29,....,0xB5AD,0x95B5,0xB6B5,0xB6B5};
int arr1[28*28];
void setup() {
  Serial.begin(9600);
  while (!Serial);

  Serial.println("OV767X Camera Capture");
  Serial.println();
  Serial.println("Send the 'c' character to read a frame ...");
  Serial.println();
}

void loop() {
  if (Serial.read() == 'c') {

    for(int a =0; a< 112; a++)
   {
    for(int b =0; b< 112; b++)
    {
      Serial.print( pixels[176*a +b]);
      Serial.print(", ");
    }
    Serial.println("");
   }
   Serial.println("");
  }
}9.c OV7670:Reshape test
Github Link for this subsection.
Code explanation:
for(int i=0; i < 28; i++){
    for(int j=0; j< 28; j++){
      int sum =0;

     for(int k =0; k<4;k++){
      for(int l =0; l<4; l++){
        sum += arr[4*(112*i+j) + 112 * k + l];
      }
     }
      sum = sum /16;
      arr1[i*28+j] = sum;
      Serial.print(sum);
     Serial.print(", ");
    }
    Serial.println("");
  }

Serial.println("");
These lines of code use a 4x4 pooling kernel, with stride 1, to go over a 112x112 2D array to output a 28x28 image.
The sketch:
#include "num.h"
float arr1[28 * 28];
int filterWidth = 4;
int filterheight = 4;
void setup() {
  Serial.begin(9600);


}

void loop() {
  // put your main code here, to run repeatedly:
  for(int i=0; i < 28; i++){
    for(int j=0; j< 28; j++){
      int sum =0;

     for(int k =0; k<4;k++){
      for(int l =0; l<4; l++){
        sum += arr[4*(112*i+j) + 112 * k + l];
      }
     }
      sum = sum /16;
      arr1[i*28+j] = sum;
      Serial.print(sum);
     Serial.print(", ");
    }
    Serial.println("");
  }

Serial.println("");

}9.d Exploring the reshape.ipynb Colab notebook
Github Link for this subsection.
Code explanation:
from skimage.transform import resize
t = number28.reshape(28,28)
print(t.shape)
number112 = resize(t, (112, 112))
print(number112.dtype)
"""
for i in range(0,112):
  for j in range(0,112):
    if number112[i][j] < 10e-20:
      number112[i][j] = 0
      /
"""
for i in range(0,112):
  for j in range(0,112):
      number112[i][j] = number112[i][j] * 10e+19
      if number112[i][j] < 10:
       number112[i][j] = 0
np.amax(number112)
number112 = number112 /12
np.amax(number112)
plt.imshow(number112, cmap='gray', interpolation='none')
plt.imshow(t, cmap='gray', interpolation='none')
These lines of code upscale the 28X28 MNIST image into a 112X112 image.
def matprint(mat, fmt="g"):
    col_maxes = [max([len(("{:"+fmt+"}").format(x)) for x in col]) for col in mat.T]
    for x in mat:
        for i, y in enumerate(x):
            print(("{:"+str(col_maxes[i])+fmt+"}").format(y), end=",")
        print("")
matprint(number112)
These lines of code print the upscaled 112X112 MNIST image.
number28new = number28new.reshape(28,28)
for i in range(0,28):
  for j in range(0,28):
      if number28new[i][j] < 35:
       number28new[i][j] = 0
plt.imshow(number28new, cmap='gray', interpolation='none')
These lines of code print the reshaped 28x28 MNIST image.
Now that we have built a TinyML model and tested the two approaches to inputting data into our model, it's time to integrate the TinyML model into the main application.
10.a TinyML Model: Input test
Github Link for this subsection.
How do we send in the input data?
With a time-series-based model, it was pretty obvious to send in the input data as the input tensor was a 1-dimensional array.
//1D input tensor
tflInputTensor->data.f[i * 3 + 0] = (ax + 8.0) / 16.0;
tflInputTensor->data.f[i * 3 + 1] = (ay + 8.0) / 16.0;
tflInputTensor->data.f[i * 3 + 2] = (az + 8.0) / 16.0;
I didn't know how to send data into this particular TinyML model so I devised a test.
I stored the array values of an MNIST training data into a num.h file.
num.h:
float num[784] = {0,0,0,0,0,0,  0,  0,  0,  0,  0,  0,  0,  0,  0,  0,  0,  0,  0,  0,  0,  0,0,0,0,0,0,0,
0,0,0,0,0,0,  0,  0,  0,  0,  0,  0,  0,  0,  0,  0,  0,  0,  0,  0,  0,  0,0,0,0,0,0,0,
0,0,0,0,0,0,  0,  0,  0,  0,  0,  0,  0,  0,  0,  0,  0,  0,  0,  0,  0,  0,0,0,0,0,0,0,
0,0,0,0,0,0,  0,  0,  0,  0,  0,  0,  0,  0,  0,  0,  0,  0,  0,  0,  0,  0,0,0,0,0,0,0,
0,0,0,0,0,0,  0,  0,  0,  0,  0,  0,  0,  0,  0,  0,  0,  0,  0,  0,  0,  0,0,0,0,0,0,0,
0,0,0,0,0,0,  0,  0,  0,  0,  0,  0, 49,143,223,196,149, 73,  0,  0,  0,  0,0,0,0,0,0,0,
0,0,0,0,0,0,  0,  0,  0,  0,  0,126,228,252,257,252,248,242,193, 67,  0,  0,0,0,0,0,0,0,
0,0,0,0,0,0,  0,  0,  0,  0,176,247,254,213,156,149,175,236,256,204, 53,  0,0,0,0,0,0,0,
0,0,0,0,0,0,  0,  0,  0,119,246,248,156,  0,  0,  0,  0, 69,216,259,221, 50,0,0,0,0,0,0,
0,0,0,0,0,0,  0,  0,  0,166,246,160,  0,  0,  0,  0,  0,  0,107,225,259,177,0,0,0,0,0,0,
0,0,0,0,0,0,  0,  0,115,229,234, 86,  0,  0,  0,  0,  0,  0,  0,142,252,209,0,0,0,0,0,0,
0,0,0,0,0,0,107,223,230,214,237,192, 50,  0,  0,  0,  0,  0,  0,124,245,186,0,0,0,0,0,0,
0,0,0,0,0,0,201,251,147, 44, 95,154,127,  0,  0,  0,  0,  0,116,224,235, 91,0,0,0,0,0,0,
0,0,0,0,0,0,192,254,178, 89,  0,  0,  0,  0,  0,  0,  0, 80,224,242,149,  0,0,0,0,0,0,0,
0,0,0,0,0,0, 67,227,256,244,190, 94,  0,  0,  0,  0, 82,218,248,163,  0,  0,0,0,0,0,0,0,
0,0,0,0,0,0,  0, 91,210,245,244,227,184, 90,  0, 84,219,256,188, 38,  0,  0,0,0,0,0,0,0,
0,0,0,0,0,0,  0,  0,  0, 76,114,127,201,234,231,244,263,218, 74,  0,  0,  0,0,0,0,0,0,0,
0,0,0,0,0,0,  0,  0,  0,  0,  0,  0, 47,205,266,273,250, 92,  0,  0,  0,  0,0,0,0,0,0,0,
0,0,0,0,0,0,  0,  0,  0,  0,  0,  0, 44,227,264,260,253,145,  0,  0,  0,  0,0,0,0,0,0,0,
0,0,0,0,0,0,  0,  0,  0,  0,  0,  0,173,251,208,158,218,239,163,  0,  0,  0,0,0,0,0,0,0,
0,0,0,0,0,0,  0,  0,  0,  0,  0,120,245,236, 92,  0, 52,201,227, 98,  0,  0,0,0,0,0,0,0,
0,0,0,0,0,0,  0,  0,  0,  0,  0,184,256,192,  0,  0,  0, 65,205,213, 40,  0,0,0,0,0,0,0,
0,0,0,0,0,0,  0,  0,  0,  0,  0,192,250,146,  0,  0,  0, 70,206,225, 42,  0,0,0,0,0,0,0,
0,0,0,0,0,0,  0,  0,  0,  0,  0,173,247,232,186,181,199,240,249,178,  0,  0,0,0,0,0,0,0,
0,0,0,0,0,0,  0,  0,  0,  0,  0, 39,140,201,226,230,232,233,184, 65,  0,  0,0,0,0,0,0,0,
0,0,0,0,0,0,  0,  0,  0,  0,  0,  0,  0,  0,  0,  0,  0,  0,  0,  0,  0,  0,0,0,0,0,0,0,
0,0,0,0,0,0,  0,  0,  0,  0,  0,  0,  0,  0,  0,  0,  0,  0,  0,  0,  0,  0,0,0,0,0,0,0,
0,0,0,0,0,0,  0,  0,  0,  0,  0,  0,  0,  0,  0,  0,  0,  0,  0,  0,  0,  0,0,0,0,0,0,0};
model.h:
//MPU6050_model.ino
#include <TensorFlowLite.h>
#include "tensorflow/lite/micro/micro_error_reporter.h"
#include "tensorflow/lite/micro/micro_interpreter.h"
#include "tensorflow/lite/micro/micro_mutable_op_resolver.h"
#include "tensorflow/lite/schema/schema_generated.h"
#include "tensorflow/lite/version.h"
#include "model.h"
#include "num.h"
const tflite::Model* tflModel = nullptr;
tflite::ErrorReporter* tflErrorReporter = nullptr;
TfLiteTensor* tflInputTensor = nullptr;
TfLiteTensor* tflOutputTensor = nullptr;
tflite::MicroInterpreter* tflInterpreter = nullptr;
constexpr int tensorArenaSize = 140 * 1024;
uint8_t tensorArena[tensorArenaSize];
float out[10];
void setup() {
Serial.begin(115200);
while (!Serial)
delay(10);
static tflite::MicroErrorReporter micro_error_reporter;
tflErrorReporter = µ_error_reporter;
tflModel = tflite::GetModel(model);
if (tflModel->version() != TFLITE_SCHEMA_VERSION) {
TF_LITE_REPORT_ERROR(tflErrorReporter,
"Model provided is schema version %d not equal "
"to supported version %d.",
tflModel->version(), TFLITE_SCHEMA_VERSION);
return;
}
static tflite::MicroMutableOpResolver<6> micro_op_resolver;
micro_op_resolver.AddMaxPool2D();
micro_op_resolver.AddConv2D();
micro_op_resolver.AddDepthwiseConv2D();
micro_op_resolver.AddFullyConnected();
micro_op_resolver.AddReshape();
micro_op_resolver.AddSoftmax();
static tflite::MicroInterpreter static_interpreter(tflModel, micro_op_resolver, tensorArena, tensorArenaSize, tflErrorReporter);
tflInterpreter = &static_interpreter;
TfLiteStatus allocate_status = tflInterpreter->AllocateTensors();
if (allocate_status != kTfLiteOk) {
TF_LITE_REPORT_ERROR(tflErrorReporter, "AllocateTensors() failed");
return;
}
tflInputTensor = tflInterpreter->input(0);
}
void test_func(){
for(int i = 0; i < 28; i++){
  for(int j =0; j < 28; j++){
      tflInterpreter->input(0)->data.f[28*i+j] = num[28*i+j] / 255;
    }
  }
for(int i = 0; i < 28; i++){
  for(int j =0; j < 28; j++){
      Serial.print(tflInterpreter->input(0)->data.f[28*i+j]);
      Serial.print(", ");
    }
      Serial.println("");
  }
Serial.println("");
for(int i = 0; i < 28; i++){
  for(int j =0; j < 28; j++){
      Serial.print(num[28*i+j]);
      Serial.print(", ");
    }
      Serial.println("");
  }
Serial.println("");
for(int i = 0; i < 28; i++){
  for(int j =0; j < 28; j++){
      Serial.print(tflInterpreter->input(0)->data.f[28*i+j]-num[28*i+j]);
      Serial.print(", ");
    }
      Serial.println("");
  }
*/
}
void loop() {
}Code Explanation: Input tensors:
for(int i = 0; i < 28; i++){
for(int j =0; j < 28; j++){
tflInterpreter->input(0)->data.f[28*i+j] = num[28*i+j] / 255;
}
}To test out the input tensors, I sent in input data using a 2D loop.
for(int i = 0; i < 28; i++){
for(int j =0; j < 28; j++){
Serial.print(tflInterpreter->input(0)->data.f[28*i+j]);
Serial.print(", ");
}
Serial.println("");
}
Serial.println("");Then, I printed out the values stored in the input tensors of the TinyML model.
for(int i = 0; i < 28; i++){
for(int j =0; j < 28; j++){
Serial.print(num[28*i+j]);
Serial.print(", ");
}
Serial.println("");
}
Serial.println("");I then printed out the actual values stored in the loop.
for(int i = 0; i < 28; i++){
for(int j =0; j < 28; j++){
Serial.print(tflInterpreter->input(0)->data.f[28*i+j]-num[28*i+j]);
Serial.print(", ");
}
Serial.println("");
}Finally, I printed out the difference between the values stored in the input tensors and the values stored in the array. If all the differences are zero, then the input has been properly stored in the input tensors just the way we want.
10.b TinyML Model: Model test
Github Link for this subsection.
Now that we have figured out how to send in input data, It's time to test out the model. This code is the same as above except that inference is called and the output tensors are printed out.
num.h file:
float num[784] = {0,0,0,0,0,0,  0,  0,  0,  0,  0,  0,  0,  0,  0,  0,  0,  0,  0,  0,  0,  0,0,0,0,0,0,0,
0,0,0,0,0,0,  0,  0,  0,  0,  0,  0,  0,  0,  0,  0,  0,  0,  0,  0,  0,  0,0,0,0,0,0,0,
0,0,0,0,0,0,  0,  0,  0,  0,  0,  0,  0,  0,  0,  0,  0,  0,  0,  0,  0,  0,0,0,0,0,0,0,
0,0,0,0,0,0,  0,  0,  0,  0,  0,  0,  0,  0,  0,  0,  0,  0,  0,  0,  0,  0,0,0,0,0,0,0,
0,0,0,0,0,0,  0,  0,  0,  0,  0,  0,  0,  0,  0,  0,  0,  0,  0,  0,  0,  0,0,0,0,0,0,0,
0,0,0,0,0,0,  0,  0,  0,  0,  0,  0, 49,143,223,196,149, 73,  0,  0,  0,  0,0,0,0,0,0,0,
0,0,0,0,0,0,  0,  0,  0,  0,  0,126,228,252,257,252,248,242,193, 67,  0,  0,0,0,0,0,0,0,
0,0,0,0,0,0,  0,  0,  0,  0,176,247,254,213,156,149,175,236,256,204, 53,  0,0,0,0,0,0,0,
0,0,0,0,0,0,  0,  0,  0,119,246,248,156,  0,  0,  0,  0, 69,216,259,221, 50,0,0,0,0,0,0,
0,0,0,0,0,0,  0,  0,  0,166,246,160,  0,  0,  0,  0,  0,  0,107,225,259,177,0,0,0,0,0,0,
0,0,0,0,0,0,  0,  0,115,229,234, 86,  0,  0,  0,  0,  0,  0,  0,142,252,209,0,0,0,0,0,0,
0,0,0,0,0,0,107,223,230,214,237,192, 50,  0,  0,  0,  0,  0,  0,124,245,186,0,0,0,0,0,0,
0,0,0,0,0,0,201,251,147, 44, 95,154,127,  0,  0,  0,  0,  0,116,224,235, 91,0,0,0,0,0,0,
0,0,0,0,0,0,192,254,178, 89,  0,  0,  0,  0,  0,  0,  0, 80,224,242,149,  0,0,0,0,0,0,0,
0,0,0,0,0,0, 67,227,256,244,190, 94,  0,  0,  0,  0, 82,218,248,163,  0,  0,0,0,0,0,0,0,
0,0,0,0,0,0,  0, 91,210,245,244,227,184, 90,  0, 84,219,256,188, 38,  0,  0,0,0,0,0,0,0,
0,0,0,0,0,0,  0,  0,  0, 76,114,127,201,234,231,244,263,218, 74,  0,  0,  0,0,0,0,0,0,0,
0,0,0,0,0,0,  0,  0,  0,  0,  0,  0, 47,205,266,273,250, 92,  0,  0,  0,  0,0,0,0,0,0,0,
0,0,0,0,0,0,  0,  0,  0,  0,  0,  0, 44,227,264,260,253,145,  0,  0,  0,  0,0,0,0,0,0,0,
0,0,0,0,0,0,  0,  0,  0,  0,  0,  0,173,251,208,158,218,239,163,  0,  0,  0,0,0,0,0,0,0,
0,0,0,0,0,0,  0,  0,  0,  0,  0,120,245,236, 92,  0, 52,201,227, 98,  0,  0,0,0,0,0,0,0,
0,0,0,0,0,0,  0,  0,  0,  0,  0,184,256,192,  0,  0,  0, 65,205,213, 40,  0,0,0,0,0,0,0,
0,0,0,0,0,0,  0,  0,  0,  0,  0,192,250,146,  0,  0,  0, 70,206,225, 42,  0,0,0,0,0,0,0,
0,0,0,0,0,0,  0,  0,  0,  0,  0,173,247,232,186,181,199,240,249,178,  0,  0,0,0,0,0,0,0,
0,0,0,0,0,0,  0,  0,  0,  0,  0, 39,140,201,226,230,232,233,184, 65,  0,  0,0,0,0,0,0,0,
0,0,0,0,0,0,  0,  0,  0,  0,  0,  0,  0,  0,  0,  0,  0,  0,  0,  0,  0,  0,0,0,0,0,0,0,
0,0,0,0,0,0,  0,  0,  0,  0,  0,  0,  0,  0,  0,  0,  0,  0,  0,  0,  0,  0,0,0,0,0,0,0,
0,0,0,0,0,0,  0,  0,  0,  0,  0,  0,  0,  0,  0,  0,  0,  0,  0,  0,  0,  0,0,0,0,0,0,0
The sketch:
//MPU6050_model.ino
#include <TensorFlowLite.h>
#include "tensorflow/lite/micro/micro_error_reporter.h"
#include "tensorflow/lite/micro/micro_interpreter.h"
#include "tensorflow/lite/micro/micro_mutable_op_resolver.h"
#include "tensorflow/lite/schema/schema_generated.h"
#include "tensorflow/lite/version.h"
#include "model.h"
#include "num.h"
const tflite::Model* tflModel = nullptr;
tflite::ErrorReporter* tflErrorReporter = nullptr;
TfLiteTensor* tflInputTensor = nullptr;
TfLiteTensor* tflOutputTensor = nullptr;
tflite::MicroInterpreter* tflInterpreter = nullptr;
constexpr int tensorArenaSize = 140 * 1024;
uint8_t tensorArena[tensorArenaSize];
float out[10];
void setup() {
Serial.begin(115200);
while (!Serial)
delay(10);
static tflite::MicroErrorReporter micro_error_reporter;
tflErrorReporter = µ_error_reporter;
tflModel = tflite::GetModel(model);
if (tflModel->version() != TFLITE_SCHEMA_VERSION) {
TF_LITE_REPORT_ERROR(tflErrorReporter,
"Model provided is schema version %d not equal "
"to supported version %d.",
tflModel->version(), TFLITE_SCHEMA_VERSION);
return;
}
static tflite::MicroMutableOpResolver<6> micro_op_resolver;
micro_op_resolver.AddMaxPool2D();
micro_op_resolver.AddConv2D();
micro_op_resolver.AddDepthwiseConv2D();
micro_op_resolver.AddFullyConnected();
micro_op_resolver.AddReshape();
micro_op_resolver.AddSoftmax();
static tflite::MicroInterpreter static_interpreter(tflModel, micro_op_resolver, tensorArena, tensorArenaSize, tflErrorReporter);
tflInterpreter = &static_interpreter;
TfLiteStatus allocate_status = tflInterpreter->AllocateTensors();
if (allocate_status != kTfLiteOk) {
TF_LITE_REPORT_ERROR(tflErrorReporter, "AllocateTensors() failed");
return;
}
tflInputTensor = tflInterpreter->input(0);
}
void loop() {
for(int i = 0; i < 28; i++){
for(int j =0; j < 28; j++){
tflInterpreter->input(0)->data.f[28*i+j] = num[28*i+j]/255.0;
}
}
/*
for(int i = 0; i < 1; i++){
for(int j =0; j < 1; j++){
Serial.print(tflInterpreter->input(0)->data.f[28*i+j]);
Serial.print(", ");
}
}
*/
TfLiteStatus invokeStatus = tflInterpreter->Invoke();
out[0] = tflInterpreter->output(0)->data.f[0];
  out[1] = tflInterpreter->output(0)->data.f[1];
  out[2] = tflInterpreter->output(0)->data.f[2];
  out[3] = tflInterpreter->output(0)->data.f[3];
  out[4] = tflInterpreter->output(0)->data.f[4];
  out[5] = tflInterpreter->output(0)->data.f[5];
  out[6] = tflInterpreter->output(0)->data.f[6];
  out[7] = tflInterpreter->output(0)->data.f[7];
  out[8] = tflInterpreter->output(0)->data.f[8];
  out[9] = tflInterpreter->output(0)->data.f[9];
float maxVal = out[0];
int maxIndex = 0;
for(int k =0; k < 10;k++){
  if (out[k] > maxVal) {
      maxVal = out[k];
      maxIndex = k;
    }
  }
Serial.print("Number ");
Serial.print(maxIndex);
Serial.println(" detected");
Serial.print("Confidence: ");
Serial.println(maxVal);
Serial.print(out[0]);
  Serial.print(",");
  Serial.print(out[1]);
  Serial.print(",");
  Serial.print(out[2]);
  Serial.print(",");
  Serial.print(out[3]);
  Serial.print(",");
  Serial.print(out[4]);
  Serial.print(",");
  Serial.print(out[5]);
  Serial.print(",");
  Serial.print(out[6]);
  Serial.print(",");
  Serial.print(out[7]);
  Serial.print(",");
  Serial.print(out[8]);
  Serial.print(",");
  Serial.println(out[9]);
}Code explanation:
TfLiteStatus invokeStatus = tflInterpreter->Invoke();These lines of code invoke inference on the data stored in the input tensors.
out[0] = tflInterpreter->output(0)->data.f[0];
out[1] = tflInterpreter->output(0)->data.f[1];
out[2] = tflInterpreter->output(0)->data.f[2];
out[3] = tflInterpreter->output(0)->data.f[3];
out[4] = tflInterpreter->output(0)->data.f[4];
out[5] = tflInterpreter->output(0)->data.f[5];
out[6] = tflInterpreter->output(0)->data.f[6];
out[7] = tflInterpreter->output(0)->data.f[7];
out[8] = tflInterpreter->output(0)->data.f[8];
out[9] = tflInterpreter->output(0)->data.f[9];These lines of code access the output tensors and store them in an array to be used later.
float maxVal = out[0];
int maxIndex = 0;
for(int k =0; k < 10;k++){
if (out[k] > maxVal) {
maxVal = out[k];
maxIndex = k;
}
}
Serial.print("Number ");
Serial.print(maxIndex);
Serial.println(" detected");
Serial.print("Confidence: ");
Serial.println(maxVal);These lines of code print out the class index and confidence value of the class with the highest output value.
Serial.print(out[0]);
Serial.print(",");
Serial.print(out[1]);
Serial.print(",");
Serial.print(out[2]);
Serial.print(",");
Serial.print(out[3]);
Serial.print(",");
Serial.print(out[4]);
Serial.print(",");
Serial.print(out[5]);
Serial.print(",");
Serial.print(out[6]);
Serial.print(",");
Serial.print(out[7]);
Serial.print(",");
Serial.print(out[8]);
Serial.print(",");
Serial.println(out[9]);These lines of code print out the confidence values for each of the individual classes.
10.c MNIST: Test images
Github Link for this subsection.
You can use these images, converted into NumPy arrays, to test out your MNIST TinyML model.
I thank my GSoC mentor, Paul Ruiz, for guiding me throughout the project!
Links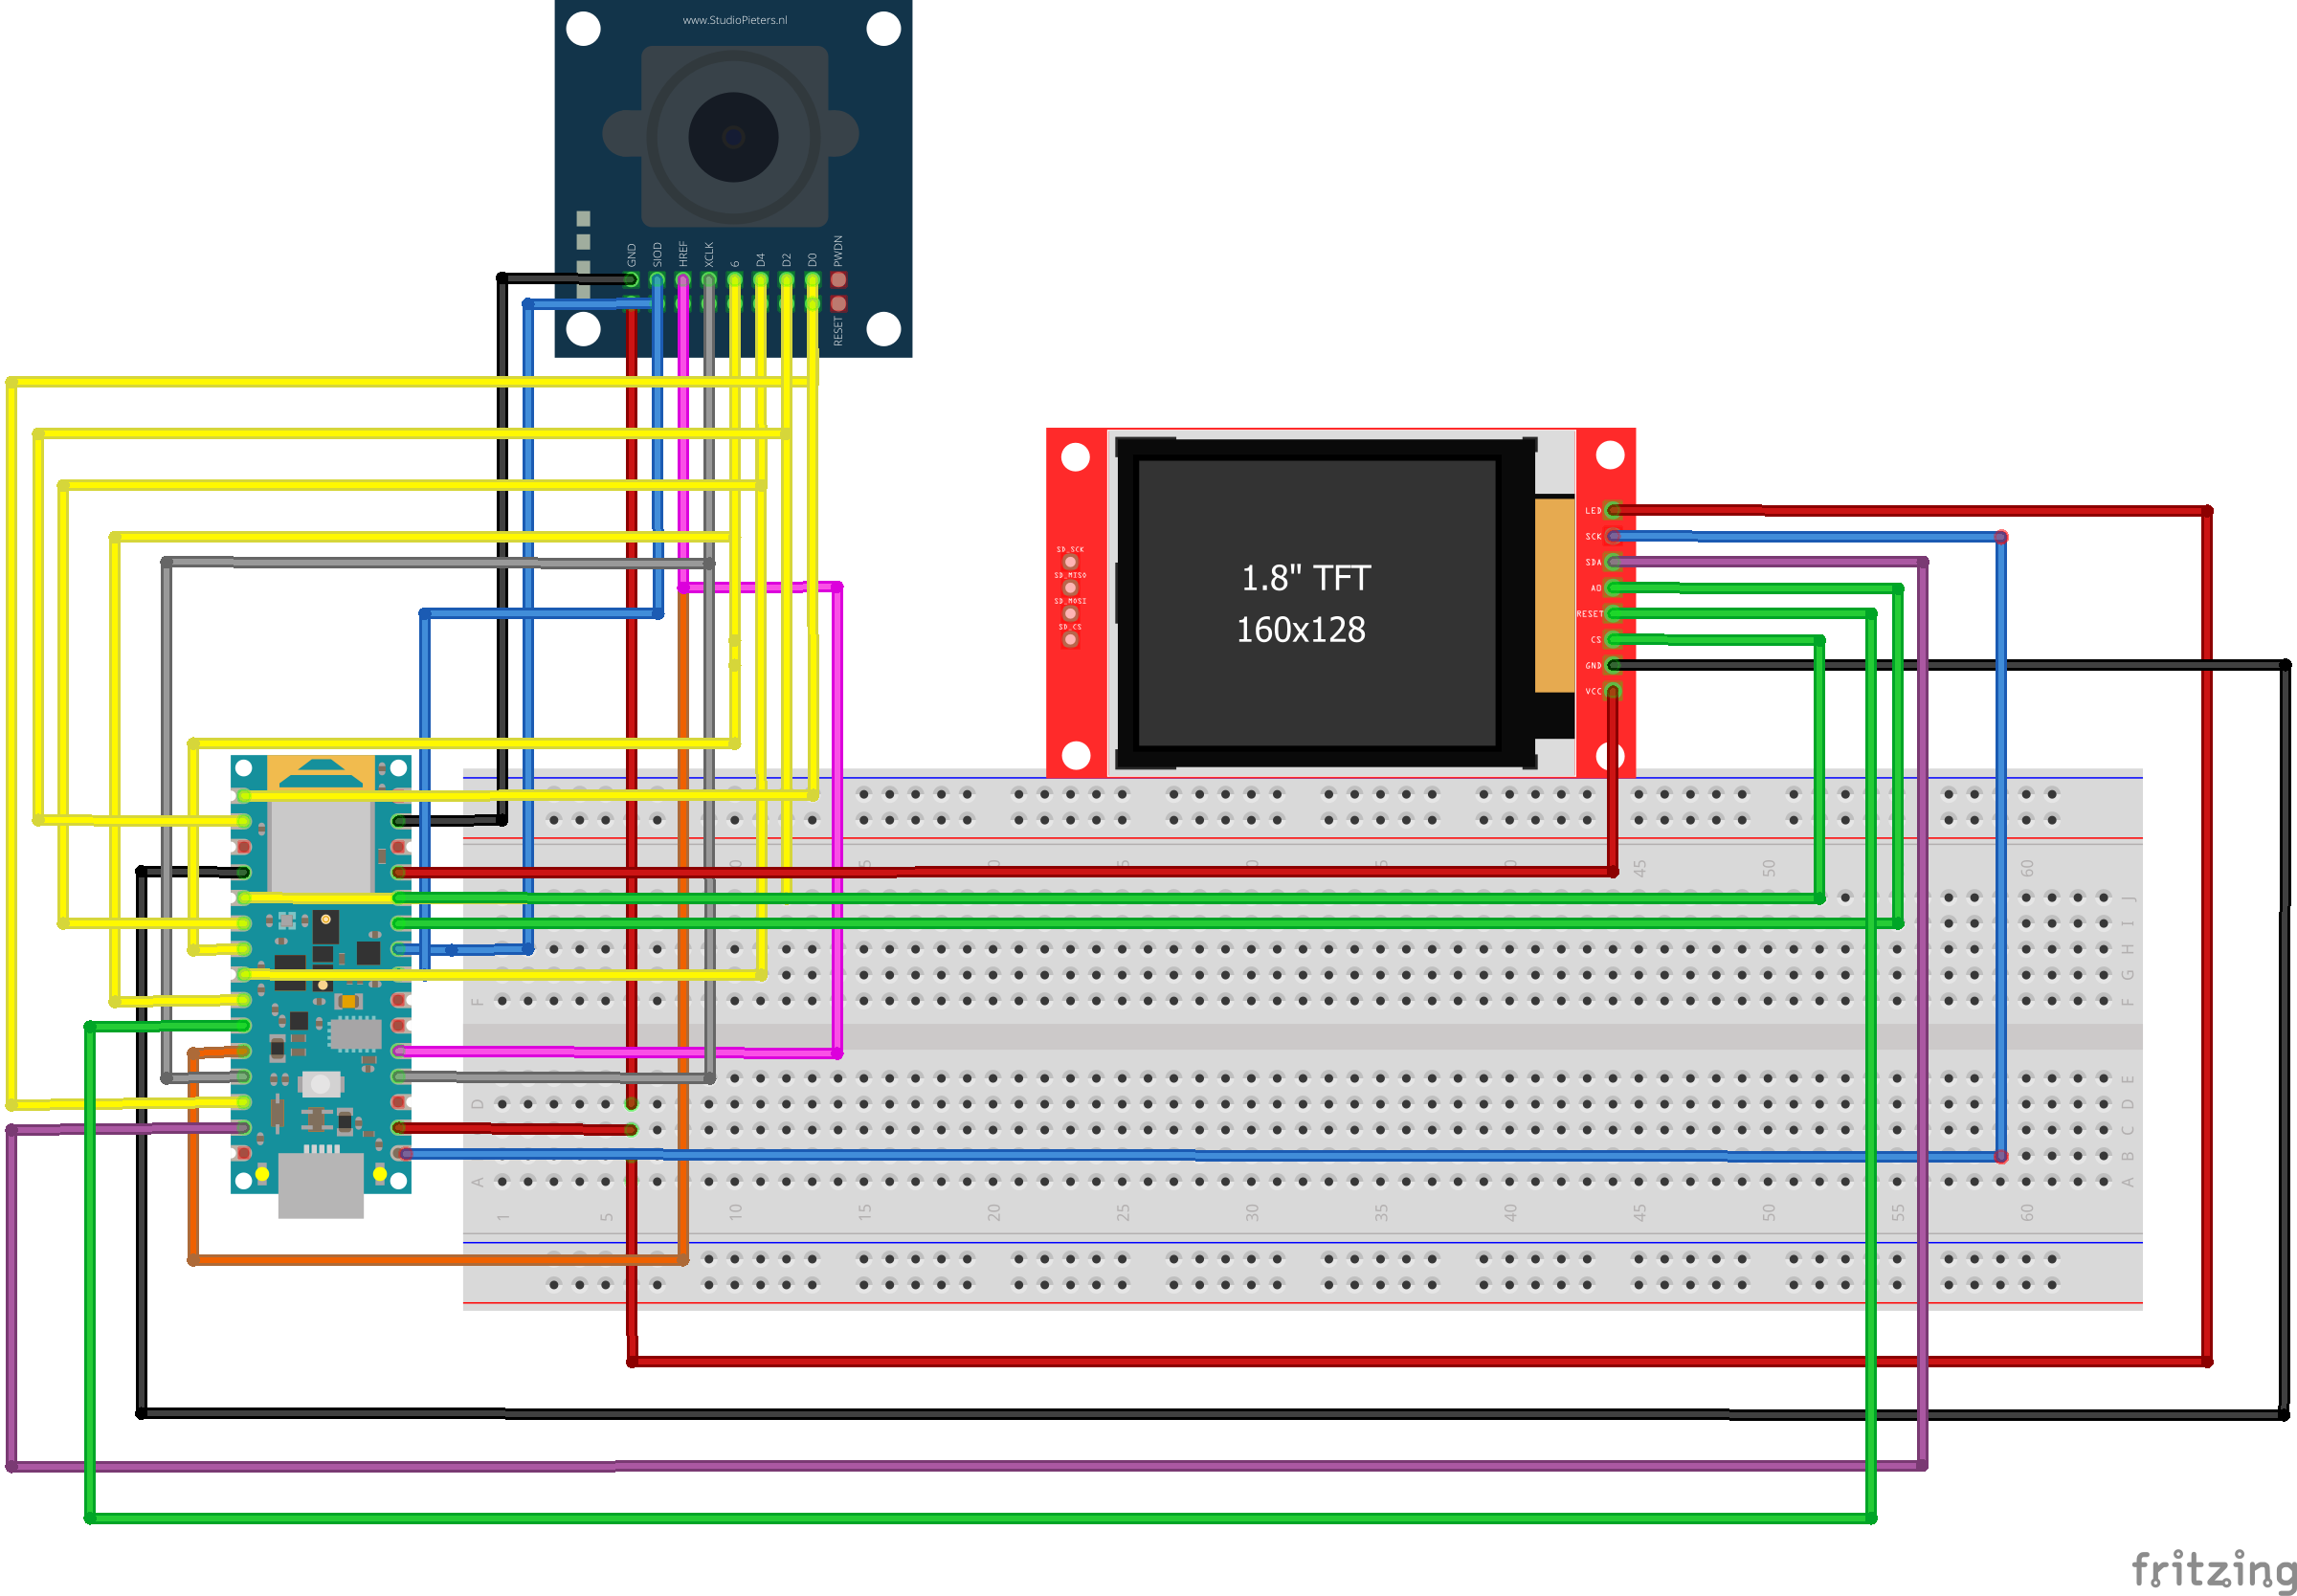


Comments
Please log in or sign up to comment.