


Hardware components | ||||||
 |
| × | 1 | |||
 |
| × | 1 | |||
 |
| × | 1 | |||
| × | 1 | ||||
| × | 1 | ||||
| × | 1 | ||||
Software apps and online services | ||||||
| ||||||
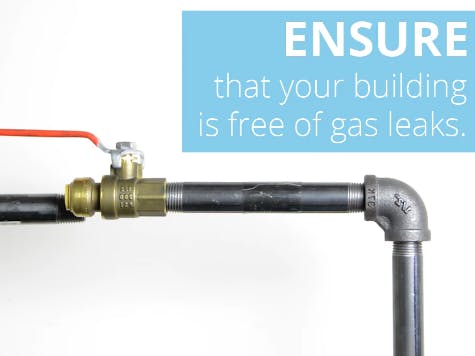
Here's a tutorial on how to create a gas-valve monitoring application to protect buildings from not just external damage but also internal dangers.
From 2002 to 2012, gas leak explosions were responsible for over 100 fatalities. The average pipe is 56 years old and would cost $2~8 million dollars per mile to replace. With that in mind, I decided to embark on a project to tackle this program in an affordable but industrial-ready way. Luckily, Temboo already has an IoT application page with a gas valve monitoring tutorial.
For those who are more visually inclined in terms of learning, there's also a video to help walk you through the tutorial! It covers all the spots that might be missed with a cursory glance and includes the exact materials required to setup:
1. Sign up for AWS and Temboo!
2. Go to your AWS account and find your Security Credentials to obtain your AWSAccessKeyID and AWSSecretKeyID.
3. Use the Temboo IoT Gas Leak App page to save a profile under the "Save AWS Keys" tab in "Obtain API Credentials"
4. Create a SQS Queue in AWS. This will be used to communicate with the gas valve. The board will retrieve instructional messages sent from an iOS application.
5. Limit the retention time to 5 minutes to ensure older messages aren't read by mistake.
6. Find your 12 digit Account ID included in the URL and ARN of your Queue.
7. Back in Temboo, enter the Variables needed in the SendMessage and ReceiveMessage choreos, found under the tab "Send a SQS Message" within Set Choreo Inputs
9. Create a SNS Subscription with the email address that the alert should be sent to as the subscription endpoint.
10. Locate the TopicArn of the topic you want to publish to.
12. Select your choice of hardware back on Temboo! TI CC3200, Artik 10, or Arduino Yun, they all work! However, the next set of instructions will be assuming that you're using a Yun, like I am.
13. Connect the power and ground of your board to your breadboard.
14. Connect the first pin of your MQ-9 gas sensor to ANALOG A0
Connect the middle pin of the gas sensor to power, and the third pin of your sensor to ground.
15. Connect the ground of the solenoid valve to the Collector pin (middle) of the TIP120 Transistor.
Connect the Base pin (first) of the TIP120 Transistor to DIGITAL 4.
Connect the Emitter pin (third) of the TIP120 Transistor to ground.
16. Connect the ground of the 12v power supply to the same ground as your board.
Connect the positive end of the 12v power supply to the rail with the power end of the pump.
17. Download the Code in the last tab of the tutorial process
18. Put it onto your board and install it! You're good to go!


Comments