


Hardware components | ||||||
_ztBMuBhMHo.jpg?auto=compress%2Cformat&w=48&h=48&fit=fill&bg=ffffff) |
| × | 1 | |||
 |
| × | 1 | |||
 |
| × | 1 | |||
 |
| × | 1 | |||
 |
| × | 1 | |||
 |
| × | 1 | |||
Software apps and online services | ||||||
 |
| |||||
Hand tools and fabrication machines | ||||||
 |
| |||||
 |
| |||||
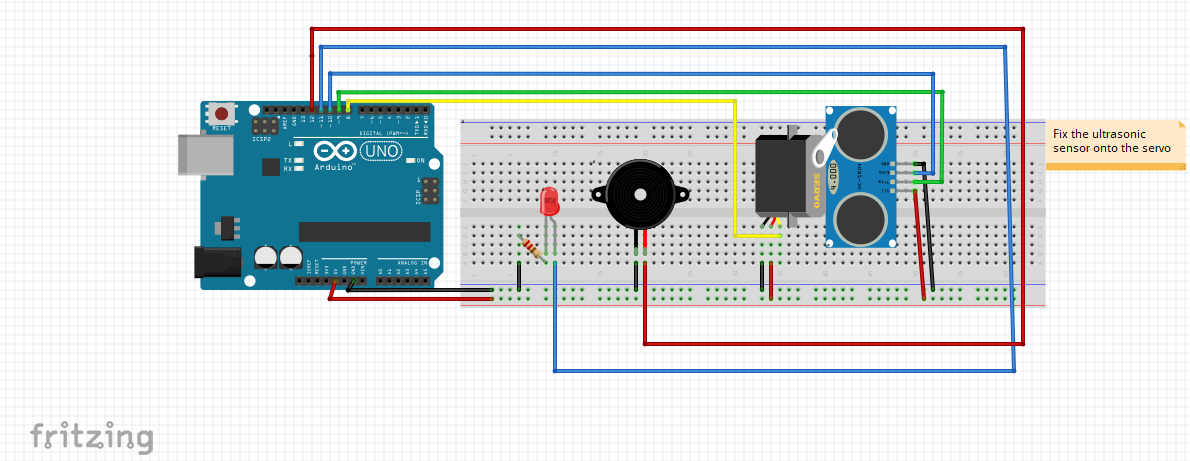
This project helps you create a system to sense and measure the distance to solid objects nearby. This is accomplished with an ultrasonic sensor. To scan for objects around it, we have fixed it to a servo motor, which sweeps around, enabling the sensor to scan in a semicircular region in front of it.
To make the project more fun, we have added a red LED and a buzzer. The code is such that if anything comes closer than 15 cm, the LED will light up dimly. If it is closer than 5cm, the LED will glow brightly and the buzzer will sound the alarm. You can edit the code and make changes to these distances if needed.
Assemble the components according to the circuit diagram given below. Attach the ultrasonic sensor to the servo motor such that the sensor sweeps 180 deg while the servo moves. This can be done with double-sided tape or a glue gun. Attach the servo firmly such that the sensor faces the space you want to scan. We have made a simple holder for the servo using cardboard.
Before entering the code, go to the Library manager (Tools->Manage Libraries) and download the NewPing (type it in the textbox, and click install when it appears in the list). You can do this project without this library, and the method is explained towards the end.
Upload the code to your Arduino board. Any Arduino board can be used, but if you change the pins to which you attach the components, be sure to change it in the code too.
View the results, i.e, the distance to the obstacle, in the serial monitor. You can also see this as a graph in the serial plotter tool.
Test out your cool new setup!! You can use it to detect intruders in your room, as a cheap parking sensor or even to catch the thief who has been stealing the candy bars!!
Adding a few tips;
The code given below uses the NewPing library. If you don't want to install the library, It can be done without this by replacing
int cm = sonar.ping_cm();
with
long duration, inches, cm;
pinMode(trigPin, OUTPUT);
  digitalWrite(trigPin, LOW);
  delayMicroseconds(2);
  digitalWrite(trigPin, HIGH);
  delayMicroseconds(10);
  digitalWrite(trigPin, LOW);
  pinMode(echoPin, INPUT);
duration = pulseIn(echoPin, HIGH);
cm
As you can see, it is long and complicated. But this gives you a clear picture of how the ultrasonic sensor works. A signal is given to the trigpin for 10 seconds and the duration it takes to reach echoPin is calculated. Since two times the distance it travelled (from the sensor to the object and back again) is equal to speed (speed of sound i.e, 0.0343 cm/microsecond) X time (duration), we end up with the value of distance stored in cm.
For a simpler project, the LED and buzzer and even the servo can be avoided. Simply neglect them from the circuit and use the following code.
#include <NewPing.h>
const int TriggerPin = 6;
const int EchoPin = 7;
// 100 = maxDistance
NewPing sonar (TriggerPin, EchoPin, 100);

void setup() {
 Serial.begin(9600);
}
void loop() {
 int cm = sonar.ping_cm();
 Serial.println(cm);
 delay(50);
}
Happy building!!! Stay curious, stay inspired!!

Comments
Please log in or sign up to comment.