


Hardware components | ||||||
 |
| × | 1 | |||
 |
| × | 1 | |||
 |
| × | 1 | |||
 |
| × | 1 | |||
 |
| × | 1 | |||
| × | 1 | ||||
 |
| × | 1 | |||
Software apps and online services | ||||||
| ||||||
Today we build a wireless, battery-powered, big red button that can be placed anywhere in the office or home. To make sure the button always is available and ready to be pressed, the button periodically reports its health so that we can monitor it remotely.
But this example goes way beyond simply being a big red button. It is an instance of a more general class of devices: a passive General Purpose Input/Output (GPIO) device that can be used for any kind of digital input device, such as an industrial sensor or a digital switch.
Because we use sub-GHz radio technology, we can expect to get kilometers of range in an out-door setting and hundreds of meters of indoor range. If this range is not enough, just add mesh routers to extend the network even further.
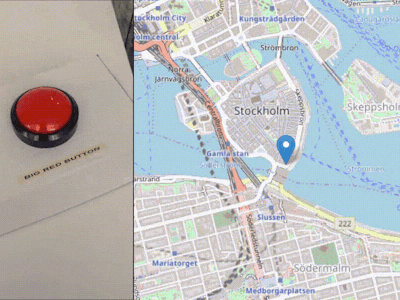
When the button is pushed, we immediately get a notification on our phone – and see where the button was pushed on the map.
- One TI CC1350 Launchpad, acting as a serial gateway
- One Raspberry Pi Zero W, for connecting the serial gateway
- One more TI CC1350 Launchpad to use with the button
- One Coin Cell board to connect a coin cell battery to the Launchpad
- At least one coin cell battery
Start by following the steps in this article to set up the Raspberry Pi Zero W with one Launchpad board as a serial gateway.
Step 1: Set up the Launchpad HardwareTo set up the Launchpad hardware, we need to upload the right firmware to their built-in SoCs. For this we need Flash Programmer 2 and a laptop computer running Windows.
Install Flash Programmer 2 from here.
Download the firmware image for the TI CC1350 Launchpad:
cc1350lp-868mhz.bin(Europe)
cc1350lp-915mhz.bin(US, Oceania, Asia)
Use Flash Programmer 2 to flash the firmware to the Launchpad: plug in the Launchpad in the laptop and flash the firmware file to the Launchpad. (Detailed instructions on how to use Flash Programmer 2 here.)
Step 2: Connect the Battery and the Big Red ButtonConnect the coin cell holder 3V output pin to the Launchpad 3.3V input pin, and GND to GND in the same way. Make sure to remove the row of jumpers closest to the USB connector so that we don’t waste power.
Connect battery board
The button connects with two jumper wires. Connect one of them to a GND
pin on the Launchpad, and the other to the DIO_23
pin.
Connect the button
Step 3: Add the Launchpad to the Wireless NetworkLogin to the Thingsquare app on the web, or your iOS or Android phone.
Tap your gateway and tap the Invite button. The Launchpad device will start blinking green. You can follow the Launchpad connection progress under Nearby if you enable Bluetooth on your phone.
Invite the device via the gateway
After a minute, the new Launchpad will stop blinking and will appear under the Network devices. Tap the device and then the Remote button to enable remote access to the device. You need to be logged in to your account to enable remote access.
Make it your own with a suitable Big Red Icon and Big Red Name
To turn your Launchpad device into a Big Red Device, tap the Launchpad picture in the upper left corner to select a suitable icon. Then tap the device name on the right to give it a suitable name.
The Pin Configuration page configures the device to listen to pin input events
We now need to configure the device to start paying attention to the pin where the button is physically connected. Tap Pin Configuration to display the current device settings. To configure the device to monitor the button, tap Digital input pin and select DIO 23. Then tap Digital input pin configuration and select Pull-up. Finally, tap Apply Pin Configuration to activate the new settings.
Receive push notifications when the button is pushed
The device now notifies the backend server whenever the button is pushed. When the app is opened, you can detect if the button is pushed. But what about when you are not staring at the app? You can configure the system to push notifications when certain events happen with your devices.
We now configure your device so that you’ll receive push notifications from the Big Red Button.
Click Notifications. A page with the device’s active push notifications is displayed. Tap Digital input changed to add a new push notification configuration that detects a button push. Feel free to change the notification message, and finally tap Add.
If you want to verify that push notifications is working in your app, tap the newly added notification, and then tap Test. You should immediately get a push notification with the specified message.
The Power Configuration page allows you to configure the device to last a year on a coin cell battery
Configure the device for battery-driven operation. Tap the Launchpad in the app and then open the Power Consumption page. Set Sensor sample period and Statistics gather period to report data every two hours. Configure the Launchpad to run in Lifetime power mode with a large Reachability in lifetime mode setting, allowing them to be run on batteries. Finally, tap the Apply Configuration button to push the new configuration to the Launchpad.
The smart phone app receives push notifications
The Big Red device has now entered a low-activity power-saving mode. But whenever the button is pushed, it immediately wakes up and notifies the backend. Since you have configured push notifications, you will receive a notification when someone pushes the button.
Step 8: Calculate Battery LifetimeSee detailed information about power consumption, battery lifetime, and historical button pushes in the app
The Big Red device periodically reports statistics, including its power consumption. Using a few samples from the recent power consumption, the system can estimate the total lifetime when running on a coincell battery. To see the estimated battery lifetime of your device, tap the Power Consumption button.
The device also stores historical button pushes. You can view a chart with detailed information by clicking the hand icon in the upper-right corner. Three graphs are shown containing the current binary state of the button, the number of button pushes since last reboot, and the number of unfiltered hardware interrupts that the button has generated.
Final Step: Add as Many Buttons as You Want!You now have one Big Red Button, but a single wireless mesh network can support thousands of devices. So feel free to add as many as you want!
Each wireless mesh network can support thousands of devices, so just keep adding big red buttons!
How many have you built? Did you make more than 100? Let us know!


_3u05Tpwasz.png?auto=compress%2Cformat&w=40&h=40&fit=fillmax&bg=fff&dpr=2)


Comments
Please log in or sign up to comment.