Amazon Echo is fun to use and it has a really cool feature to control most of the home automation devices that are available out there, like Philips Hue and other devices. But nothing is better than experimenting and building your own DIY Home automation system.
In this project I'm going to show you how to create an IoT-based light that connects to AWS Lambda and I will show you how to create your own Amazon skill to work with your IoT light.
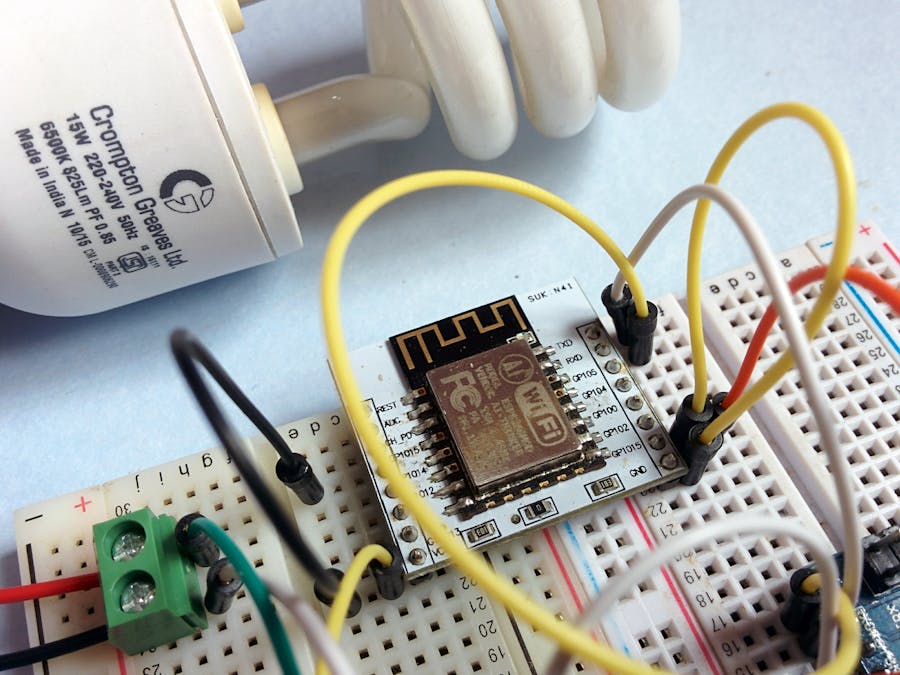
Arduino and ESP8266At the heart of this project is an Arduino Nano and a ESP8266-12E, the esp8266 is used to connect the Arduino Nano to the internet. The esp8266 and the Arduino nano can both be programmed using the Arduino IDE, so start by downloading it.
The IoT Light connects to the Phant server and checks for the state of the IoT Light, the state of the Light on the Phant is modified by the AWS Lambda function each time the Alexa intent is called. Detailed Instructions on how to setup each of the blocks can be found in later steps of the project.
Let's start with setting up the Phant server, the Phant server is an open source Data Logging server for IoT devices developed by Sparkfun written in Nodejs. You can setup Phant server on AWS E2C Instance.
You can start by downloading the Phant sever code from GitHub, create an E2C instance on AWS and open up an SSH terminal, install NodeJS on the Instance and then install Phant by typing the below command.
npm install -g phant
Next you should be able to launch phant server by typing
phant
By default the Phant server runs on port 8080 for HTTP and port 8081 for telnet. You can visit the Phant website setup by visiting <your-E2C-instance-ip>:8080
Once on the Phant website create a new stream by clicking on create and create a single value field in the name of "lightstate".
In the next page you should see your public and private keep note it down, you will need these in the next step.
Programming the ESP8266Let's start with programming the esp8266, for this you will need the arduino IDE, after downloading and install the arduino IDE, navigate to File --> Preferences and in the Additional Boards URL enter the bellow URL.
http://arduino.esp8266.com/stable/package_esp8266com_index.json
And then navigate to Tools --> Boards --> Boards Manager and install the esp8266 boards.
Next, connect the esp8266 to the Sparkfun FTDI chip and upload the below program, you need to add your WiFi SSID, password, the public and private key of the Phant server and the IP of the Phant server.
#include <ESP8266WiFi.h>
#include <Phant.h>
const char WiFiSSID[] = "<wifi_ssid>";
const char WiFiPSK[] = "<wifi_pass>";
const char parseKey[] = "1b";
const char PhantHost[] = "<ip>";
const char gPublicKey[] = "<public_key>"; //Enter your phant public key goes here
const char gPrivateKey[] = "<private_key>"; //Enter your phant private key goes here
const unsigned long postRate = 1000;
unsigned long lastPost = 0;
void setup()
{
 Serial.begin(115200);
 connectWiFi();
 digitalWrite(LED_BUILTIN, HIGH);
}
void loop()
{
 if (lastPost + postRate <= millis())
 {
   if (getFromPhant()) lastPost = millis();
   else lastPost = millis();
 }
}
void connectWiFi()
{
 byte ledStatus = LOW;
 WiFi.mode(WIFI_STA);
 WiFi.begin(WiFiSSID, WiFiPSK);
 while (WiFi.status() != WL_CONNECTED)
 {
   digitalWrite(LED_BUILTIN, ledStatus);
   ledStatus = (ledStatus == HIGH) ? LOW : HIGH;
   delay(100);
 }
}
int getFromPhant()
{
Phant phant(PhantHost, gPublicKey, gPrivateKey);
 WiFiClient client;
 if (!client.connect(PhantHost, 8080)) {
   return 0;
 }
 //Get data from phant cloud
   client.print(phant.get());
   client.println();
  int cTrack = 0;
  bool match = false;
  int pCount = 0;
  while(1) {
   if (client.available()) {
     char c = client.read();
     if(!match) {
       if(c == parseKey[cTrack])
       {
         if(cTrack == (sizeof(parseKey)-2)) match = true;
         cTrack++;
       }
       else {
         cTrack = 0;
       }
     }
     else {
       if(pCount == 2) {
         int dControl = c - '0';
         if(dControl == 1 | dControl == 0){
           Serial.println(dControl);
         }
         }
       }
       pCount++;
     }
   }
   if (!client.connected()) {
     client.stop();
   }
  return 1;
}
After programing the esp8266 it is now time to program the arduino Nano the arduino nano and the esp share data via serial so make sure you have the tx and rx pin of the nano disconnected before uploading the programing the arduino nano.
The light is controlled via digital pin 4 of the arduino nano you can change this or use multiple pins based on your project.
Copy the code from below and paste it in the arduino IDE and hit upload.
int light = 4; // Light Connected to digital pin 4
void setup()
{
 pinMode(light, OUTPUT);
 Serial.begin(115200);
 while (!Serial);
}
void loop() {
 if (Serial.available())
 {
   int state = Serial.parseInt(); //Convert serial data to int
   if (state == 1)
   {
     digitalWrite(light, HIGH); // When state is 1 turn on the Light
   }
   if (state == 0)
   {
     digitalWrite(light, LOW); // When state is 0 turn off the Light
   }
 }
}
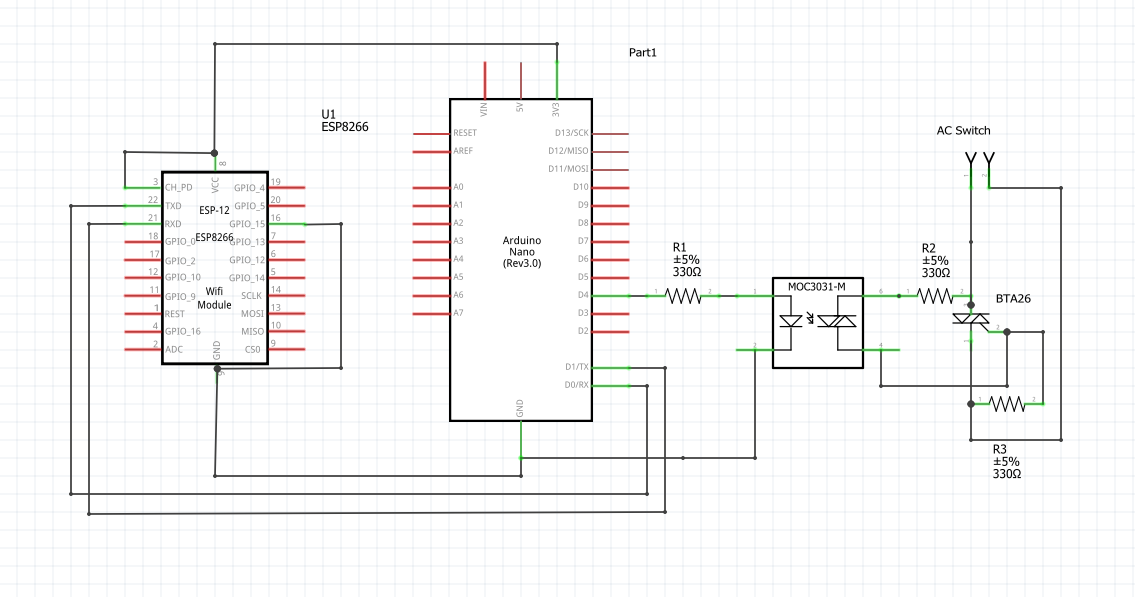
Now, once the code is uploaded to both the boards, you can assemble the circuit, for this all you need the do is follow the circuit diagram below, no soldering skills is required as this project is assembled on a Breadboard but feel free to solder all the components onto a PCB once you are done testing it on a breadboard.
This circuit uses a Tiac (BTA26) and an opto-coupler to control the AC mains voltage based on the state of the arduino digital pin 4. So the light turns on when the arduino digital pin 4 goes high.
TestingBefore setting up the Alexa skill you can test the circuit by powering it on and making sure it connects to a WiFi network with internet access and once the esp8266 connects to the Phant server, you be able to change the state of the digital pin 4, on and off, there by turning the Triac and the light on and off.
Next, you will need to setup AWS Lambda, To create the function go to AWS Developer Console, if you don't have an account make sure you sign up for one, you could also use the same account credentials that you use for shopping at amazon.com.
Once you reach the developer console after logging in you need to navigate to Lambda and Create a new function.
Select Nodejs 4.x as your Runtime, and give a name and Role to your function. In the next page add Alexa Skills Kit Trigger form the add trigger menu and scroll down until you find a code editor and make sure the index.js file is selected.
Copy the code from below and paste it in the code editor make changes where it says <ip> , <public_key> and <private_key> to the values you saved while stetting up the Phant server.
var https = require('https');
var http = require('http');
ip = "<ip>"; // Enter your ip to the Phant server here
public_key = "<public_key>"; // Enter your public key to the Phant server here
private_key = "<private_key>"; // Enter your private key to the Phant server here
exports.handler = (event, context) => {
 try {
   switch (event.request.type) {
     case "IntentRequest":
       console.log(`INTENT REQUEST`)
       switch(event.request.intent.name) {
         case "TurnLightOn":
         var endpoint = "http://"+ip+":8080/input/"+public_key+"?private_key="+private_key+"&lightstate=1"
         http.get(endpoint, function (result) {
         console.log('Success, with: ' + result.statusCode);
         context.succeed(
          generateResponse(
               buildSpeechletResponse("The light is turned on", true),
               {}
           )
         )
         }).on('error', function (err) {
           console.log('Error, with: ' + err.message);
           context.done("Failed");
         });
           break;
         case "TurnLightOff":
           var endpoint2 = "http://"+ip+":8080/input/"+public_key+"?private_key="+private_key+"&lightstate=0";
           http.get(endpoint2, function (result) {
           console.log('Success, with: ' + result.statusCode);
           context.succeed(
               generateResponse(
                buildSpeechletResponse("The light is turned off", true),
                   {}
               )
           );
           }).on('error', function (err) {
           console.log('Error, with: ' + err.message);
           context.done("Failed");
           });
           break;
         default:
           throw "Invalid intent";
       }
       break;
     case "SessionEndedRequest":
       console.log(`SESSION ENDED REQUEST`);
       break;
     default:
       context.fail(`INVALID REQUEST TYPE: ${event.request.type}`)
   }
 } catch(error) { context.fail(`Exception: ${error}`) }
}e
buildSpeechletResponse = (outputText, shouldEndSession) => {
 return {
   outputSpeech: {
     type: "PlainText",
     text: outputText
   },
   shouldEndSession: shouldEndSession
 }
};
generateResponse = (speechletResponse, sessionAttributes) => {
 return {
   version: "1.0",
   sessionAttributes: sessionAttributes,
   response: speechletResponse
 }
};
Once you have made the changes save the changes and then note the "arn", the arn can be found on the right, top of the page, you will need this number for setting up the Alexa Skill later.
Creating the Alexa SkillOnce you have setup the circuit, phant server and Lambda now you its time to create your own Alexa skill. The Amazon Skill runs on the Amazon Echo, dot and any devices that supports Alexa Voice service.
To create the Alexa Skill you will need to visit the Amazon developer page and select Alexa form the menu. In the alexa developer page, select alexa skills kit and in the next page select create add a new alexa skill.
Fill in the details in the first step as follows -
- Skill Type : Custom Interaction Model
- Name : Give a name to your amazon skill
- Invocation Name: This is a two word name that you use to ask alexa to select your skill set before asking alexa to toggle the state of the light. For more on Selecting Invocation Name you can check you the Invocation name Guidelines.
Make sure you save the details before you proceed to the next step.
Interaction Model, in this step you teach you amazon skill to understand Natural Language spoken by humans. For this you will need Sample Utterances, this is the sentences you would say to alexa to turn on or off the lights. You can see the Utterances I used below.
TurnLightOn Turn Light On
TurnLightOn Set Light On
TurnLightOn Switch the light on
TurnLightOff Turn Light Off
TurnLightOff Set Light Off
TurnLightOff Switch the light off
Each of the utterances start with the instance name to bind it to, Here we have only 2 instances one to turn on the lights and the other to turn it off.
In the instance schema field you need to declare the instances before using it, this is writing in JSON format and you can use the Instance schema I used below.
{
 "intents": [
   {
     "intent": "TurnLightOn"
   },
   {
     "intent": "TurnLightOff"
   }
 ]
}
On the next page it is time to bind the AWS Lambda function to the Alexa Skill, Select the service end point to AWS Lambda and enter the ARN, make sure you save the details before proceeding.
Now it is time to test the Alexa app, power on the devices and you should be able to type in the Utterance in the Enter Utterance field, for example "Turn on the Light" and you should see the light turn on.
And that is it you should now have an Alexa Controlled Lights, you can publish your app and use it along with your Alexa devices or if you don't have an alexa device you could use echosim.io to test your Alexa skill.


_3u05Tpwasz.png?auto=compress%2Cformat&w=40&h=40&fit=fillmax&bg=fff&dpr=2)
Comments
Please log in or sign up to comment.