


Hardware components | ||||||
 |
| × | 1 | |||
 |
| × | 2 | |||
 |
| × | 4 | |||
 |
| × | 4 | |||
| × | 1 | ||||
 |
| × | 6 | |||
| × | 2 | ||||
| × | 6 | ||||
 |
| × | 1 | |||
Software apps and online services | ||||||
| ||||||
Hand tools and fabrication machines | ||||||
 |
| |||||
| ||||||
I’ve always been drawn to the inviting, blinking lights, the jungle of dangling, messy wires, and the fun of programming a sequence of steps into the onboard computer and seeing what result would the mashed up set of hardware would produce… No, I’m actually not talking about Android Things here, but the synthesisers, samplers and mixing desks which have been around for decades and were instrumental (excuse the pun) to the type of music that’s close to my heart — electronic! The teen dream career of an electronic music artist has eluded me, be it due to a lack of talent, resources to build the dream studio, or both. But thankfully, tinkering with Android for a living has proven to be just as much fun, with exciting frameworks and technologies able to experiment with, coming out regularly, one of which has particularly sparked (not again!) my interest —Android Things!
MIDI protocol on Android has been around since Marshmallow, and staying true to my dream, I already wrote a little MIDI Controller back in January 2016 which worked a treat as input for my music production and DJ software. I’ve never released the code as open source as, although functional, it was leaky on configuration changes and I once I put it away for a short while, I never got back to it, with great regret! Android Things has encouraged me to revisit my project, and rebuild the control surface with physical potentiometers and buttons, and learn about Nearby API a thing or two, and this in detail is how this was achieved.
SoftwareThe project consists of two modules — things and mobile. The modules will facilitate communication using Nearby API in P2P_STAR strategy, where the mobile companion app will advertise itself as the hub for the components to connect to and receive payloads that describe the MIDI events the app will send via USB connection to the PC running the MIDI software, in this case, Traktor DJ. Out of the two strategies available in Nearby API, P2P_STAR is recommended for high bandwidth, 1-to-N type topologies where N spokes communicate with 1 central hub, which should yield low latency which is crucial to modulating music expressively.
The things app will convert digital and analog signals from the connected components to the Android Things board to the payload expected in the Nearby contract. In terms of MIDI signal standards, we will be interested only in two of them — NOTE_ON — which indicates that a key, or button has been pressed and CONTROL_CHANGE — which represents a value from a range, typically 0–127, that usually is triggered by rotary or slider potentiometers.
The “spoke” things app needs to discover the “hub” and establish a connection with it. The order of callbacks for the things app is in such order:
override fun onCreate(savedInstanceState: Bundle?) {
   // ...
   midiPresenter = MidiControllerPresenter(this, getString(R.string.service_id))
   midiControls = MidiControls(midiPresenter)
   midiConnectionCallback = MidiConnectionCallback(midiPresenter)
   googleApiClient = GoogleApiClient.Builder(this)
           .addConnectionCallbacks(this)
           .addOnConnectionFailedListener(this)
           .addApi(Nearby.CONNECTIONS_API)
           .build()
}
override fun onStart() {
   super.onStart()
   midiPresenter.onStart()
}
override fun onStop() {
   super.onStop()
   midiPresenter.onStop()
}
override fun start() {
   midiControls.onStart() // init controls in MidiControls.kt
   googleApiClient.connect()
}
override fun stop() {
   midiControls.onClose()
   if (googleApiClient.isConnected) {
       googleApiClient.disconnect()
   }
}
// start discovering the companion "hub" app
override fun startDiscovery(service: String) {
   Nearby.Connections.startDiscovery(
           googleApiClient,
           service,
           MidiEndpointDiscoveryCallback(midiPresenter),
           DiscoveryOptions(Strategy.P2P_STAR)
   ).setResultCallback { result ->
       midiPresenter.onResultCallback(result)
   }
}
// stop on connection, or error when discovering (then restart)
override fun stopDiscovery(service: String) {
   Nearby.Connections.stopDiscovery(googleApiClient)
}
override fun acceptConnection(endpointId: String) {
   Nearby.Connections.acceptConnection(googleApiClient, endpointId, MidiPayloadCallback())
}
// when a hub is discovered request a connection with it
override fun requestConnection(endpointId: String, serviceId: String) {
   Nearby.Connections.requestConnection(
           googleApiClient,
           serviceId,
           endpointId,
           midiConnectionCallback
   ).setResultCallback { result ->
       midiPresenter.onResultCallback(result)
   }
}
(above: MainActivity.kt)
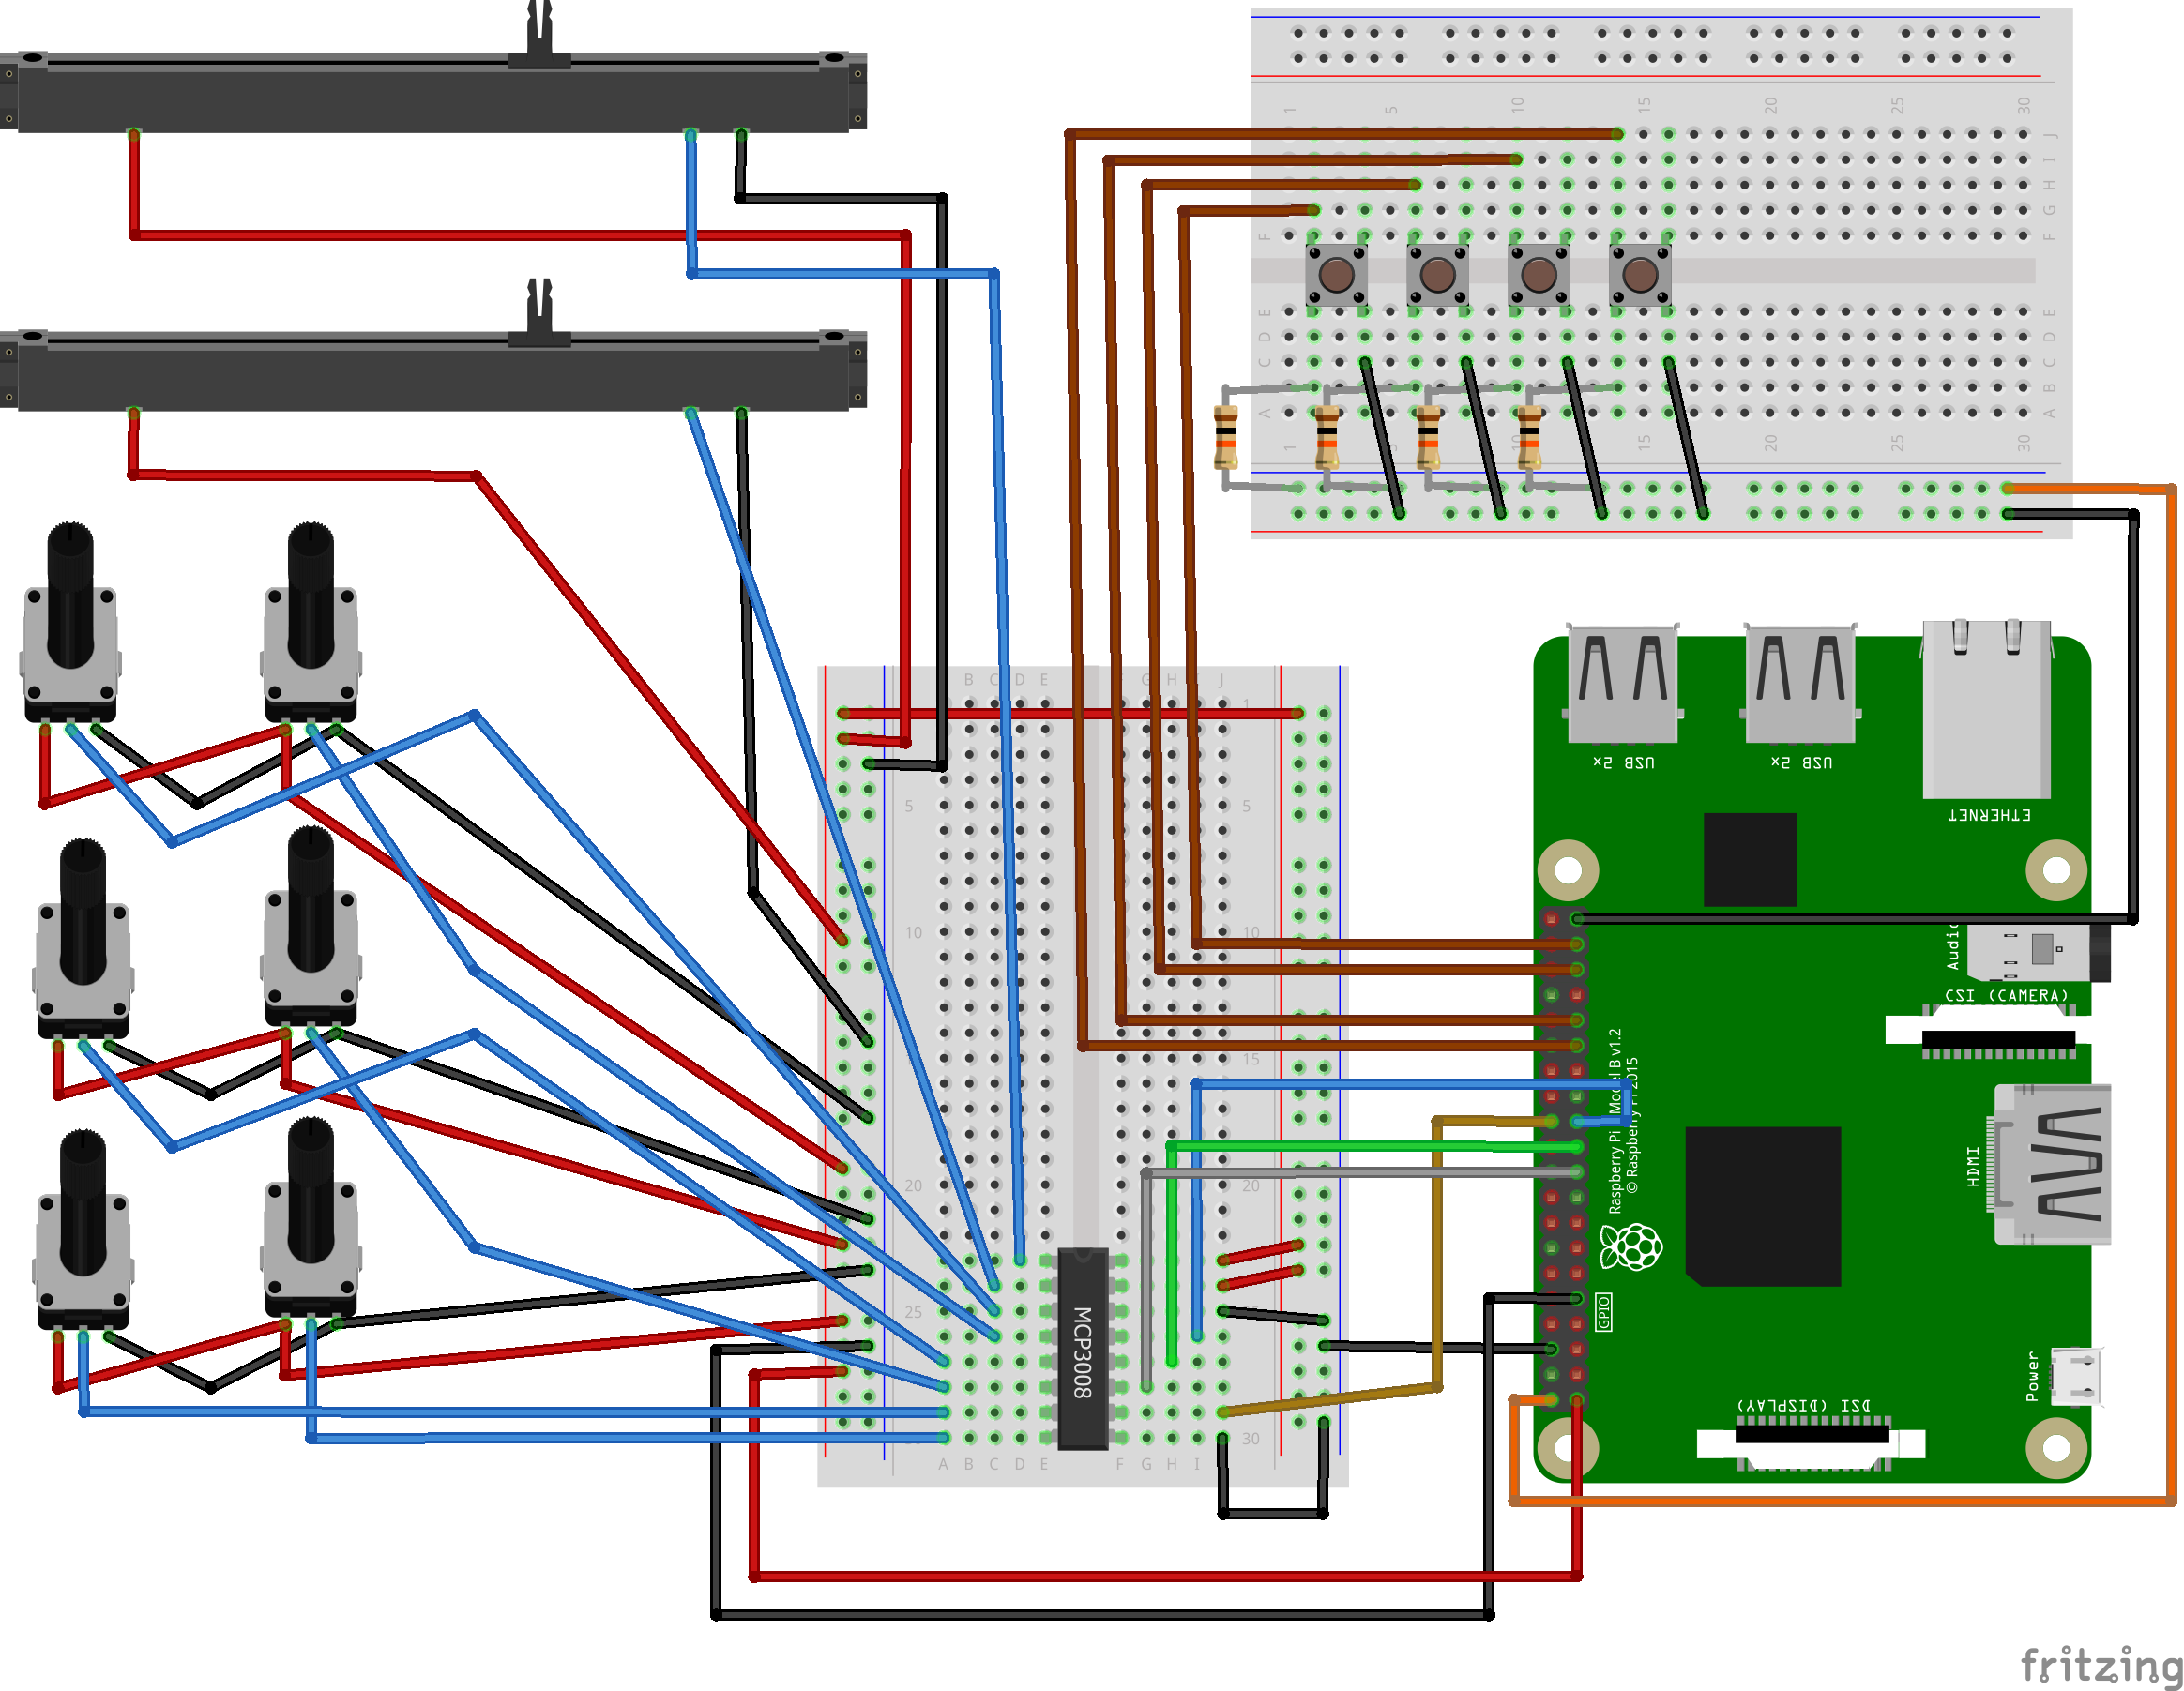
In order to build the Android Things component you will need the following:
- A Raspberry Pi 3
- A breadboard — one large one or a couple of small ones
- 10KΩ resistor x 4
- Push button x 4
- MCP3008–8-Channel 10-Bit ADC
- 10KΩ Linear rotary potentiometer x 6 — I used these
- 10KΩ Linear slider potentiometer x 2 — I used these
- Potentiometer Knob (optional) x 6 — I used these
- Enough male-to-male and female-to-male wires to wire it all together
- All Pots to pins 1–8 of the ADC, GND, 3v3 (blue, black, red wires)
- All Buttons to pins 26/23/6/5 and GND, 5v (brown, black, orange)
- ADC pins, as mapped below, 16&15 -> 3v3, 14-> (analog) GND, 13-> SPI0 CLK (BCM11), 12-> SPI0 MISO (BCM9), 11-> SPI0 MOSI (BCM10), 10-> CS0 (BCM8), 9-> (digital) GND
The app has two Controller domain types — MidiButton and MidiPot (-entiometer). The Button sends NOTE_ON the moment it’s pressed on and suppresses subsequent repeated events and does not send NOTE_OFF when it is released — we let the client software to handle the Toggle-like behaviour. The Pot sends the position of its potentiometer in range of 0–127. The reason why we don’t call this object Knob is because potentiometers can by rotary (knobs) and of slider type (typical vertical or horizontal sliders, eg. a crossfader).
class MidiButton(val keyCode: Int, val midiChannel: Byte) {
   val velocity: Byte = 64
   val key: Byte = 0
}
(above: MidiButton.kt)
class MidiControls(presenter: MidiControllerContract.Presenter) {
   private val driver: Driver = Driver()
   private val mcpDriverManager: McpDriverManager = McpDriverManager(presenter, driver)
   private val midiButtonDrivers: MutableList<ButtonInputDriver> = mutableListOf()
   private val midiButtonMapping: Map<String, Int> = mapOf(
           driver.getBtn0() to KeyEvent.KEYCODE_0,
           driver.getBtn1() to KeyEvent.KEYCODE_1,
           driver.getBtn2() to KeyEvent.KEYCODE_2,
           driver.getBtn3() to KeyEvent.KEYCODE_3
   )
   val midiButtons: MutableList<MidiButton> = mutableListOf()
   fun onStart() {
       midiButtonMapping.asIterable().forEachIndexed { index, entry ->
           midiButtonDrivers.add(buttonInputDriver(entry.key, MidiButton(entry.value, index.toByte())))
       }
       mcpDriverManager.start()
   }
   private fun buttonInputDriver(pin: String, midiButton: MidiButton): ButtonInputDriver {
       return ButtonInputDriver(pin, Button.LogicState.PRESSED_WHEN_LOW, midiButton.keyCode).apply {
           register()
           midiButtons.add(midiButton)
       }
   }
   fun onClose() {
       midiButtonDrivers.forEach {
           it.unregister()
           it.close()
       }
       mcpDriverManager.stop()
   }
}
(above: MidiControls.kt)
The Pot is a listener to a given output channel of the ADC (0–7) which is only of significance to itself, whilst the CONTROL_CHANGE events posts to an assigned MIDI channel which are the only thing of interest to the client. This is similar to how the Button does not advertise its Pin address to the MidiPresenter
Pots are controllers which only publish changes in the analog value of a controller they are mapped to with a static key notation per a controller. What this means is that although a key on a keyboard is mapped to a given controller, that key is static, and in effect identifies your controller. Therefore, our MidiPot instances can share one MIDI Channel, and in that channel they will be identified by different keys (notes). Here we’ve chosen all pots to share channel 10 and their IDs to be resolved by notes in the first octave. The only variable value per pot is the change (or velocity).
class MidiPot(private val mcpDriver: McpDriver,
             private val presenter: MidiControllerContract.Presenter,
             private val analogChannel: Int,
             val midiChannel: Byte,
             val key: Byte) : Listener {
   override fun onChange(read: Int) {
       presenter.onControlChange(this, read.toByte())
   }
   fun start() {
       mcpDriver.addListener(analogChannel, this)
   }
   fun stop() {
       mcpDriver.addListener(analogChannel, null)
   }
}
(above: MidiPot.kt)
class McpDriverManager(private val presenter: MidiControllerContract.Presenter, driver: Driver) {
   companion object {
       val mixerAdcStartChannel = 10
   }
   private val keys: DoubleArray = doubleArrayOf(Key.C0, Key.Cs0, Key.D0, Key.Ds0, Key.E0, Key.F0, Key.Fs0, Key.G0)
   private val mixerMcpDriver: McpDriver = McpDriver(driver.getSpio0(), driver.getSclk(), driver.getMosi(), driver.getMiso())
   private val mixerMidiPots: MutableList<MidiPot> = mutableListOf()
   fun start() {
       mixerMcpDriver.start()
       (0 until keys.size).mapTo(mixerMidiPots) {
           MidiPot(mixerMcpDriver, presenter, it, (mixerAdcStartChannel).toByte(), keys[it].toByte()).apply { start() }
       }
   }
   fun stop() {
       mixerMidiPots.forEach { it.stop() }
       mixerMcpDriver.stop()
   }
}
(above: McpDriverManager.kt)
This in effect will allow us to map them in Traktor to Ch11.CC.<019–024>, which mean Channel 11, Control Change, corresponding key ID.
MidiControllerPresenter class controls the flow of the MIDI events:
override fun onNoteOn(midiButton: MidiButton, pressed: Boolean) {
 endpoint?.apply {
 if (pressed) {
 if (lastMidiButtonPressed != midiButton) {
 view.sendPayload(endpoint!!,
 MidiEventWrapper(MidiEventType.STATUS_NOTE_ON, midiButton.midiChannel, midiButton.key, midiButton.velocity))
 lastMidiButtonPressed = midiButton
            }
        } else {
 lastMidiButtonPressed = null
 }
 }
}
override fun onControlChange(midiPot: MidiPot, velocity: Byte) {
 endpoint?.apply {
 view.sendPayload(endpoint!!,
 MidiEventWrapper(MidiEventType.STATUS_CONTROL_CHANGE, midiPot.midiChannel, midiPot.key, velocity))
 }
}
(above: MidiControllerPresenter.kt)
// MainActivity.kt (things)
override fun sendPayload(endpointId: String, wrapper: MidiEventWrapper) {
   Nearby.Connections.sendPayload(
           googleApiClient,
           endpointId,
           Payload.fromBytes(byteArrayOf(wrapper.type(), wrapper.channel(), wrapper.note(), wrapper.pressure())))
}
(above: MainActivity.kt)
The mobile app on start advertises itself in P2P_STAR strategy to any devices wishing to connect to it. Upon establishing a successful handshake, it will listen to payloads and convert them to MIDI events sent to the connected device which is interested in obtaining the MIDI events. To prevent the app from going to sleep or being interrupted, a Lock mode can be triggered by clicking on the fab, although a more ideal solution would perhaps be a Foreground Service.
I will skip the Nearby callbacks on mobile as they look fairly similar, but concentrate on the Payload receiving and pushing forward to the MIDI software part.
// MainActivity.kt (mobile)
class MidiPayloadCallback(private val midiController: MidiController) : PayloadCallback() {
   override fun onPayloadReceived(endpointId: String?, payload: Payload?) {
       val data = payload?.asBytes()
       if (data is ByteArray && data.size == 4) {
           val bytes = byteArrayOf((data[0] + data[1]).toByte(), data[2], data[3])
           midiController.send(bytes, System.nanoTime())
       }
   }
}
(above: MainActivity.kt)
// MidiController.kt (mobile)
class MidiController(
       context: Context,
       private val midiManager: MidiManager = context.getSystemService(Context.MIDI_SERVICE) as MidiManager,
       private val midiDeviceMonitor: MidiDeviceMonitor = MidiDeviceMonitor(context, midiManager)
) : AndroidViewModel(context.applicationContext as Application) {
   private var midiInputPort: MidiInputPort? = null
// ...
   // off the MIDI event goes into android.media.midi.MidiReceiver
   fun send(msg: ByteArray, timestamp: Long) {
       midiInputPort?.send(msg, 0, msg.size, timestamp)
   }
}
(above: MidiController.kt)
So far so good, but how do you exactly make the board build for digital signals only to understand the analog readings of the Pot? Oh yes, time for the…
ChallengesWhen it comes to Android Things boards, neither at the moment has analog inputs out of the box. A popular solution for non-Android Things project is Arduino, however since we are not dealing with on in this example we have to find a way to convert the analog signals of the potentiometers into the digital input our board expects. This can be achieved via cheap additional chips, which in this case is the MCP3008. Boasting 8 analog inputs it can support all the potentiometers I need for the final version of this project, but being bereft of official drivers for it, we have to write our own or scavenge the net for solutions of other developers who had faced this problem before and were kind enough to share their solutions. In this case we can depend on the latter thanks to this open source example found in the depths of Stack Overflow Q&A. What the driver does is it maps the outputs of the MCP to the four pins on the Pi, which we have to poll at intervals suitable for our use case and map the values into something useful to our domain. Because the chip used here is a 10-bit chip, the output can range between 0–1023 (2^^10), so given the MIDI Control Change range is 0–127 we have to divide them by 8.
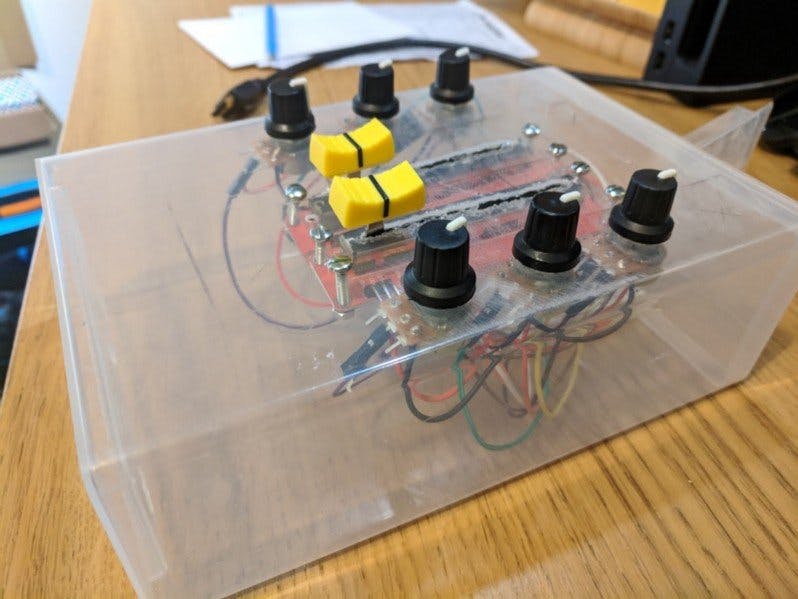
Building the enclosureAlthough for prototyping a breadboard would be enough, in order to operate a mixer fully intuitively, one would expect the sliders and the knobs to be laid out in a typical mixer manner, with two vertical banks of controls per channel. This means that we will need some sort of an enclosure into which we can place our control surface, without having to worry about plugging out a wire from our breadboard or two.
As a person not terribly experienced with DIY I chose to improvise with a solution I would not hurt myself with and one not requiring too much investment. It just so happened that something quite useful for the job I had around the house, which with a little imagination and careful planning I managed to turn into a semi stable enclosure. Behold, a mixer encased with a big box of mini Tic Tacs :-)
In case you want to build an enclosure from same materials you will also need a good soldering iron and bolts that will fit the holes in the slide pots (3mm).
Setting up the client softwareThis step will purely depend on the use case, as not only the software with which we might want to use this controller can vary, also the choice of the control surfaces with it will. However in our case, we will be interested in the selection of controls shown in the screenshot. You can use the free trial version of Traktor DJ for this, which will only limit you to 30 minutes of use per session, as I have for the following demo. To set up the controls on your machine open the Controller Manager section set up the controls so that you end up with a setup similar to the following screenshot. The guide to setting up the controls can be found HERE.
Once both apps are deployed, and the mobile device connected as MIDI to a computer running MIDI software, we can start the apps, let them discover themselves and start having some fun!
What’s nextThis rudimentary solution was a lot of fun to put together and although my slightly more advanced MIDI mixer I had purchased about 10 years ago had set me back £80, the overall cost of this project was about half that. However, I believe that you can’t put a value on the knowledge and fun gathered building it and that’s what I find most exhilarating about Android Things — ability to prototype real life solutions that combine software and hardware.
Secondly, I don’t think that I am done with the project. First of all, it’s clear to see I haven’t chosen the best enclosure, which has limited my ability to add buttons to it, instead having to opt to using an additional breadboard. I would like to fix this with a custom made enclosure with better access to the cables. Lastly, the RPi has twin SPI Chip Select pins — BCM8, which we’ve used here, and BCM7 which should allow us to add another MCP3008 ADC for extra 8 analog channels. A better enclosure should allow me add another row of pots and a crossfader, which could be mapped to any additional controls in the software. These additions will probably not call for another blog as it should be clear how to go from what I have already written. Either way, I hope you enjoyed reading about this project and if you have build it as well, do let me know.
The source code for this project is available on Github


_3u05Tpwasz.png?auto=compress%2Cformat&w=40&h=40&fit=fillmax&bg=fff&dpr=2)
Comments
Please log in or sign up to comment.