


Hardware components | ||||||
 |
| × | 1 | |||
| × | 1 | ||||
This hack focuses on the GPS board of the 3DR Solo drone. There has been written plenty of stuff about Solo’s GPS over the past 12 months since its market introduction. This article takes an attempt to distinguish between facts and fiction, and provides a guide on how to improve the reception with your existing GPS board, and how you can boost GPS reception further by using multiband GPS receivers, such as the UBLOX m8n inside Solo.
A word of caution before you proceed: modding the GPS touches one of the core elements of your flight system. All modifications require a great portion of care and good RC building skills are mandatory. And not to forget - warranty will be voided with this hack.
We did not have access yet to the sporadically distributed "Rev B" GPS module from 3DR, so all mentions refer to the "Rev A" GPS board.
Prerequisites:
- You know how to assemble and disassemble the GPS board – see the Solo teardown hack on Hackster.
- You know how to analyze 3DR Solo dataflash logs in MissionPlanner.
- You are familiar with the UBLOX u-center monitoring software.
- Your Solo is running FW 2.4 or higher.
3DR Solo uses a UBLOX Neo m7n GPS receiver. The module provides GPS only reception which is fully sufficient in all areas around the world. However, some pilots reported long satellite acquisition times to get a fix even in non-obscured locations. Typically, this should take no longer than 30 sec to a minute in a “known” area where you have been flying before, and no longer than a couple of minutes if you are going to fly at a new location.
Main reason for such long wait times is an improper shielding of the GPS unit inside Solo. Problem is the copper foil used to protect the GPS board. It can interfere and create shortcuts with the electronic components on the board if not applied properly.
Improve Shielding
Resolution is to add some insulation material between the board and the copper foil – the famous “cardboard-mod” as you can read about on many internet posts tried to fix this issue. However, instead of cardboard material, which can soak moisture and even worsen the situation, the better solution is to insulate the board with a plastic shield. You can buy such insulating plates from e.g. impconcepts.com or cut them yourself. Easiest option is to go for the new Rev 2 3DR GPS shield which is sold in the 3DR store.
You may also create your own shield from copper foil. Such foil can be purchased in your local hobby store for a few cents. Use the drawing attached in the CAD file section below to cut the copper accordingly. Apply adhesive tape on both sides to insulate thoroughly from electric shortcuts. An additional measure is to ground the foil by soldering a cable between the shield and GND.
Minimize vibrations
An unusual high level of vibrations can cause a loss of GPS lock. The UBLOX GPS is specified to operate at accelerations up to 4G. In case you are using unbalanced props or defective motors, the dynamic accelerations resulting from this can exceed this threshold, causing a subsequent malfunction of the GPS.
In order to verify the vibration levels of your Solo, you can analyze the dataflash log. Therefore, go for a normal flight with Solo and cruise around in either Stabilize, FLY Manual, or FLY mode. Then SSH into Solo and copy the latest dataflash log from the /logs/dataflash directory onto your computer. Open the log in MissionPlanner and select the “Vibrations 3.3” predefined chart.
Max peak values must be lower than 60m/sec2, and should be ideally lower than 30 m/sec2. The VIBE.Clip0-2 parameters count every exceed of the thresholds and should ideally be close to zero and not exceed 100 over the course of a full battery.
Alternatively, you can measure those values also in flight using the vibe viewer in Tower.
With all those measures described, you should be perfectly fine with the stock Rev A GPS of Solo. And you have done everything right to upgrade your GPS board as the next step.
Taking it to the next level with more satellite supportSolo today is one of the very few state-of-the-art drones on the market which relies on GPS only. Many other brands are offering the Russian Glonass, Chinese Beidou, and/or as of recently, the European Galileo satellite systems in addition.
Benefit is that you have more satellites in access, allowing you to get a better and faster fix in situations where not enough GPS satellites are at reach or are hidden by buildings, trees and other obstacles. Beidou for example allows better support in the greater China region, Glonass complements GPS especially in the northern hemisphere.
Due to the close proximity of the GPS board to the battery power lines, there is however a higher potential EMI noise level inside 3DR Solo compared to other drones, which may be an additional challenge for multiband receivers. However, all our experiments and tests have shown that this can be well mitigated by the shielding actions described above in the first chapter.
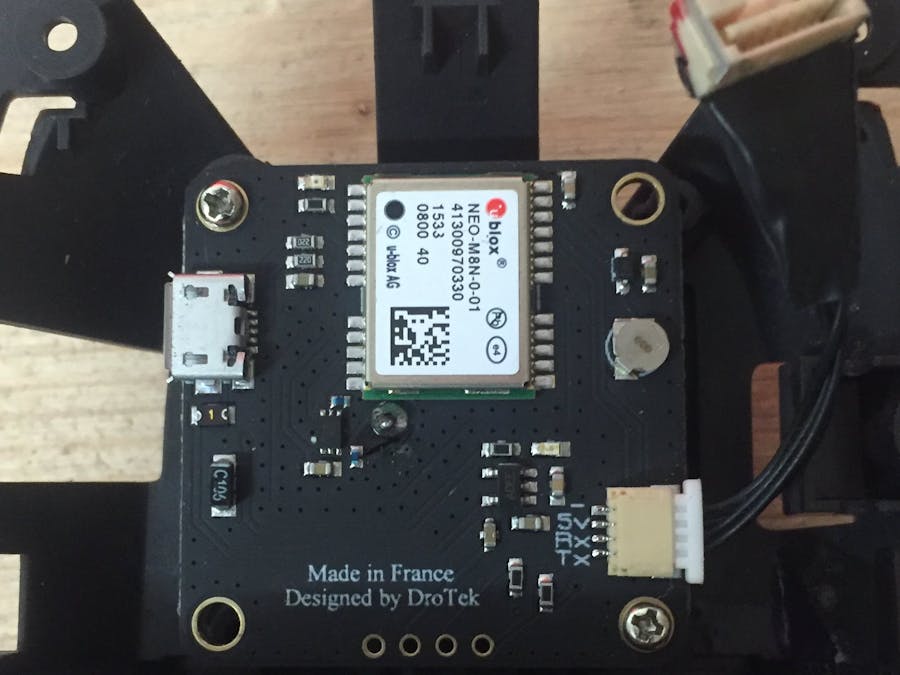
Also, the board needs to be equipped with high quality antenna and filtering mechanisms. Especially low cost m8n boards may compromise here. Therefore, go only for high end gear, such as e.g. the Drotek GPS boards. Since Solo uses a separate compass, you may go with a GPS only unit, such as the 36x36mm UBLOX NEO-M8N GPS module which fits well inside Solo.
First before we build the new GPS into Solo, we need to configure it properly. The configuration of the GPS unit is done with the U-Center software from UBLOX. Install the U-Center on your computer and connect the board via USB. We recommend to first update the UBLOX firmware to the 3.01 version which added Galileo support in January 2016. Now set the following parameters and store them permanently on the GPS chip (see U-Center manual on how to do this)
- PRT: Baud Rate 38400
- RATE: Measurement period 200 msec (5 Hz)
- GNSS: enable Galileo by checking the box.
- NAV5: Dynamic Model Airborne <4G; Fix Mode 3 – Auto 2D/3D
All other parameters are kept default.
Note: Do not use the m8n parameter file published on the Arducopter wiki page – its outdated.
Assembly of the unit
You need to adjust the mounting holes a bit to fit the unit in.
To connect, best is to solder a Molex 1.25mm Pitch CLIK-Mate™ Part No: 502386-0670 onto the wiring of the GPS module. Then you do not need to cut the original GPS cable and you have a plug&play solution. Note: never remove the ferrite ring!
Wiring:UBLOX GPS side - Solo cable:
- GND - black cable
- Vcc - red cable
- Rx - brown cable
- Tx - yellow cable
After assembling the new unit, ensure the shielding measures described in the first chapter are all in place.
Test the GPS
There is a powerful method to verify the operation of the GPS remotely by connecting the UBLOX U-Center with Solo via Solo WiFi.
Therefore, boot Solo and controller. Then launch Mission Planner on your PC and connect to Solo network using UDP. Press CRTL-F to open the advanced options menu and select the MAV Serial Pass option. With that we establish a Mavlink pass through communication channel to Solo.
Then open u-center and set up a TCP network connection in the Receiver menu by adding: tcp://localhost:500. Now U-Center is connected to Solo GPS and we can review the actual settings and GPS performance. Put Solo in an open environment and watch how the GPS is acquiring a fix and how the accuracy improves with the increasing number of satellites connected.
The following picture shows the horizontal deviation over time as well as the satellite view. There are many, many more options to examine, please see the manual of u-center for details.
Bottom line: Our experience has been extremely positive over the past 6 months since we performed the described changes of the stock GPS. Very short times to get a reliable fix in “difficult” environments, where the stock 3DR Solo GPS would have struggled, very robust flight performance even between houses and trees, and no loss of GPS signal in many hours of flight.


Comments
Please log in or sign up to comment.