

Hardware components | ||||||
 |
| × | 1 | |||
Software apps and online services | ||||||
| ||||||
This is a BreakoutBros.com tutorial. See the full post here and check back for more.
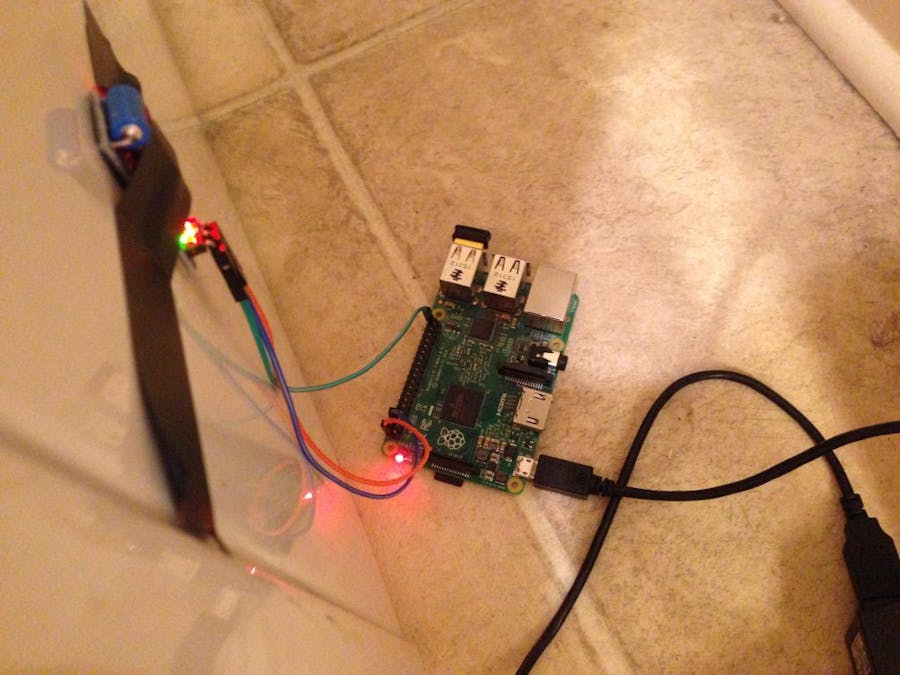
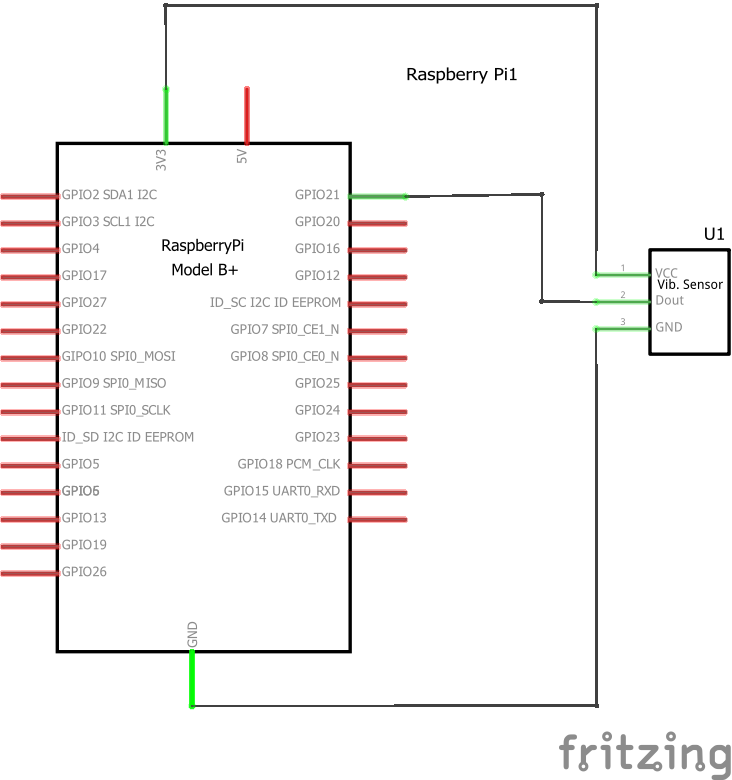
In my last post I put together a Raspberry Pi project that would display whether a dryer is running on a webpage hosted on the Pi. If you haven’t read that article yet you can check it out here. If you haven’t read the article yet the gist of it is that it used a vibration sensor to tell whether a clothes dryer was running and to display the status on a website hosted on the Pi.
That was nice but it had some disadvantages, mainly that you could only check on your dryer while on your home network and that you had to keep refreshing the page to update the status. Some people in the comments and on Reddit suggested using a notification service that would send updates to your phone, tablet or PC no matter where you are. I hadn’t heard of that before but I liked the idea and that will be today’s topic.
There are a few different services like this you can use, but I settled on Pushover for this tutorial. The main reason I chose them was the pricing structure (7 day free trial and then $5 per device type) and the handy examples on their website.
FirstThe first thing you will want to do to start sending notifications is to go to Pushover’s website and register an account. When you make an account they give you a user key, make a note of that because you will need it later. Then go install the Pushover app on whichever device you want to get notifications on. You will need to name each device you use so make sure to pick something descriptive if you have more than one device. I’m using my iPhone so I called it samios.
For each application you create to send notifications you will need another key (in addition to your user key) called an API Token, so on your user page click Register an Application, fill in in a name, type and (if you want) upload an icon before clicking Create Application. I called mine DryerMon and uploaded the BreakoutBros logo as an icon.
The application you created should now appear in your list of applications and you can click on it to get your API Token.
Now that that’s taken care of let’s boot up the Raspberry Pi and see what it takes to actually start sending notifications. If you remember from last time, we detect whether the dryer is running or not using a vibration sensor. The Pi polls the vibration sensor over a period of time and if it detects vibrations it assumes the dryer is running, otherwise it knows it is turned off. All of that logic is going to stay pretty much the same. The biggest addition is the code to tell Pushover to send a notification to your phone. You do this using an HTTP Post request. You are probably somewhat familiar with HTTP because you type those letters in front of a web address in your browser. This is simply requesting that the server sends you a resource (such as an HTML file) for your browser to display. To send a notification you do something similar but instead of requesting a webpage from a server we are going to be sending data from our Pi to Pushover’s server, and in HTTP land you can send data using a Post request.
We can wrap the code for this in a simple Python class.
Note: Note that I am using Python 2.7, check what Pushover has to say if you are using Python 3. If you are running Raspbian (most of you) then it should be using 2.7 by default so don’t worry about it.
import httplib
import urllib
class PushoverSender:
    def __init__(self, user_key, api_key):
        self.user_key = user_key
        self.api_key = api_key

    def send_notification(self, text):
        conn = httplib.HTTPSConnection("api.pushover.net:443")
        post_data = {'user': self.user_key, 'token': self.api_key, 'message': text}
        conn.request("POST", "/1/messages.json",
                     urllib.urlencode(post_data), {"Content-type": "application/x-www-form-urlencoded"})
        # print(conn.getresponse().read())
This looks a little funny but basically all it does is send an HTTP Post request that includes 3 data fields: your user key, API Token and a message. Remember that you saw your user key when you created your Pushover account and your API token when you created the app. You can pass them in as a regular Python string when you create the class and use the send_notification method to send a new notification using any text you want. If your notification isn’t getting through then try uncommenting the print statement at the bottom and it will print out the response to your HTTP request. When I was debugging this I was sending in the wrong key and the error message here was helpful.
I also created a DryerMonitor class to handle just about everything else. It will monitor the vibration sensor and use the PushoverSender class above to send notifications when the dryer starts or stops. It’s very similar to the code from the first dryer monitor project and it’s a little long so I won’t paste in the whole thing, but I do want to mention a few things.
class DryerMonitor:
    poll_duration_secs = 30
    poll_hz = 60

    def __init__(self, gpio_bcm, pushover_sender):
        self.gpio = gpio_bcm
        self.pushover_sender = pushover_sender
        self.status = None

    def __enter__(self):
        self.push_startup_notification()
        self.init_gpio()
        return self

    def __exit__(self, exc_type, exc_val, exc_tb):
        self.push_close_notification()
        self.cleanup_gpio()

    ######################################
    # See Github link for rest of code
    ######################################
I wanted this monitor to send a notification when the script started or stopped, even if it stopped because it was killed from the command line or hit an exception and crashed. The __enter__() and __exit__() functions here are what take care of that. We are going to use this class in a with statement, so that the __enter__ function is called when we go in to the with statement and the __exit__ function is called when we leave it.
 with DryerMonitor(21, pushover_sender) as dm:
        dm.update_dryer_status()
        while True:
            dm.update_dryer_status()
If you aren’t familiar with, uh, with, this page has a good explanation. Notice how in the __enter__ method it sends out a notification telling us the script has started and the __exit__ method tells us it quit, that way we won’t be waiting for a notification that our clothes are dry when our monitor script crashed 6 hours ago.
The other thing to notice is that we are passing in an instance of the PushoverSender class in the DryerMonitor constructor. So our Pushover notification functionality is wrapped up in that class and all DryerMonitor has to do is to call the send_notification method.
LastlyFinally one last thing to note when you look at the code on Github is that I’m going to paste my user key and API token into separate files and then not check those files into Git. The user key goes into user.key and the API token goes into apitoken.key, when you get your own keys create those files in the same directory as the Python script. If you clone the code from Git it won’t work until you create those two files.
And that’s pretty much it. Grab the code from Github and run it on your Pi. Now you will get notifications when your dryer starts and stops on your phone no matter where you are. The screenshot below shows some typical behavior.
This was pretty simple example but by combining different sensors I think you could come up with some pretty cool smart home projects and with a service like Pushover it’s easy to monitor it using your phone or other devices. I can’t remember the exact number but I believe you a few thousand free notifications per month when you buy the app so that should be plenty for most projects. If you know of another notification that you like better or want us to take a look at, let us know in the comments.
The full code is on our Github page, it’s the same repository as last time but I put it under the use-pushover branch. I included the parts list, no new hardware today so nothing has changed there. You can also find the wiring diagram in the previous article. As always feel free to leave a comment or question at the bottom of the article if anything comes to mind. Hope you enjoyed! Be sure to subscribe to our email list so you don’t miss future tutorials and reviews!
Parts list:KOOKYE Raspberry Pi IoT Starter Kit Internet of Things for Raspberry Pi


Comments
Please log in or sign up to comment.