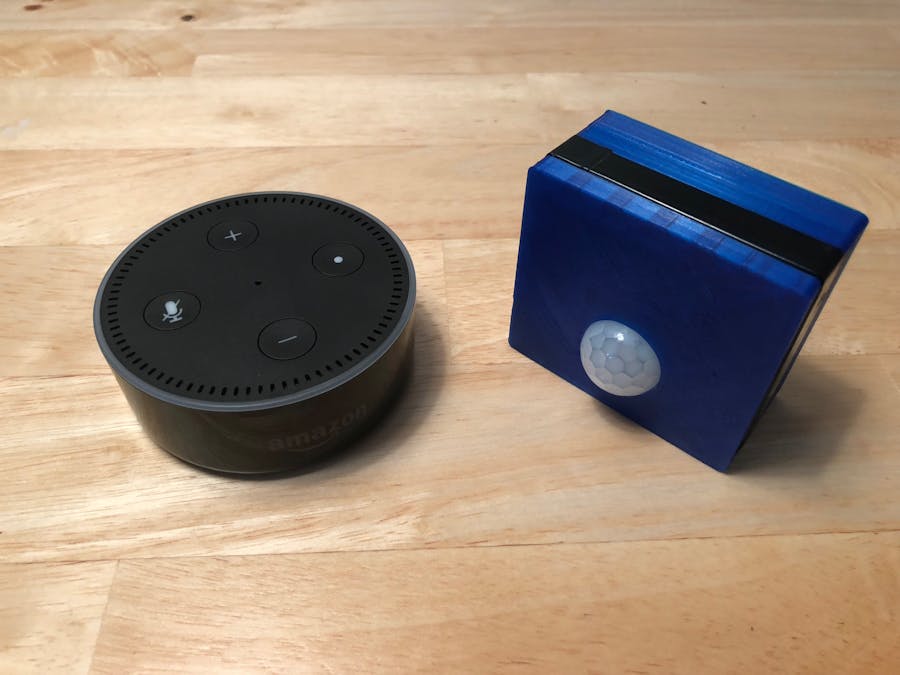
Amazon Alexa and Arduino have been forces to be reckoned with in their respective industries. With the prospects and realization of smart homes coming to fruition, the combination of these two companies in one project creates an exciting dynamic for innovation. One area that can be improved with these technologies is home security.
Description
This project is intended to develop the connection between Arduino and Amazon Alexa’s interaction for smart home security. Many indoor or outdoor spaces can be monitored and protected by simply saying, “Alexa ask Sentinel to arm my security.” Upon receiving the command, the software activates each individual Arduino sensor module. When the Arduino sensor module is powered on, it monitors the environment. Disturbances picked up by each PIR sensor are sent to the Raspberry Pi base station, which uploads them to a database with a unique identifier for each module. When asking Sentinel what happened, Alexa will access the Firebase to recount up to five events that day and their locations. Note: The code can be altered to hear more than that if desired.
Use
An Alexa skill on and Amazon Echo device will work in tandem with Arduino sensor modules, and Raspberry Pi base station in order to create a network of security sensors for both inside and outside your house.
- The Alexa skill acts as the mediator between you and your Sentinel security system. It can arm, disarm, and recount the disturbances stored in the Firebase.
- The sensors consist of an Arduino Nano R3, PIR motion sensor, NRF24L01 radio module, and four AA batteries in a holder. Multiple sensors can be named and used in different locations, both indoor and outdoor to create a network of sensing capabilities for a smart home. Each PIR sensor has a range of 10ft of monitoring space and can be located 20ft from the base station.
- The Raspberry Pi base station compiles the sensor outputs when disturbances occurs and uploads them to the Firebase database from which the Alexa skill can retrieve information.
Sentinel security, will allow users to monitor their smart home through the combination of these innovative technologies.
The ProjectSetup the Hardware
Arduino Sensor Modules
- Step 1: Obtain all of the hardware components listed above.
- Step 2: Use a 3D printer to manufacture the SensorBase.stl and SensorBack.stl files. Note: A strip of electrical tape on edge is not necessary but makes a nice seal for weatherproofing.
- Step 3: Place all of the components in the module as shown.
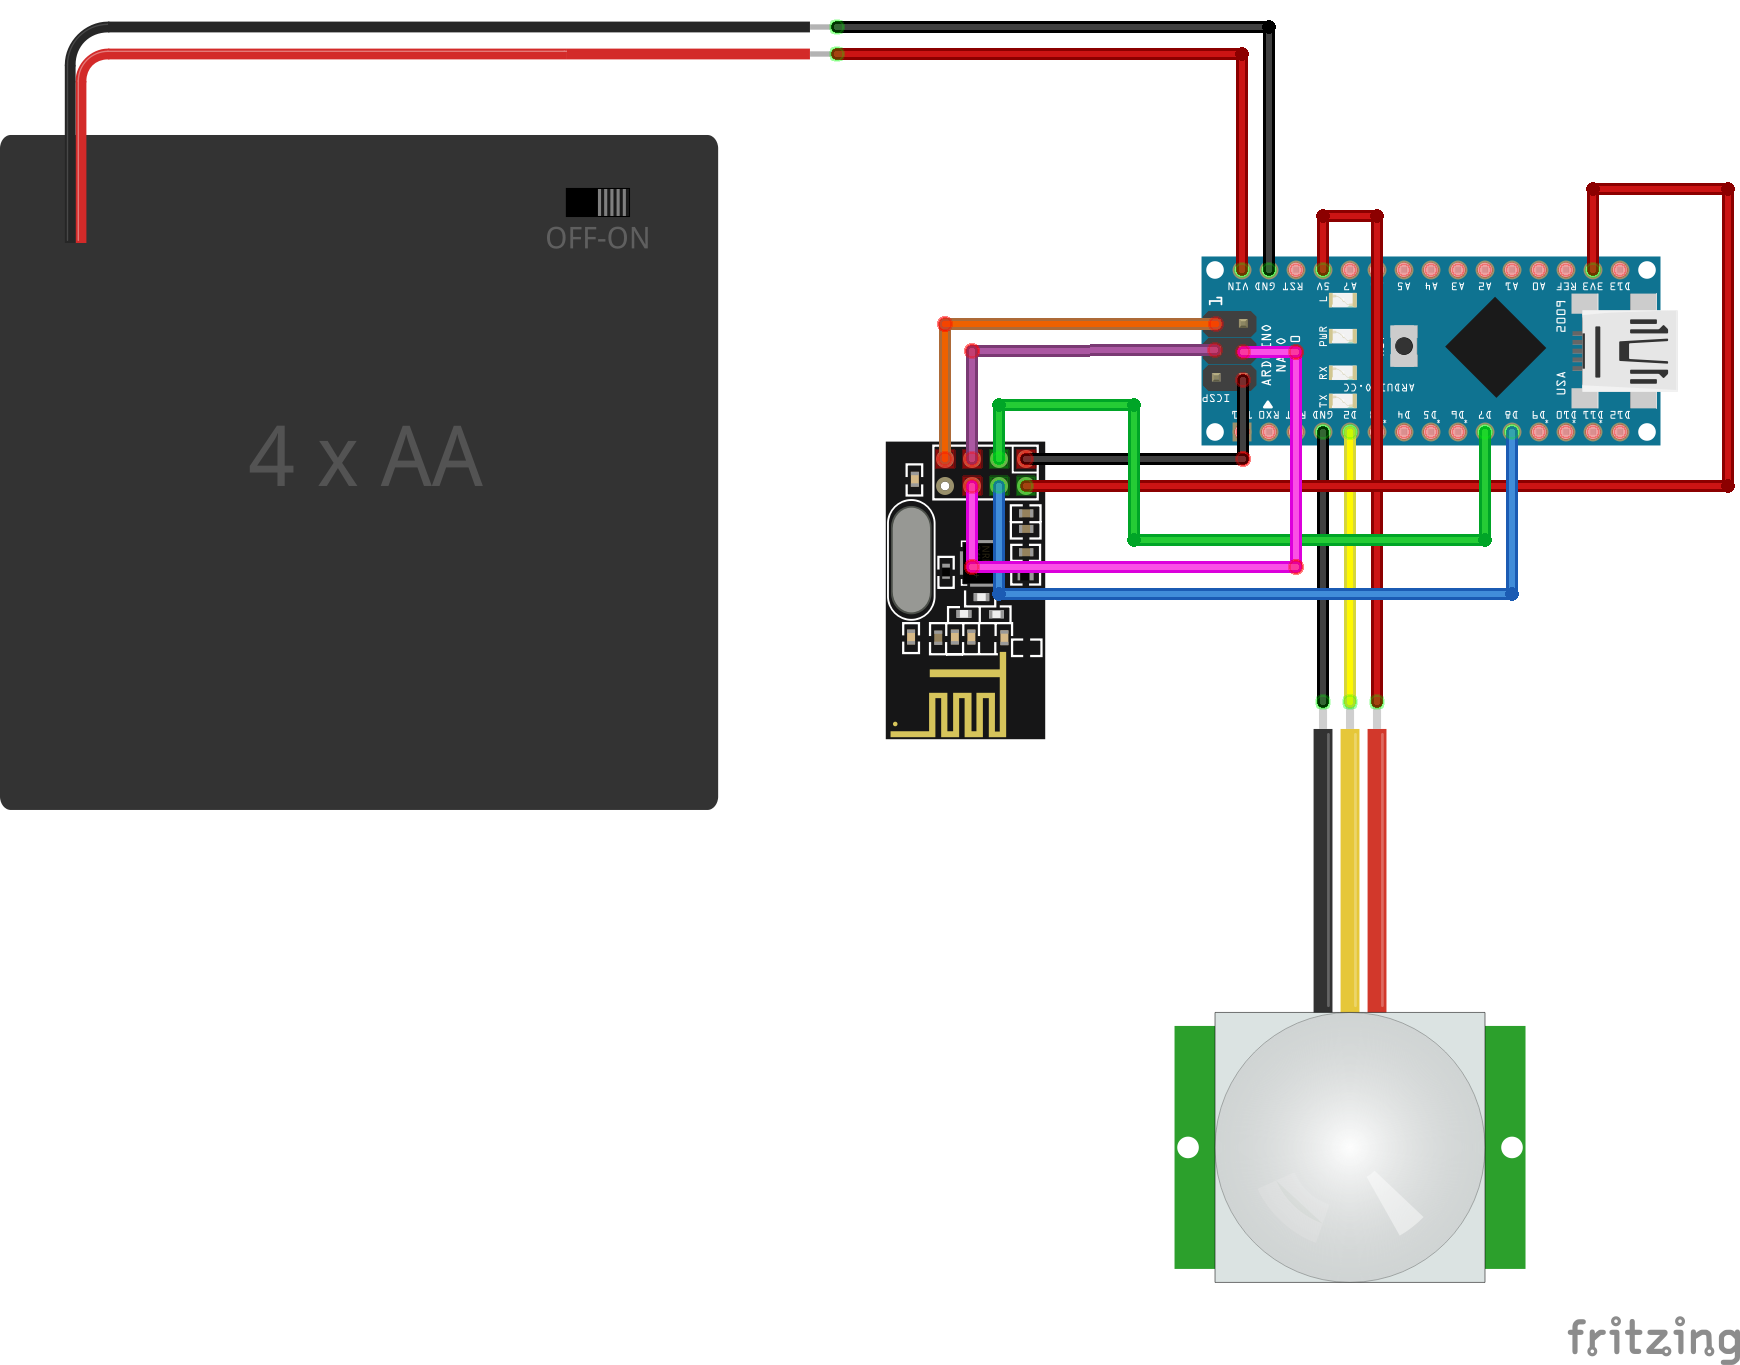
- Step 4: Use a soldering iron to wire the sensor module according to the Fritzing diagram and pictures below.
- Step 5: Repeat Step 2 - Step 4 for as many sensor modules as you wish. Note: The code will allow for up to 256 sensors.
- Step 6: For each sensor choose a new sensor ID starting with "0" on line 17 on sensor.ino.
- Step 7: Upload the modified sensor.ino to each Arduino Nano R3.
Raspberry Pi Base Station
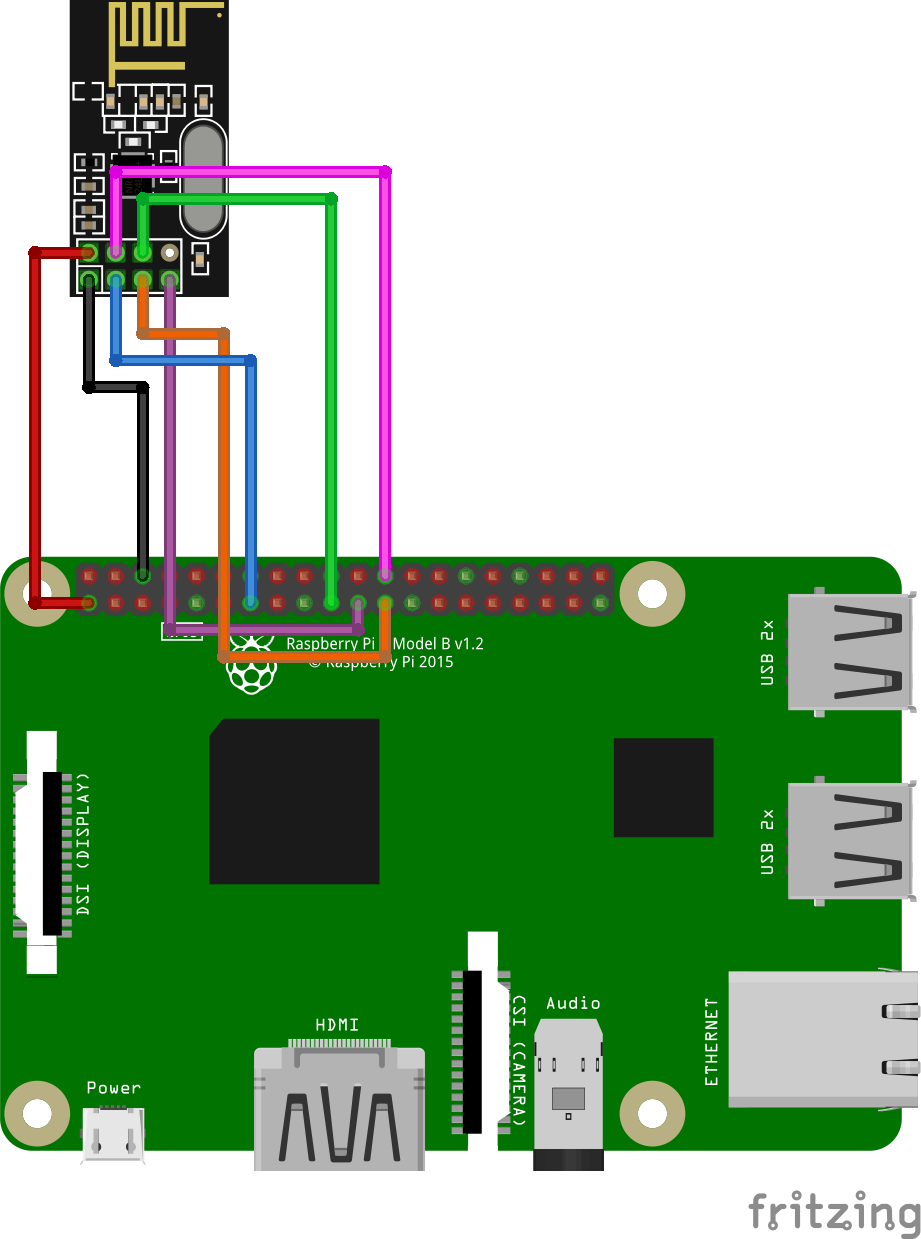
- Step 1: Use the Fritzing diagram to wire the Raspberry Pi with the NRF24L01 radio module.
- Step 2: On the Raspberry Pi, download the Github repository and install the necessary resources for this project.
git clone https://github.com/jonmendenhall/alexaHomeSecurity.git
cd alexaHomeSecurity
./setup-pi
- Step 3: Modify lines 19-22 in the base.py file to match your Google Firebase Project ID and API key. Note: Firebase will be explained in the following section.
- Step 4: Run the command below, and make sure your Raspberry Pi is set to Console Autologin under Boot Options, then Desktop / CLI.
sudo raspi-config
- Step 5: Run the command below to edit the startup configuration file.
sudo nano /etc/profile
- Step 6: Add the following line to the end of this file, then press CTRL+X, then Y, then ENTER to save the file.
python3 alexaHomeSecurity/base.py
Setting Up the Software
Google Firebase
Google Firebase is used in this project as the database to which the Amazon Alexa Skill obtains the data.
- Step 1: Click here and select "Go to Console."
- Step 2: Click "Add Project." It will prompt you to fill in your project name and country/region. Once the information is filled in, press "Create Project."
- Step 3: Click "Add Firebase to your web app." Copy the apiKey, authDomain, databaseURL, and storageBucket onto a text editor like MS Word or Pages. Note: This confiuragtion data will be used for connecting the Raspberry Pi to Firebase.
- Step 4: Click "Database" in the left-side navigation bar. Then press "Get Started."
- Step 5: Click the "Rules" tab. Copy the code below into the online editor, replacing what was already there. This is necessary to change the security settings, allowing the project to access the database.
{
    "rules": {
        ".read": "auth
        ".write": "auth == null"
    }
}
- Step 6: Now open the file lambda/index.js from the downloaded Github repository, and modify line 8 to match your Firebase project name as seen below.
firebase.host = "PROJECTNAMEHERE.firebaseio.com"
Package the Alexa Skill Code
- Step 1: In your computer terminal, navigate to the downloaded Github repository then execute the setup-aws file. This will generate the zip file to be uploaded to your AWS Lambda Function.
Setup the Amazon Alexa Skill and AWS Lambda Function
The Alexa Skill allows the player to play battleship through an Amazon Echo device. AWS Lambda is used to store the Alexa Skill code.
- Step 1: Click here and sign into the Amazon developer console or create an account.
- Step 2: Click "Your Alexa Dashboard," and then select "Get Started" under Alexa Skills Kit.
- Step 3: Click "Add New Skill," and fill in the required skill information. Click "Save" then "Next."
- Step 4: Copy the contents of intentSchema.json from the downloaded Github repository into the Intent Schema field on the AWS developer console.
- Step 5: Copy the contents of sampleUtterances.txt into the Sample Utterances field on the AWS developer console. Click "Save" then "Next."
- Step 6: Go back to the AWS console and click "Lambda."
- Step 7: Create a function and fill in the name. Make sure the Runtime is "Node.js 6.10." For "Role." Select "Create a custom role," and leave the default information in the fields. Press "Allow."
- Step 8: Now change "Role" to "Choose an existing role." Select the role that you just created. Click "Create Function."
- Step 9: Select "Alexa Skills Kit" from the list of triggers. Scroll down to select "Disable" skill ID verification, and then click "Add" and "Save."
- Step 10: Click the Lambda function at the top of the tree in the Designer. Change the code entry type to "Upload a .ZIP file." Then upload the generated lambda.zip file, and press "Save."
- Step 11: Copy the ARN string at the top of the page, and go back to your Alexa Skill in the developer console.
- Step 12: Select AWS Lambda ARN for service endpoint type. And then, paste the ARN into the field. Click "Save" then "Next."
- Step 13: Make sure this skill is enabled for testing on your account.


_3u05Tpwasz.png?auto=compress%2Cformat&w=40&h=40&fit=fillmax&bg=fff&dpr=2)
Comments
Please log in or sign up to comment.