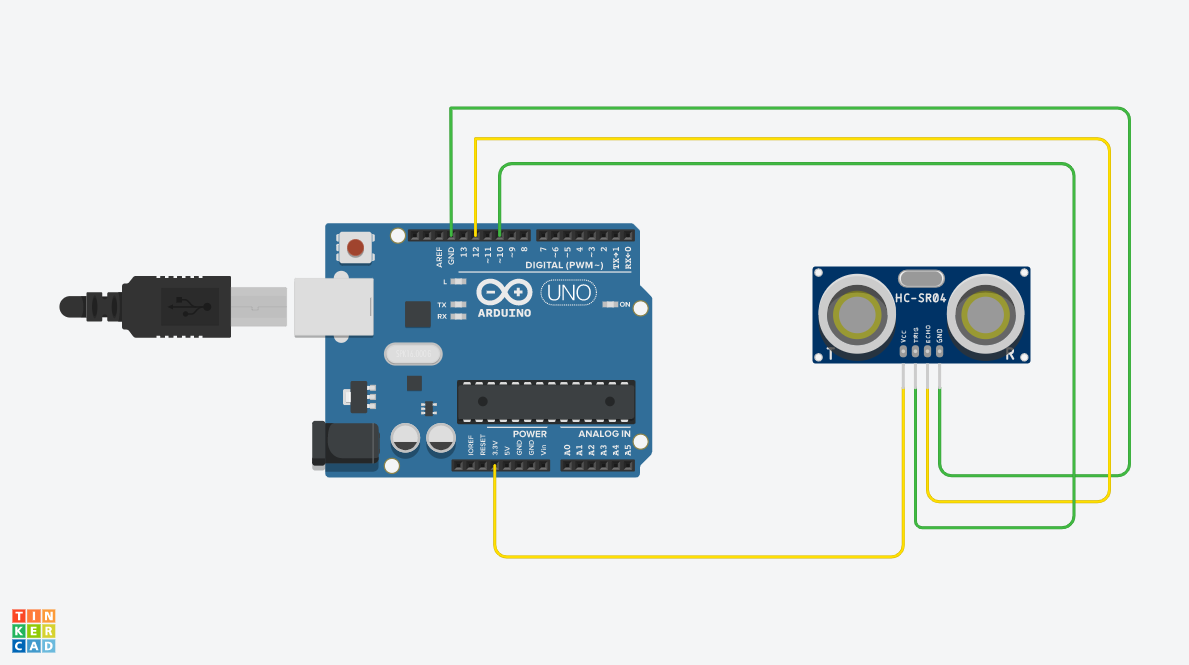
In this tutorial we are going to learn how to interface ultrasonic sensor with Arduino Uno.
Ultrasonic sensor : This sensor measures the distance of a target object by emitting ultrasonic sound waves, and converts the reflected sound into an electrical signal. Ultrasonic waves travel faster than audible sound (ultrasonic is the sound that humans cannot hear). Ultrasonic sensing is one of the best ways to sense proximity of obstacle and detect levels of substance or liquid with high reliability. An ultrasonic sensor module uses a transducer to send and receive ultrasonic pulses. The working principle of this module is simple. It sends an ultrasonic pulse out of trigger pin at 40kHz which travels through the air and if there is an obstacle or object, it will bounce back to the sensor at echo pin. By calculating the time travelled by wave and the speed of sound, the distance of the object is calculated.
Ultrasonic sensor module has four pins namely Gnd, Vcc, Echo and Trigger. Gnd is considered as the negative pin and it is connected to the ground of the system. Vcc powers the sensor. It typically requires 3.3V. Trig (Trigger) pin is used to trigger the ultrasonic sound pulses. Echo pin produces a pulse when the reflected signal is received.
Arduino Uno is the brain of this system. It is microcontroller board based on the microcontroller ATmega328P. Arduino is capable of reading inputs, processing them and generating outputs. It has 14 digital input/output pins(of which 6 can be used as PWM outputs), 6 analog inputs, a USB connection, a power jack, an ICSP header and a reset button.
Now as we know about ultrasonic sensor we can start building up our circuit. Connections are as follows : Gnd to Gnd of Arduino Echo to D12 of Arduino Trig to D10 of Arduino Vcc to 3.3v of Arduino
Circuit diagram made using software named 'Tinkercad' is uploaded in zip file in the hardware section. Here is the code for the project :
 // Interfacing Ultrasonic sensor with Arduino uno
#define echoPin 12 //connect echo pin of ultrasonic sensor to D12 of Arduino
#define trigPin 10 //connect trigger pin of ultrasonic sensor to D10 of Arduino
long duration;  // declare variables to hold duration and distance
int distance;
void setup() //setup() is used for initialization
{
 Serial.begin(9600);  //set the baud rate of serial communication to 9600
 pinMode(trigPin,OUTPUT); //set trigPin as output pin of Arduino
 pinMode(echoPin,INPUT);  //set echoPin as output pin of Arduino
}
void loop(){
 digitalWrite(trigPin,LOW); //generate square wave at trigger pin
 delayMicroseconds(2);
 digitalWrite(trigPin,HIGH);
 delayMicroseconds(10);
 digitalWrite(trigPin,LOW);
 duration=pulseIn(echoPin,HIGH);//calculation of distance of obstacle
 distance=(duration*0.034/2);
 Serial.print("Distance : ");
 Serial.print(distance);
 Serial.println(" cm ");
 delay(1000);
}
After uploading the code check the right corner of the software you will find a magnifying glass icon and. Click on that option and you will get the values of ultrasonic sensor. Eg : Distance : 3 cm that means the object is 3 cm away from the sensor. This is called a serial monitor mainly used to display the values of sensors.


_ztBMuBhMHo.jpg?auto=compress%2Cformat&w=48&h=48&fit=fill&bg=ffffff)


_I7aeCDfrDz.jpg)


Comments
Please log in or sign up to comment.