InqSpeedRacer is a web-based electronic speed-trap for HotWheels®. The project was created for an 8th Grade Science class studying Physics of Motion topics. It is also a demonstrator of creating an InqPortal server that not only serves multiple clients, but the clients can connect to multiple servers. This can be easily used as a template for Home Automation. Creating multiple kinds of InqPortal "servers" that use sensors, relays and/or actuators to sense and control the environment. A client dashboard can be created to connect to all servers and monitor and control all servers. The client being a browser based application can then run on Windows, Chromebook, Android, Linux and Apple device.
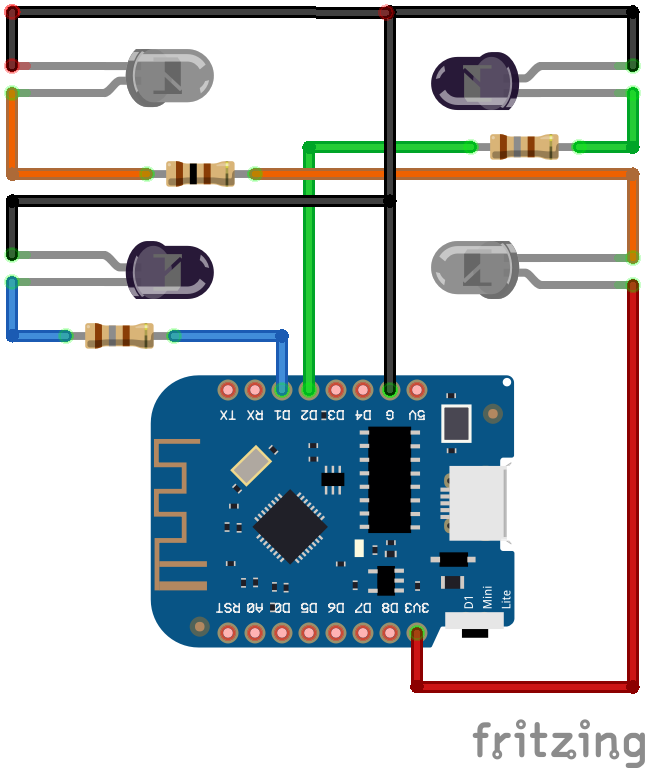
Hardware Module DesignThis was a relatively quick burn project. We wanted to make six for the students and we wanted to keep one on hand for posterity… well truth be told… in case we had to support fixing a bug. We had to order parts. As electronics are not one of our natural fortes, it took all of about thirty minutes of searching with the phrase of “Arduino photo diode” to come up with a viable circuit. Thirty minutes later we had a enough parts ordered for ten ESP8266 WeMos boards, resistors infrared LEDs and infrared photo diodes. The last I wasn’t certain about as many posts swore they were photo transistors and the other half said diodes. I decided to keep my dog for another fight. All I know is they’re the same size as the LED’s (5mm) and they’ve got two wires and the circuit shows working with two wires. We try to keep the KISS principal in-mind on the hardware side. They showed up about three days later and we had it bread-boarded and the prototype software running in about thirty more minutes. Here are the parts we used per unit.
- 1 WeMos ESP8266 D1 Mini – I prefer these for size and bullet proof USB and 3.3v regulators included. They can be powered by even the oldest and cheapest USB micro AC adapters. Even 250 mW is plenty of power. Actually, if we had to purchase an AC adapter, it would have cost more than the entire rest of the InqSpeedRacer.
- 2 Infrared LEDs – I think I burned a few of these up getting the right current limiting resistor as there was no info included or offered by the seller.
- 2 Infrared Photo Diodes – Ditto burn
- 3 Resistors – (1) 100 Ω and (2) 180 Ω
Total outlay – less than $4 per InqSpeedRacerServer.
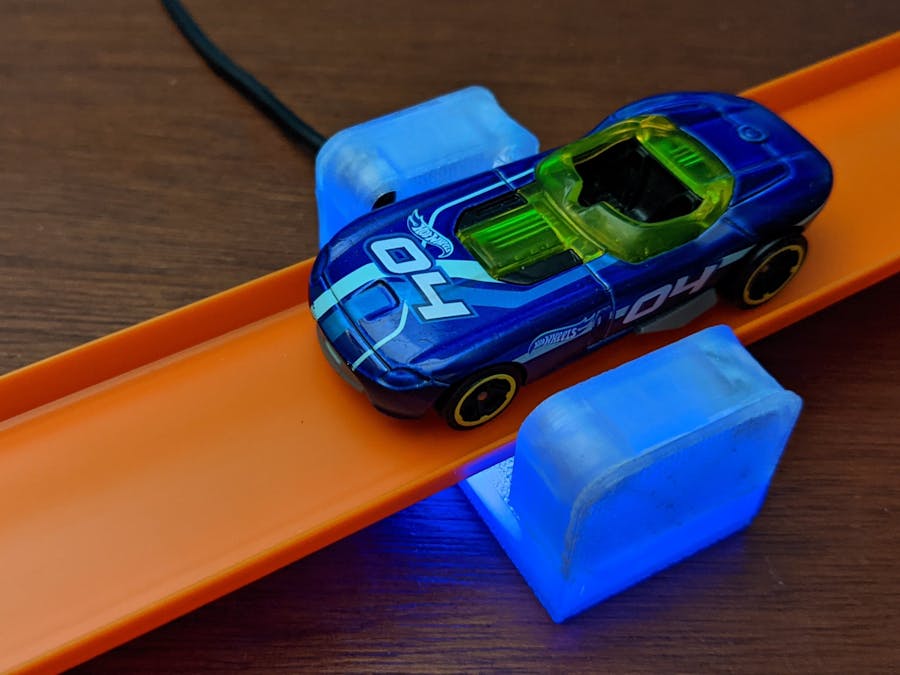
The prototype was done in clear ABS, but it tends to print translucent instead and you can’t really see the parts inside. BUT it made for a stunning picture with the built-in blue LED flashing inside! Other design features include
- Low profile
- Has bracket to slide into the bottom of the tracks to keep it from getting knocked.
- Light weight (< 19 grams) – Light enough that even on an unsupported down-hill, it can be attached and won’t significantly cause a change in track curvature.
The server-side software uses the InqPortal library that can be easily found in the Arduino IDE Library Manager. This server was designed so the developer doesn't have to mess with any WiFi, WebServer logic. They can focus on the job at hand - A speed trap. Here are some of the details about the server.
- The line count of the fully commented, fully WiFi web based server Sketch is only 140 lines. Only ten lines of that have anything to do with the Web Server. The rest is to monitor the phototransistors, performing the timing calculations and comments.
- After a car passes and the speed is reported out to the clients, it automatically resets and is ready for the next car passing.
- Unlike the other InqPortal examples, this one actually does something in the loop() method. It takes advantage that the loop frequency when fully running is about 100kHz. I use this to check to see if the light beams are blocked for a car coming through. I originally did an Interrupt version, but the code complexity didn't really pan out to be any better. This one gives a timing resolution of 1/100, 000 of a second. This is far better than the millisecond resolution we report out to the client.
Here is the code, but save yourself the time... InqSpeedRacer is one of the Examples included once you download the InqPortal library into your Arduino IDE. It is here merely to let you get a sense of how easy it is to configure an InqPortal based project.
#include <InqPortal.h>
// Works with InqPortal v5
// Can use NULL if you want to configure via InqPortal Admin
// or hard code your router SSID and Password.
#define YOUR_SSID           NULL
#define YOUR_PW             NULL
#define DEFALUT_SSID        "InqSR"
#define VERSION             "3.0.0"
#define LED                 D4
#define PHOTO1              D1
#define PHOTO2              D2
#define LOG_LEVEL           1
#define CHK_FOR_RUN         50      // Check for a valid run (ms)
#define CHK_FOR_FAULT       1000    // Check to see if there is a fault (ms)
InqPortal svr;
// Published variables
float speed = 0;
u32 finish = 0;
// Working Variables (not published)
u32 tPhoto1Blocked, tPhoto1Unblocked, tPhoto2Blocked, tPhoto2Unblocked;
bool blockage = false; // To detect a continuous blockage and flash LED slowly.
void setup()
{
   // Set up Interval callbacks
   svr.onInterval(checkForRun, CHK_FOR_RUN);
   svr.onInterval(checkForFault, PAUSE);
   // Publish runtime and persisted variables
   svr.publishRO("V", VERSION, sizeof(VERSION), "InqSpeedRacer Version");
   svr.publishRO("S", &speed, "Speed (m/s)");
   svr.publishRO("F", &finish, "Finish (ms)");
   svr.publishRO("T", NULL, "Server time (ms)",
       []()->u32 { return millis(); });
   svr.autoSend(0);
   // Start the InqPortal server.
   svr.begin(DEFALUT_SSID, NULL, YOUR_SSID, YOUR_PW);
   pinMode(LED, OUTPUT);
   pinMode(PHOTO1, INPUT_PULLUP);
   pinMode(PHOTO2, INPUT_PULLUP);
   clear();
}
#define isBlocked(p) digitalRead(p)
#define LED_TOGGLE digitalWrite(LED, !digitalRead(LED))
#define LED_OFF digitalWrite(LED, true)
void loop()
{
   // Sensor 1
   if (!tPhoto1Blocked)
   {
       if (isBlocked(PHOTO1))
       {
           tPhoto1Blocked = micros();
           set();
       }
   }
   else if (!tPhoto1Unblocked)
   {
       if (!isBlocked(PHOTO1))
           tPhoto1Unblocked = micros();
   }
   // Sensor 2
   if (!tPhoto2Blocked)
   {
       if (isBlocked(PHOTO2))
       {
           tPhoto2Blocked = micros();
           set();
       }
   }
   else if (!tPhoto2Unblocked)
   {
       if (!isBlocked(PHOTO2))
           tPhoto2Unblocked = micros();
   }
}
void set()
{
   svr.onInterval(checkForFault, CHK_FOR_FAULT);
   blockage = true;
   if (!finish)
       finish = millis();
   LED_OFF;
}
void clear()
{
   tPhoto1Blocked  = 0;
   tPhoto1Unblocked = 0;
   tPhoto2Blocked  = 0;
   tPhoto2Unblocked = 0;
   finish = 0;
   svr.onInterval(checkForFault, PAUSE);
   blockage = false;
}
void checkForRun(void*)
{
   if (!blockage)
       LED_TOGGLE;
   if (tPhoto1Blocked && tPhoto1Unblocked &&
       tPhoto2Blocked && tPhoto2Unblocked)
   {
       // WARNING - Don't mess with this.  Needed to handle wrapping
       // of the u32 coming from the micros()!!
       s32 t = (abs((s32)(tPhoto1Blocked - tPhoto2Blocked)) +
                abs((s32)(tPhoto2Unblocked - tPhoto1Unblocked))) / 2;
       // This does the speed calculation based on the distance
       // between the two sensors of 19.7 mm and time in micro seconds.
       speed = 19700.0 / (float)t;   // m/s
       // Sends it out the the clients.
       svr.send("lflu", "S", speed, "F", finish);
       clear();
   }
}
void checkForFault(void*)
{
   // We added this in case we have false trigger.  After duration
   // of CHK_FOR_FAULT (ms), it will clear out the times.
   // This checks if its still blocked... then we know something
   // is in the way.  We blink slowly.
   blockage = isBlocked(PHOTO1) | isBlocked(PHOTO2);     // Still blocked?
   if (blockage)
       LED_TOGGLE;
   else
   {
       svr.LOG(LOG_LEVEL, "Fault detected and cleared\n");
       clear();
   }
}
The client side has two Apps (web pages) and the JavaScript coding is actually longer than the server-side coding at 105 and 240 lines respectively. The first page simply reports a running tally of all the speeds of cars going through. It shows the actual speed and the scale speed assuming the HotWheels are 1:64 scale. It also does a little Physics and estimates the original height of the dropped car using K.E. = P.E. Units can be changed from mph to kph and any scaling factor.
The second page is technically more interesting from a developers standpoint and a Home Automation standpoint. InqPortal has the ability to write a client that can talk to multiple InqPortal servers. The servers do not have to be the same project. The advantage in Home Automation is simple... you can have a single dashboard that hooks up to all of your various devices and retrieves and controls all from one client... AND since it is browser based, it runs on Windows, Android, Apple and Linux. In this example we set it up to connect to several InqSpeedRacer servers to act as a finish line... like a Pinewood Derby. The code is a little more complex, not because of the multi-server access, but because the client has to normalized all the server clocks so that it can compare times when cars cross the individual servers "finish lines".
... building your own InqSpeedRacer, you first need to download the InqPortal library inside your Arduino IDE Library Manager. It will have a full copy of all necessary server and client side files in the Examples. For more details about the project head to InqSpeedRacer. For more details about the InqPortal library you can check-out my other Project Hub project Make a WebServer with 3 Lines of Code! The full cross-reference manuals and tutorials can be found at InqOnThat.com/InqPortal/


Comments
Please log in or sign up to comment.