
Hardware components | ||||||
_ztBMuBhMHo.jpg?auto=compress%2Cformat&w=48&h=48&fit=fill&bg=ffffff) |
| × | 1 | |||
 |
| × | 1 | |||
| × | 1 | ||||
| × | 1 | ||||
| × | 1 | ||||
| × | 1 | ||||
| × | 1 | ||||
| × | 1 | ||||
| × | 8 | ||||
| × | 2 | ||||
| × | 10 | ||||
| × | 2 | ||||
| × | 4 | ||||
| × | 6 | ||||
Hand tools and fabrication machines | ||||||
 |
| |||||
| ||||||
| ||||||
| ||||||
A few months ago, I shared my project about a router named Smart router with WiFi Connection Visualization, which can tell you the number of devices that are connected to your router and monitors the network speed. Luckily I've got more than 96k views and 760 Favorites on that project. I was so delighted as I regards it as a solution that can help out the people who are in the same troubles as I did.
I've thought a lot after that and came up with a new idea. I think I can go further and make it helpful to some special communities - Like my grandpa, who was once a tough guy and now suffering from AD(Alzheimer’s disease) in his old age. Often he forgets what he planed to do the next morning. Writing things on a note won't be possible as he is too old to hold a pen. But as I figured, maybe he can type, even with just one finger, he can still push the buttons and type words on the computer. So I thought, what if I integrate a printer to my Router, so he or I can write things down at a web page and let the printer print it out. In every morning he just need to look at the note and then knows about the plans he made. Also I or any other family members can leave him a note in this way any time we want. Take me for example, I would like to be able to write 'I love you, grandpa' every day in the morning so he can see my greetings miles away without getting tired with my voice (just joking).
Since I had this idea, I started to work on it.
In addition to the printer, I planned to let the router also connect to a Grove Sensor and Grove Relay. So I can control the relay and upload the sensor values to MediaTek Cloud Sandbox.
To be honest, I hope that more people will pay attention to this open source project and engage to these kind of things to help special people like my grandpa.
Well, now let’s get on the journey of making.
What Do We NeedNow, we should connect the Grove Modules to the Arduino Breakout for LinkIt Smart 7688 Duo just as the picture shows above.
Setup the Linkit Smart 7688 DuoThe software work of the router consists of 5 parts, compatible with the previous router, control the relay from Mediatek Cloud Sandbox (MCS), upload the Grove Sensors to MCS, a website to write something for printer to print out, the code on ATmega32U4.
I assume you are familiar with Linkit Smart 7688 Duo, if not, please click here to get started. Then go to the MT7688 terminal by SSH or serial.
Modify the configure file to change MT7688 into router mode.
vi /etc/config
network
Change the configure interface ‘lan’ and ‘wan’ as below shows.
config interface 'lan' option proto 'static' option netmask '255.255.255.0' option ipaddr '192.168.100.1'config interface 'wan' option ifname 'eth0' option proto 'dhcp'
We use the yunbridge
for communication between the MT7688 and the ATmega32U4 so enable the yunbridge
.
> uci set yunbridge.config.disabled='0'> uci commit
Requests is the only Non-GMO HTTP library for Python, safe for human consumption. Requests allows you to send organic, grass-fed HTTP/1.1 requests, without the need for manual labor, I use it to communicate with MCS.
I use flask web framework for this Web APP, Flask is a lightweight Python web framework based on Werkzeug, Jinja 2 and good intentions. You can click http://flask.pocoo.org/ to learn more information.
Next, install Python dependencies.
pip install requests flask Flask-WTF wtforms
MediaTek Cloud Sandbox (MCS) is a cloud based data service platform for Internet of Things devices. If you don’t have an account please click https://mcs.mediatek.com/oauth/en/signup to sign up.
MCS has already provided some useful tutorials, you can create the prototype and test device in MCS step by step following here.
Then in my project I create a new prototype for Linkit Smart 7688 named LinkitRouter, and add three data channels for this prototype they’re Button Temperature and Humidity just as picture below shows.
Now, you’ll get the Device ID, Device Key and 3 Data Channel ID, you can find the information in the test device detail page, and we will need them later.
Upload the Arduino Code1. Download demo code at https://github.com/Lee-Kevin/20.IoTRouter
2. Click “Download zip” button on right side of web page to download all the code.
3. Decompress the downloaded zip files to “C:\Users\Administrator\Documents\Arduino\” and remove “-master” in decompressed file name.
4. Launch Arduino IDE.
5. Click Sketch =>Add file to add routerBox_Arduino.ino file from “C:\Users\Administrator\Documents\Arduino\20.IoTRouter\RouterArduinoCode\routerBox_Arduino.ino”
6. Click Tools =>Board and select “Linkit Smart 7688 Duo” and chose the right port, as shown in the picture below.
7. Press CTRL +U to upload codes to your board. Wait a while, there will be saying “Done uploading”.
8. Congratulations, you have already completed the whole of the work on Arduino.
Download the code from GithubNow, we have already install the requirements, download the code from github.
cd ~ & git clone https://github.com/Lee-Kevin/20.IoTRouter
Navigate to 20.IoTRouter
and you can find there’re 3 folders, RouterArduinoCode
, RouterScript
and Drawings
. RouterArduinoCode
is the code that should be run on Arduino, RouterScript
is the Python code should to be run on Linkit Smart 7688. Now we mv
the RouterScript to /root/
.
cd 20.IoTRouter/ & mv RouterScript/ /root/
Navigate to /root/RouterScript/
and edit the UpdateSensor.py
and relay.py
using vi
editor.
cd ~ & cd /root/RouterScript/vi UpdateSensor.pyvi relay.py
Change the deviceID
, deviceKey
and dateChannelID
to your device. As shown in the following figure.
Navigate to /root/RouterScript/:
cd ~ & cd /root/RouterScript/
Then setting the startup script.
chmod +x router & mv router /etc/init.d//etc/init.d/router enable/etc/init.d/router start &
And then reboot the router.
reboot
When the router reboot done, you have done all the software work.
Hardware WorkIn this part, we need to make an box as the picture above shows, this work is by my workmate Nosk, and he is an intelligent industry designer, you can download the drawings by click here.
Then we need to cut the the board using laser cutting. I guess you don’t have a laser cutting at home, you can find some in the hacker space near from you easily. If there's no hacker space nearby, you can try the Laser Cutting Service supply by Seeed.
Here we use 4mm plywood!
Hardware Assembly- Fixed the frame by M3*10 screw and nut. (Image1,2)
- Mounting stud on PCB, then fixed it on wood. (Image 3,4)
- Fixed sensor and relay on wood by R2075 nylon rivet. (Image 5)
- Fixed the printer. (Image 6,7)
- Fixed the RGB LED by scotch tape. (Image 1)
- Fixed both side wood. (Image 2, 3)
- Lampshade made of paper, fixed it by scotch tape. (Image 4, 5)
- Fixed the outside shell by nylon rivet, don’t forgot to install button. (Image 6, 7, 8)
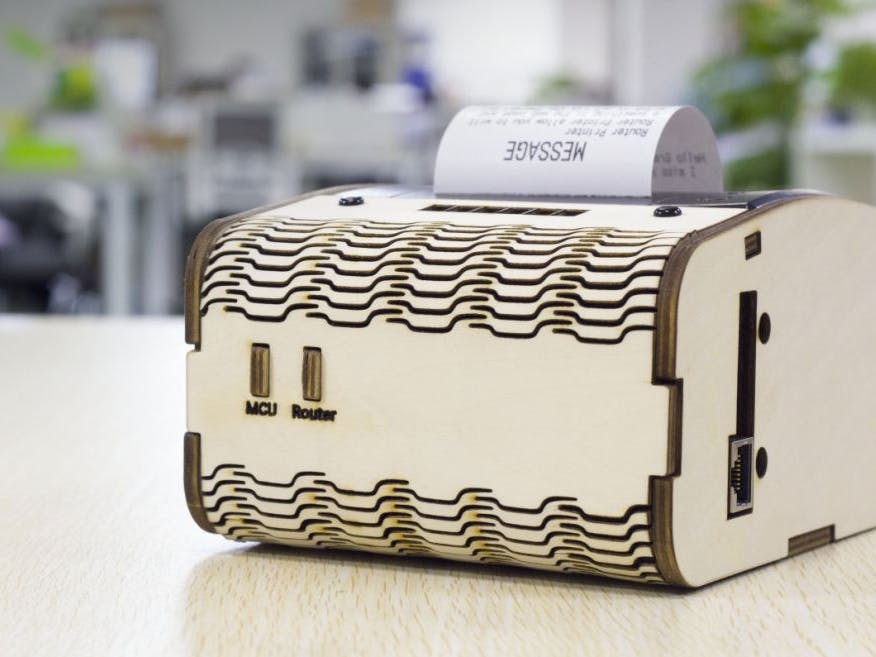
Here is the finished look of the router.
The ResultNow, you can connect to the Linkit Smart 7688 Wifi AP, and input mylinkit.local:8000 or your 7688 local IP :8000 in your web browser, and you can see the Router Printer web page just as below shows. Input something in the textbox and click Print Message and you’ll find the Printer can print it out.
The go to the MCS website, and check your our test device, you can click the button to control the relay and view the sensor values just as picture below shows.
Make. Invent. Do.This project is made as an Open Source Project. It's a starting point. Let your creativity go wild with the mechanical, electrical and software design. Make the demo your own. Decorate it. Improve the work. No matter what, write a recipe about it.
Let's do something special for special people together.
Cheers!
Seeed Studio
 user5615028


Comments