


Hardware components | ||||||
 |
| × | 1 | |||
 |
| × | 1 | |||
| × | 1 | ||||
| × | 1 | ||||
 |
| × | 1 | |||
Software apps and online services | ||||||
 |
| |||||
Hand tools and fabrication machines | ||||||
 |
| |||||
 |
| |||||
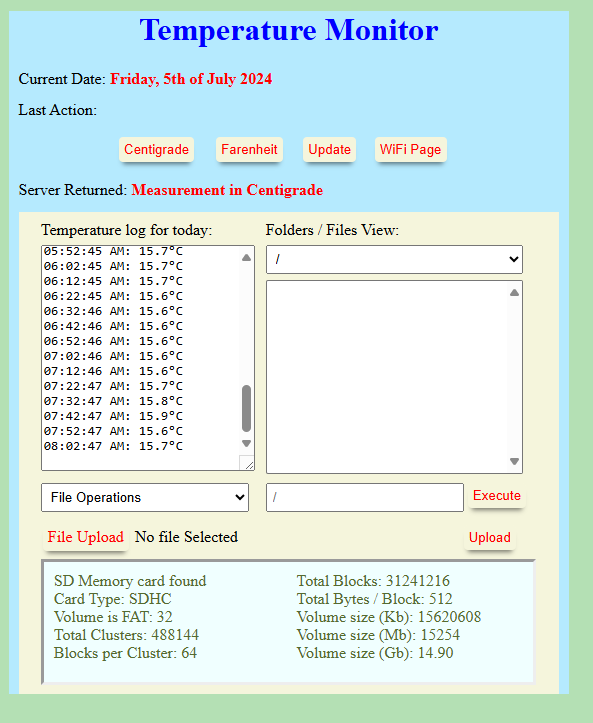
When it comes to Temperature Monitor there are hundreds of projects and using the well-known Dallas Sensor 18B20 there are much more. This project is just not a Temperature sensor. There are more take-aways with this project that are modular and can be used in various projects.
Features are:
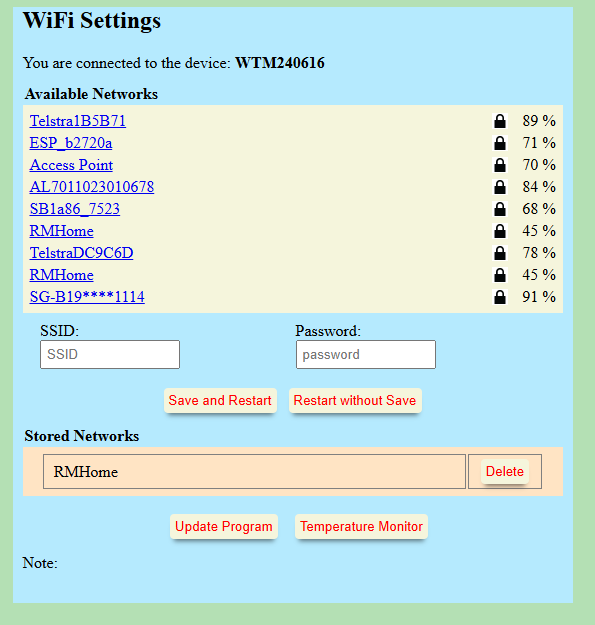
- Intuitive Captive Screen with features to save up to 6 Wi-Fi connections
- Web based Temperature Monitor that can be viewed on any browser
- Socket services for broadcast of messages
- Storage with SD Mem card reader that has full functionalities of File handling including uploading, downloading, creation of files, folders, moving of files folders, deletion etc., all from a Browser
- Elegant OTA for updating software
- Telnet for debugging / monitoring
- Storing of Temperature in a CSV format for charting
- Keeping tab of time
Practically the ESP8266 is pushed to its maximum limit in both memory and also in processing power. While I cannot take any credit for the programs other than integrating all the packages that are developed by our Arduino friends, the outcome of this is very satisfying.
Let us look at all the packages:
WebSocket Services library from Markus Sattler.ElegantOTA use the library by Ayush SharmaESP Telnet by Lennart HennigsezTime by RopGonggrijpDallasTemperature by Miles BurtonArduino_JSON by Arduino ver0.2.0SD Mem Interface from ESP8266 package by Espressif
Apparently, all the credits go to these people who have encouraged our hopes and spirit to come up with innovative solutions.
As for the program itself, it is built on all these libraries. The GUI which is browser based is made up of Java Scripts and HTML. For keeping up time initially I planned to use RTC which I had used in my earlier project. Since we are using ESP 8266 and internet is always given, I used EZtime which does a great job of keeping accurate time. Time zone would be necessary for EZTime. For this, create a free account at http://ipinfo.io/ This website provides an API for getting both IP Address of your gateway and also location, all in a JSON format. Obviously, you would need a token token for accessing this API which is provided when you create an account. Getting location and Time zone are easy with a simple GET request. The three Strings variables used are:
String LocationUri = "http://ipinfo.io/?token=";
String LocationToken = "xxxxxxxxxx";
String TZDefault = "Australia/Sydney";
Location Token is your personalised token. The entire code is in the function GetLocation. A default location can be used if you do not want to use this API. The website itself is tried for 5 attempts just in case the site is busy. (This does happen occasionally)
static void GetLocation()
{
  Serial.printf("Getting Location URL: %s, Key= %s\n", LocationUri.c_str() , LocationToken.c_str());
  logFile += ClkTZ.dateTime("H:i:s~ ")  + "Getting Timezone from URL with Token: " + LocationUri + LocationToken + "\r\n" ;
  int count = 0;
  String jsonArray;
  JSONVar myObj;
  String tz;
  while (count < 5)
  {
    count++;
    jsonArray = GETRequest(LocationUri + LocationToken);
    myObj = JSON.parse(jsonArray);
    if (JSON.typeof(myObj) == "undefined" || jsonArray == "")
    {
        delay(SECONDS); //Wait for 1 second and try again
        continue;
    }

    Serial.printf("ip: %s\n", JSON.stringify(myObj["ip"]).c_str());

    if (JSON.stringify(myObj["ip"]).c_str() == "null")
    {
      Serial.printf("ip null detected: %s\n", JSON.stringify(myObj["ip"]).c_str());
      delay(SECONDS); //Wait for 2 seconds and try again
      continue;
    }

    tz = JSON.stringify(myObj["timezone"]);

    if (tz.indexOf('/') < 0)
      tz = "";
    else
      tz.replace("\"", "");
    break;
  }
  if (count < 5 && tz != "")
  {
    ClkTZ.setLocation(tz);
    logFile += ClkTZ.dateTime("H:i:s~ ")  + "Using TimeZone from Web: " + tz + "\r\n";
  }
  else
  {
    ClkTZ.setLocation(TZDefault);
    logFile += ClkTZ.dateTime("H:i:s~ ")  + "Using Default TimeZone: " + TZDefault + "\r\n";
  }
}
For network storage EEPROM is used.
#define MAXNETWORK 6
struct NETWORK
{
  char SSID[33];
  char Password[33];
};

NETWORK Networks[MAXNETWORK];
A total of up to 6 network configurations can be stored. If you prefer you can use the library "Multi wifi", though I have created a simple routine to check Wi-Fi with stored information. Function connectWifi handles this by checking available Wi-Fi network with stored network and establishing a connection
//Check the stored networks and scanned networks. try to connect all available network
//if connected storageIndex is properly set.
void connectWifi()
{
  //Serial.println("Connecting as wifi client...");
  int n = WiFi.scanNetworks();
  storageIndex = -1;
  int j;
  //Serial.printf("Total Scanned network: %d\n", n);
  //Check if scannednetworks is available in our storage
  for (int i = 0; i < storedNetworks; i++)
  {
    for (j = 0; j < n; j++)
    {
      Serial.printf("Now checking the SSID %s at storage index %d with Scanned Network: %s\n",
            Networks[i].SSID, i, WiFi.SSID(j).c_str());

      if (WiFi.SSID(j).compareTo(String(Networks[i].SSID)) == 0)
      {
          storageIndex = i;
          break;
      }
    }
    if (j < n)  //storageIndex >= 0
    {
      if (tryConnect())
          break;
    }
  }

  if (bConnect)
  {
    Serial.printf("Connected to Network and Storage Index: %d\n", storageIndex);
    logFile += ClkTZ.dateTime("H:i:s~ ")  + "Connected to Network on Storage Index: " + String(storageIndex) + " Network Name: " + Networks[storageIndex].SSID + "\r\n";
  }
  else
  {
    Serial.println("Not Connected to Network");
    logFile += ClkTZ.dateTime("H:i:s~ ")  + "Unable to connect to Local Area Network\r\n";
  }

  return;
}

bool tryConnect()
{
  bConnect = false;
  Serial.printf("Trying to connect with SSID: %s, Password: %s\n", Networks[storageIndex].SSID, Networks[storageIndex].Password);

  WiFi.begin(Networks[storageIndex].SSID, Networks[storageIndex].Password);

  int status = WiFi.status();
  int startTime = millis();
  while (status != WL_CONNECTED && status != WL_NO_SSID_AVAIL && status != WL_CONNECT_FAILED && (millis() - startTime) <= WIFI_TIMEOUT * 1000)
  {
      delay(WHILE_LOOP_DELAY);
      status = WiFi.status();
  }

  if (WiFi.status() == WL_CONNECTED)
      bConnect = true;

  Serial.printf("StoredIndex: %d; Connection status of SSID: %s is %d\n", storageIndex, Networks[storageIndex].SSID, WiFi.status());
  return bConnect;
}
Rather than providing the code here, I have uploaded them to Github. Complete list of codes are available. Feel free to browse, download the code and use them in a way that fits your requirement
https://github.com/vdevan/WebTemperature
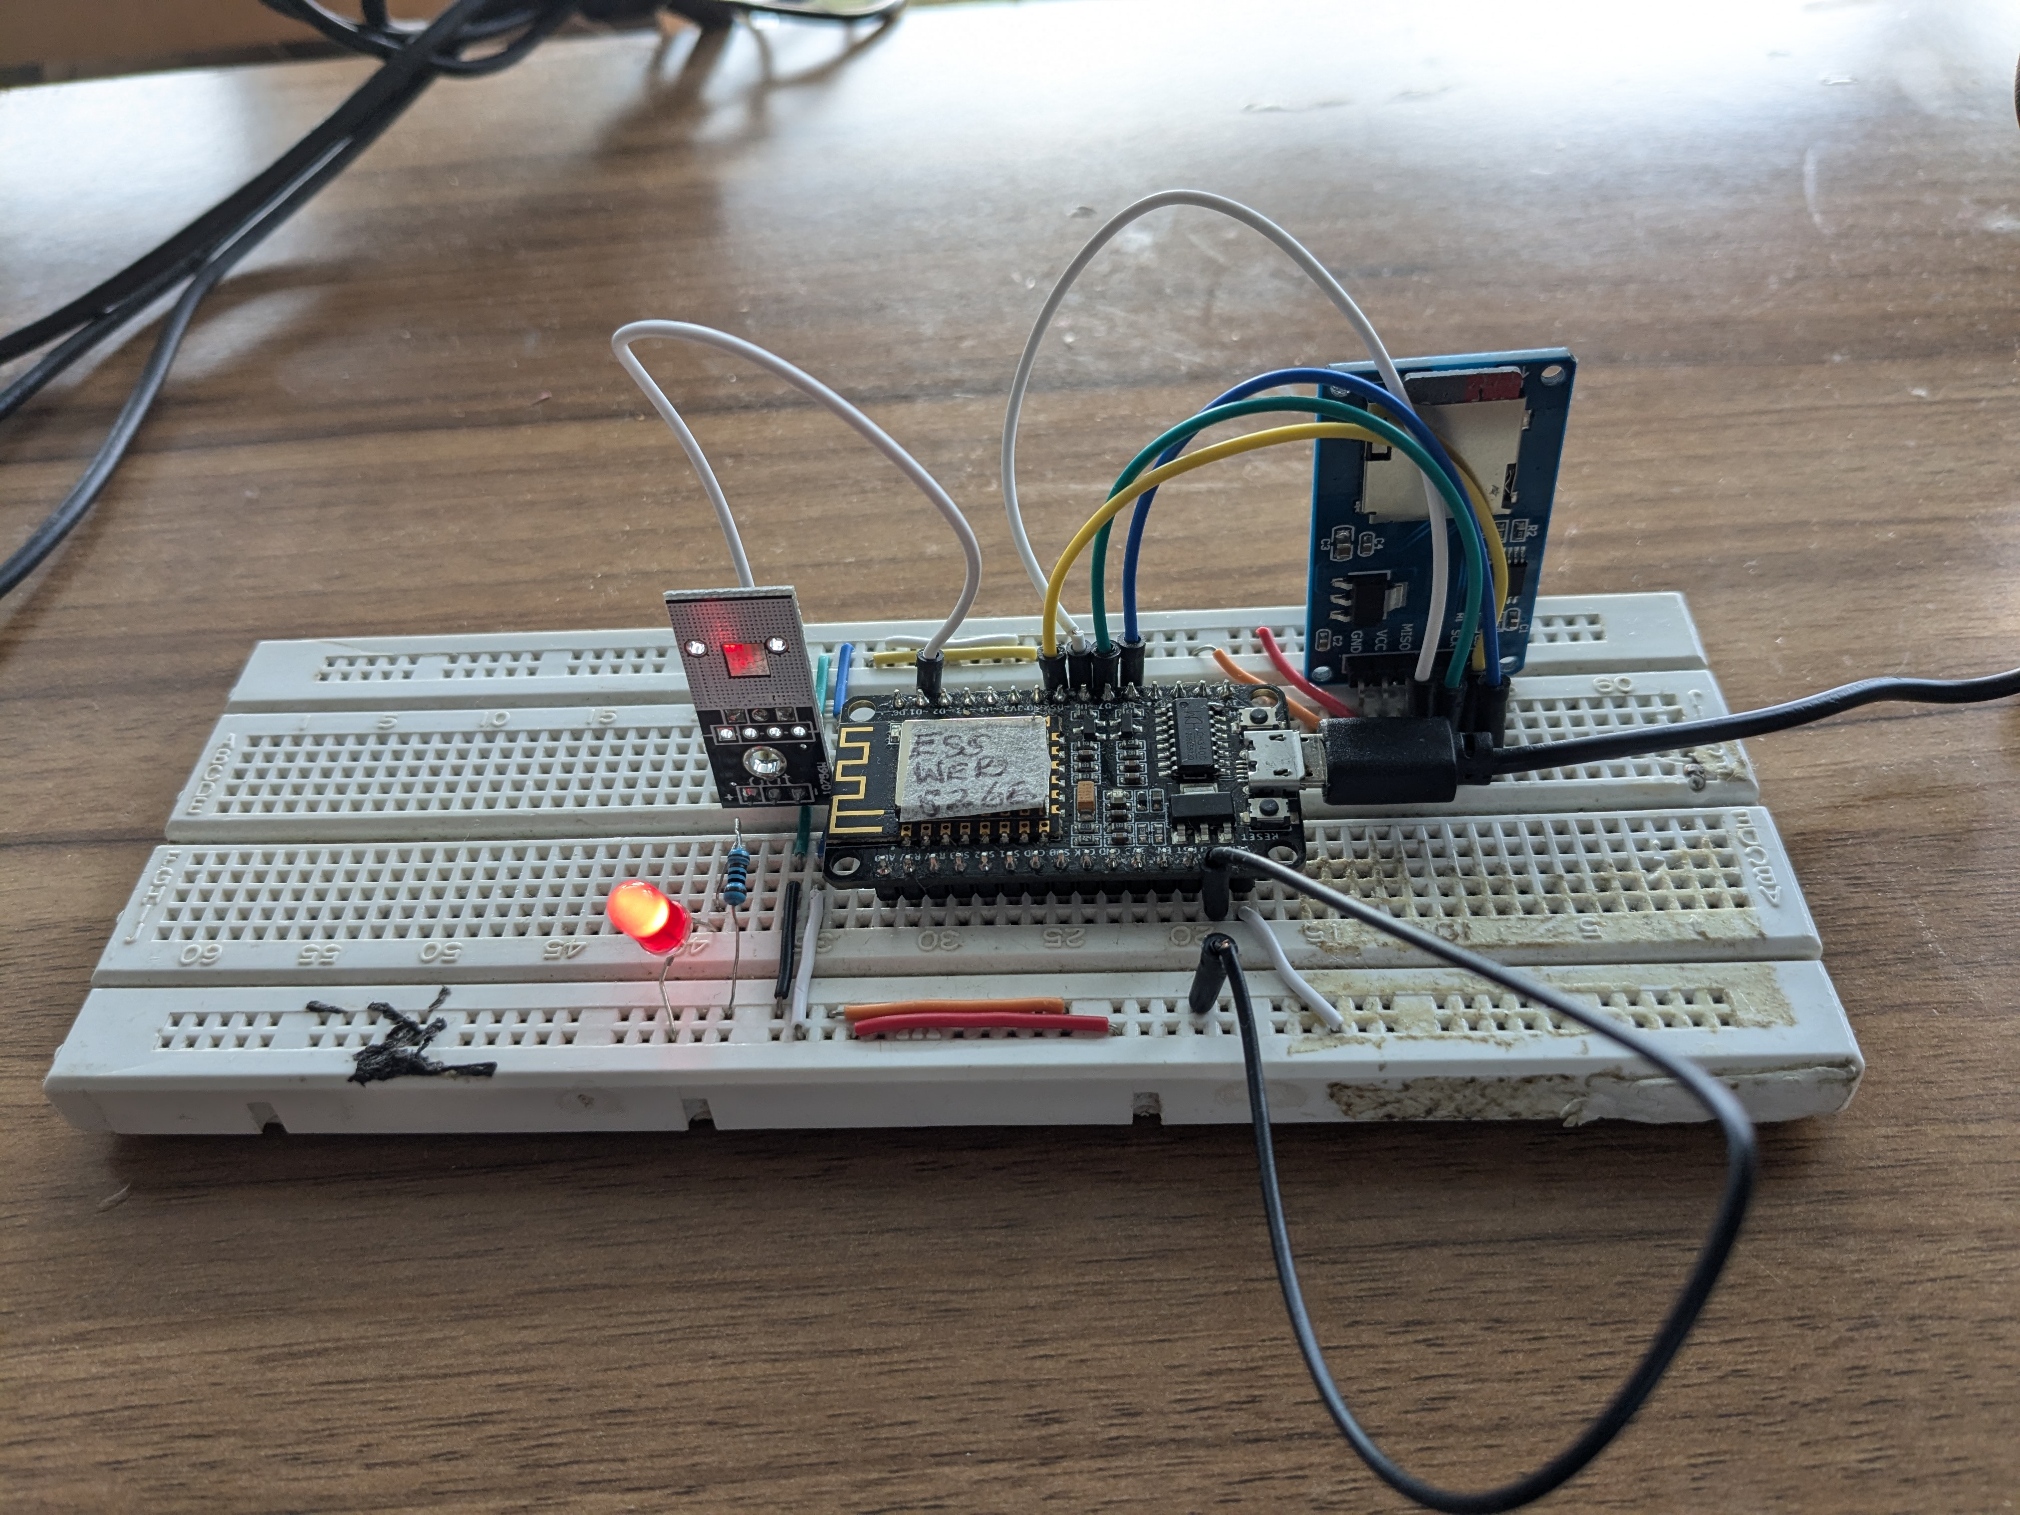
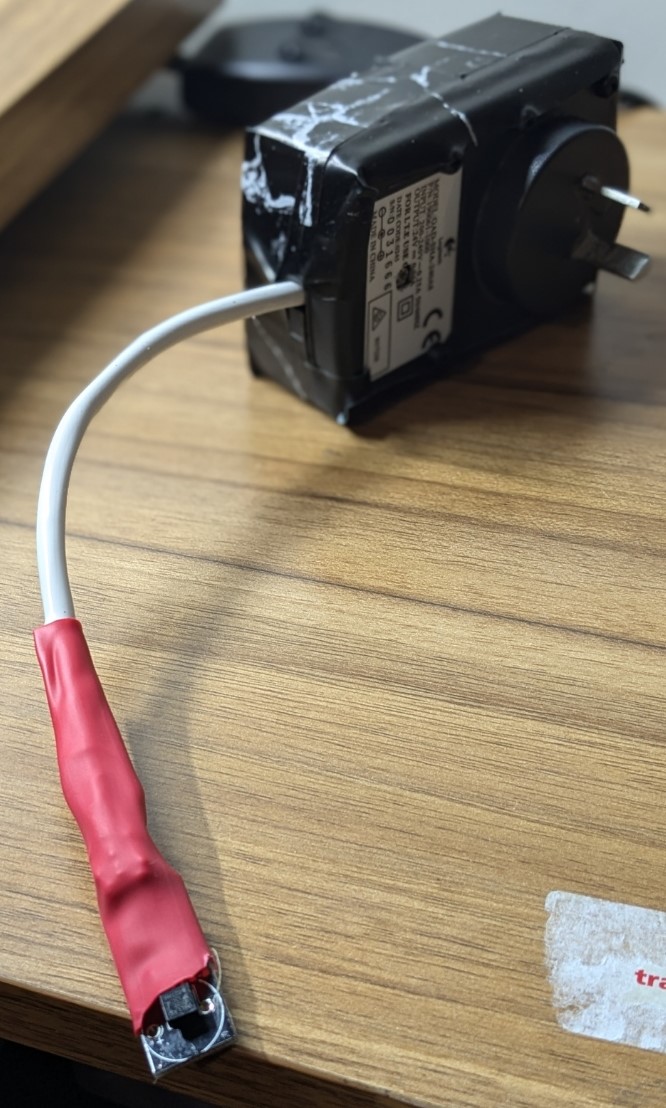
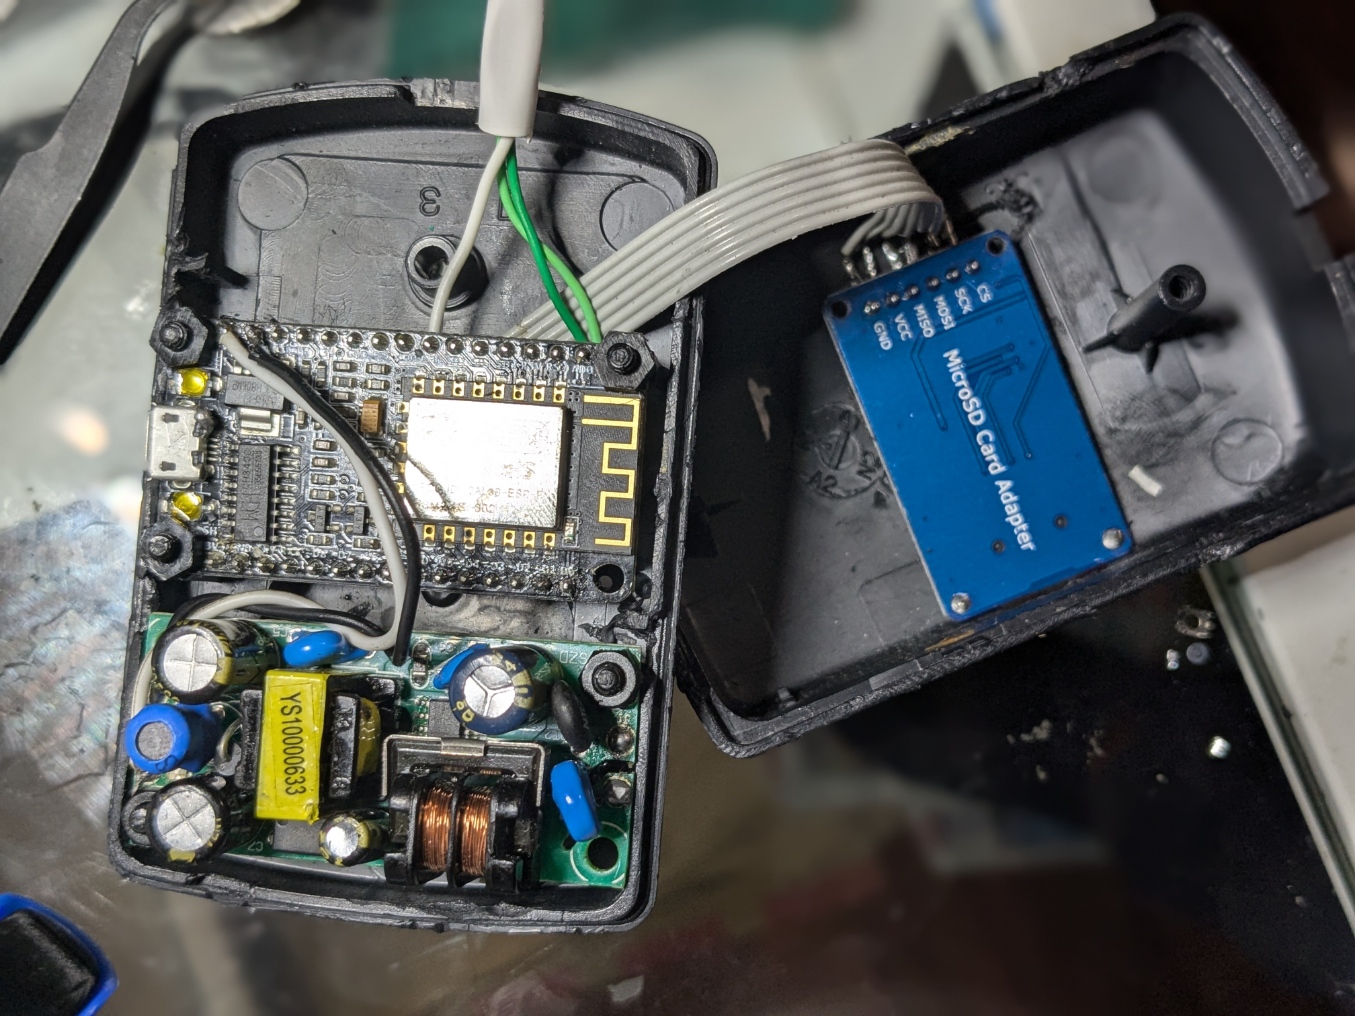
They say a picture is worth 1000 words. So, without further ado, I am posting the complete setup of the project enclosed in a small Power adapter module. From Breadboard to finished version, I have provided the images.
Test Bed
Final Assembly
Assembled PCBs inside a Powersupply adapter

Captive Screen


Comments
Please log in or sign up to comment.