


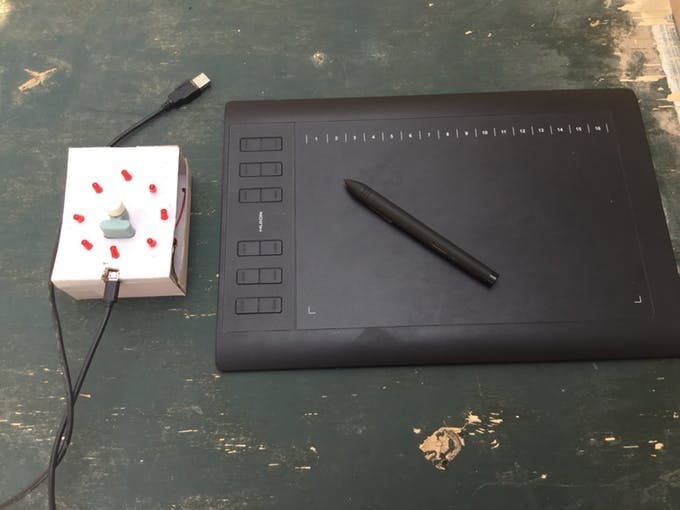
Hardware components | ||||||
 |
| × | 1 | |||
| × | 1 | ||||
Software apps and online services | ||||||
 |
| |||||
| ||||||
Hand tools and fabrication machines | ||||||
| ||||||
Not only for digital painting, the application provides full control of different software from digital painting to 3D and sculpturing companion.
IntroWhen I am using my digital tablet, there are some tools that are more commonly used than others and remembering their shortcuts in each program, putting the pen down, and typing on the keyboard is tedious and makes me lose my focus from time to time. Also, my tablet comes with keys to solve this problem but still all same no graphical interface to show which button I pressed so I came up with this solution in an innovative way we can benefit from both worlds graphical interface with feedback to pick the tool we want and no keyboard.
Let me introduce the magical tool, "Creative Companion."
Requirements to build the sofware from scratch (you can just plug in the device and use the release binary I provide below):
- 1 - Eclipse Jee Photon ( JavaFx )
- 2 - Arduino IDE
- 3 - 8 LEDs of any color
- 4 - Infineon 3D Magnetic Sensor 2Go Kit
- 5 - Wires and soldering iron
- 6 - Card box
This solution was inspired by the Microsoft Surface Dial concept, as seen in the image below.
I have never used one before so I decided to create my own DIY version of it.
For organization sake, we will break this tutorial into four main steps:
- 1 - Creative Companion hardware
- 2 - Infineon 3D magnetic sensor
- 3 - JavaFx application
- 4 - Demo with Photoshop and Zbrush as examples for our device usage
The board is simply connected to LEDs. Each 2 LED's Gnd are connected together so only 1 Gnd pin connects to the board Gnd and each pin of the others clarified in Arduino code are attached to a single LED.
I simply followed the schematic here to connect it:
We will be using Arduino IDE to program the magnetic sensor.
But first, install the board and library:
https://github.com/Infineon/Assets/releases/download/current/package_infineon_index.json
Click on Preferences -- > add the this link with the Additional Board Manager links --> Go to Board Manager and search for XMC then Click install I have already installed it before so the button says "Remove" --> Install the Library for Infineons's 3D magnetic sensor TLE493D for Arduino.
Downlaod the .ZIP file from here:
https://github.com/Infineon/TLE493D-3DMagnetic-Sensor
run the.ino sketch file from the code provided below and test the rotatory knob:
The code has two main functions:
1 - Reads the angle range then print an id for this angle range
if (angle1 < 60 && angle1 >= 30) {
   //10 oclock pin
   angle1 = (int)Tle493dMagnetic3DSensor.getAzimuth() * 57.3;
   turnoffallexcept(4);
   Serial.println(pin_number_to_wheelno(4));
}
2 - Check if knob was pressed print 9 before the id and send both so if press occured the serial will write 9 then the id of the angel range (from 0 --> 7) so the result from 90 - 97 when we read these values in our java app we know the angle id and the knob pressed if range from 0 --> 7 the serial received in our java app change the id only in the wheel we will see this later in Java application part like in the pictures.
if (Norm > 60) {
   Serial.print("9"); // indicates pressing
   starDance(1);
 }
The result till now...
Step 3: JavaFx ApplicationThe code is based upon two libraries rxtx for serial communication, Jna for switching windows, and RadialFx for the wheel GUI.
https://github.com/MrLoNee/RadialFx
https://github.com/java-native-access/jna
rxtx library http://fizzed.com/oss/rxtx-for-java
The code is provided below, but I will only clarify some points.
RadialSettingsMenu.java file has two functions:
//openZbrush();
openPhotoshop();
And to change the app, I uncommented one of them to bring the other app also.
// ********* Photoshop ************************///
							switch (id) {
							case 0: // Transform tool
								r.keyPress(java.awt.event.KeyEvent.VK_CONTROL);
								r.keyPress(java.awt.event.KeyEvent.VK_T);
								// centerNode.displayCenter(items.get(id));
								try {
									Thread.sleep(500);
								} catch (InterruptedException e) {
									// TODO Auto-generated catch block
									e.printStackTrace();
								}
								r.keyRelease(java.awt.event.KeyEvent.VK_CONTROL);
								r.keyRelease(java.awt.event.KeyEvent.VK_T);
								break;
							case 1: // Select Rect Marquee tool
You need to comment Photoshop switch case and uncomment the zbrush part (don't worry it's clear in the what to change).
Also, replace all "row 2" with "row 1" to switch between each app icon.
/gemicon/PNG/32x32/row 1/1.png");
Here is the result of both apps, each one receives serial data sensor angle range ID, and when it's clicked, it switches to its program, then sends key press and releases of the responding shortcut.
Demo 1 - Creative Companion with Photoshop
Demo 2 - Creative Companion with Zbrush
Further Development Steps:1 - 3D printing a good case design for the dial.
2 - Configuration tool app with JavaFX to extend our software to work with more applications other than Photoshop and Zbrush using a GUI instead of hard-coding the wheel icons and their responding shortcuts application name.
Hope you enjoyed the tutorial. Feel free to ask any questions in the comments. Thanks!


Comments
Please log in or sign up to comment.