

Hardware components | ||||||
| × | 1 | ||||
 |
| × | 1 | |||
 |
| × | 1 | |||
 |
| × | 1 | |||
INTRODUCTION
STM32 microcontrollers are a family of 32-bit ARM Cortex-M based processors developed by STMicroelectronics. These microcontrollers are widely used in various applications, including industrial automation, consumer electronics, Internet of Things (IoT) devices, and more. The STM32 family offers a broad range of devices with different features, performance levels, and peripherals to suit diverse project requirements.
Materials Needed:
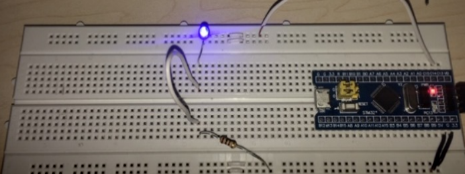
- STM32 Black Pill development board.
- USB to mini-USB cable for programming and power
- External LED
- Breadboard and jumper wires.
CubeIDE is an Eclipse-based IDE tailored by STMicroelectronics specifically for STM32 microcontrollers. It offers a comprehensive suite of tools for code development, debugging, and project management.
To commence, download and install CubeIDE from the official STMicroelectronics website. Once installed, launch CubeIDE and create a new STM32 project targeting the microcontroller on the BlackPill board.
Configuring GPIO:
LED blinking necessitates altering the state of a GPIO pin connected to an LED. Configuring GPIO pins in CubeIDE is straightforward:
- Access the Pinout & Configuration tab.
- Select the GPIO pin associated with the onboard LED (typically PC13).
- Set the Pin Mode to Output push-pull.
- Save the changes.
THE CODE:
HAL_GPIO_WritePin(GPIOC, GPIO_PIN_5, 0);
		  HAL_Delay(1000);
	      HAL_GPIO_WritePin(GPIOC, GPIO_PIN_5, 1);
This code initializes the GPIO pin connected to the LED as an output and alternates its state in a continuous loop with a delay of 500 milliseconds between each change.
Conclusion:
In this tutorial, we have learned how to set up STM32CubeIDE, configure an STM32 Black Pill development board, and write code to blink an external LED using HAL programming. This is just the beginning of your journey into embedded programming with STM32 microcontrollers. Explore further, experiment with different peripherals, and build exciting projects!


Comments