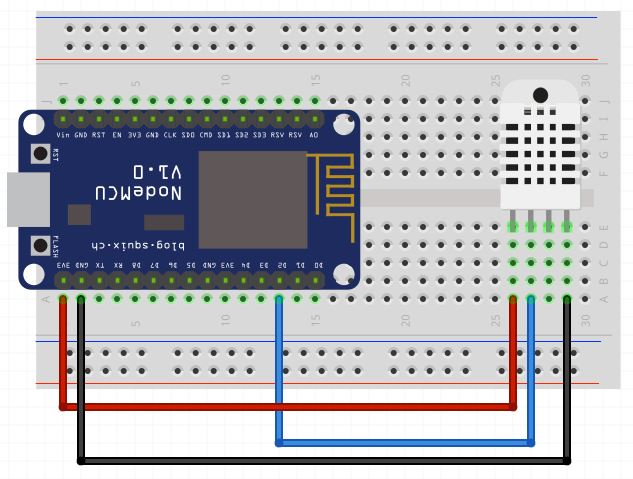
- Place the NodeMCU on the breadboard. The rest of the instructions assume the front ( with the holes ) of the DHT22 is facing you.
- The left-most pin of the DHT22 is the positive pin. You should connect it to
3v3orVinon the MCU. - The second pin of the DHT22 (from the left) is the data pin. You should connect it to
D2on the MCU. - The third pin of the DHT22 (from the left) does nothing.
- The last pin of theDHT22 (from the left) is the Ground pin. It should be connected
GND.
In this tutorial, to program the NodeMCU, we are going to use Arduino's IDE. It's the easiest way to get up and running with the DHT22.
First, you'll have to set up your machine: Environment Setup Instructions. These instructions take you through installing the IDE and the proper libraries.
In addition to this, you'll have to install two more libraries. To read the sensor, we are going to use Adafruit's DHT22 library. It can be installed using Arduino's library manager. It comes in two components. First, you'll want to download the Adafruit Unified Sensor library:
Then, install the DHT sensor library:
Important: Lastly, you'll need to increase the underlying MQTT library's memory limit. The PubSubClinet MQTT library has a default memory limit that is not enough to support all the values that the DHT22 sensor can collect. The error is also not apparent, which makes it hard to track. To increase the memory limit, please check out this forum post.
Sending data to the CloudWhen just logging to the serial monitor, our data isn't that useful. Once in thingsai.io, we can graph and react to the data.
Setting Up thingsai.io Account
1. visit to https://thingsai.io/ website.
2. Register Your self with Google account or Email Id.
Login page:
3. After Login, Click on Create New Project and Give any name of your choice. For My case it is " Room_Monitoring".
4. Now Give the Device Name. For My Case it is NodeMcu. You can Select any Name.
5. Now Add the Parameters, Like We are monitoring the Humidity and Temperature of our room then our Parameters will be Humidity (In Decimal) and Temperature (in Decimal).
Parameter Setting For Humidity and it is same as the Temperature as well.
6. Now Click on Update Device.
For Mode Detail or you facing the problem during creation of project please watch Demo Video
Now Copy the code to arduino Ide and Upload the Code to the NodeMcu and Connect the NodeMcu to your home Wifi Hotspot. If all working then Humidity and Temperature Data will start updating to thingsai.io Account.
Wifi Setup:
1. Start the Phone Wifi and scan for Ap name abcd.
2. Connect with this AP.
3. Now a Web page opened, Click on Wifi Configuration and type your Hotspot SSID and Password.
4. Now your Node is Connected to Network.
Note: If no any web page opened in browser then type 192.168.4.1 in your phone browser it will show the wifi configuration page.
Received Data From DHT22:


Comments