


Hardware components | ||||||
| × | 1 | ||||
Software apps and online services | ||||||
 |
| |||||
Hardware:
- A laptop or desktop running Linux or macOS.
Software Apps and Online Services:
- [Python3](https://www.python.org/download/releases/3.0/)
- A code editor of your choice.
- If you are running macOS, ensure you have [Homebrew](https://brew.sh/) installed and up to date on your Mac.
- Viam robotics platform (app.viam.com)
Robotics are really cool and a lot of fun to tinker around with. However, you don’t always have access to all the hardware you would like and that shouldn’t be a blocker for testing out robotics software and leveling up your robotics programming skills.
This project will show you how to build a mock robot with just your laptop so you can try out the modern robotics platform, Viam, without any hardware. This is a neat way to get started learning how to build robots.
Most Viam components come with a _fake_ model that can be useful when testing.
These fake components interact with Viam like real hardware, but of course, do not actually exist. We will be using these fake components to build out a mock robot and to explore using Viam.
In this tutorial, you will set up, control, and program a mock robotic arm and a mock motor sub-part using fake components.
## How to set up a mock robot
Set up your account on the Viam appThe first thing you need to do is set up your account on the Viam App.
Go to [app.viam.com](https://app.viam.com) and sign up.
Configure your mock robot* Go to [app.viam.com](https://app.viam.com/)
* Create a new robot
* Go to the **CONFIG** tab.

For this project, we will show you how to set up a mock robot with a fake motor and arm.
For each component, you will need to create a new component.
For the component **Type**, select **arm/motor**.
Then you can name them whatever you like (You will need to reference these names later once we connect to your mock robot with the Python SDK).
For each **Model**, select **fake**, then click **new component**.
How to install Viam server on your computerBefore you proceed with controlling your mock robot, you are going to need to install Viam server on your development machine.
Follow the steps outlined on the **SETUP** tab of the Viam app in order to install Viam server on your local computer.
Controlling your mock robot using the Viam AppWhen you add the fake motor and arm components to your robot, the Viam app automatically generates a UI for your motor and arm under the **CONTROL** tab.

If you were configuring a real motor and arm, you would be able to control it from this section of the app.
You could do things like control the direction and speed of the motor, and change the joint positions of your robotic arm.
However, since we are building a mock robot using fake components, you will only see the robot's reported positions and speeds change from the UI.
You will not be able to see your robot move in the physical world.
Next, you will need to configure your mock robotic arm with the Viam Python SDK so you can write custom logic to control the mock robot.
Controlling your mock robot using the Viam Python SDKHow to install the Viam Python SDKIn this step, you are going to install the [Viam Python SDK](https://python.viam.dev/) (Software Development Kit).
This allows you to write programs in the Python programming language to operate robots using [Viam](http://www.viam.com/).
You can find instructions for [installing the Viam Python SDK](https://python.viam.dev/) in the documentation.
If you have any issues whatsoever getting the Viam Python SDK set up or getting your code to run on your computer, the best way to get help is over on Discord (https://discord.gg/viam),
There, you will find a friendly developer community of people learning how to make robots using Viam.
How to connect to your mock robot with the Viam Python SDKThe easiest way to get started writing a Python application with Viam is to navigate to the [robot page on the Viam App](https://app.viam.com/robots), select the **CONNECT** tab, and copy the boilerplate code from the section labeled **Python SDK**.
This code snippet imports all the necessary libraries and sets up a connection with the Viam App in the cloud.
Next, paste that boilerplate code from the **CONNECT** tab of the Viam app into a file named index.py file in your code editor, and save your file.
You can now run the code.
Doing so will ensure that the Python SDK is properly installed, that the viam-server instance on your robot is alive, and that the computer running the program is able to connect to that instance.
You can run your code by typing the following into the terminal:
```bash
python3 index.py
```
If you successfully configured your robot and it is able to connect to the Viam app you should see something like this printed to the terminal after running your program.
What you see here is a list of the various resources (Like components, and services) that have been configured to your robot in the Viam app.

How to control your mock robot with PythonNext, you will be writing some code in Python to control and move your mock robotic arm.
We are going to write a program that will move the mock robotic arm into a new random position every second.
You will be able to verify that your mock robotic arm is working by checking that the joint positions of the fake arm in the **CONTROL** tab of the Viam app are changing.
The first thing you need to do is import the [arm component](https://python.viam.dev/autoapi/viam/components/arm/client/index.html) from the Viam Python SDK, and the [random](https://docs.python.org/3/library/random.html) and [async.io](https://docs.python.org/3/library/asyncio.html) libraries.
At the top of your index.py file, paste the following:
```python
from viam.components.arm import ArmClient, JointPositions
import random
import asyncio
```
Next, you will need to initialize your fake robotic arm.
In the main function, paste the following, while ensuring that the name of your fake arm matches the name of your arm in your config file.
```python
arm = ArmClient.from_robot(robot=robot, name='my_main_arm')
```
Now that your mock arm has been initialized, you can write some code to control it.
```python
# Gets a random position for each servo on the arm that is within the safe range of motion of the arm. Returns a new array of safe joint positions.
def getRandoms():
return [random.randint(-90, 90),
random.randint(-120, -45),
random.randint(-45, 45),
random.randint(-45, 45),
random.randint(-45, 45)]
# Moves the arm into a new random position every second
async def randomMovement(arm: ArmClient):
while (True):
randomPositions = getRandoms()
newRandomArmJointPositions = JointPositions(values=randomPositions)
await arm.move_to_joint_positions(newRandomArmJointPositions)
print(await arm.get_joint_positions())
await asyncio.sleep(1)
return
```
You can run this code by invoking this function located below your arm initialization in main. Your main function, should look like this:
```python
async def main():
robot = await connect()
print('Resources:')
print(robot.resource_names)
arm = ArmClient.from_robot(robot=robot, name='my_main_arm')
await randomMovement(arm)
await robot.close()
```
Now when you run this code, you should see the new mock arm positions listed in the command line, if you open the **CONTROL** tab of your mock robot, you should see the robot's arm positions changing in real-time along with the code on your development machine.

How to create a mock sub-partNow that you have your mock robotic arm working, let’s add a mock sub-part to your robot.
What is a part?A Robot in Viam is one or more computers combined into one logical robot. The bounds of a robot are usually pretty clear, but can be subjective. However, it’s possible with Viam to create a robot that is made out of multiple computers. Each of these computer-controlled units is referred to as a __part__. Most simple robots will have only one part, but can have as many parts as needed.
Parts are organized in a tree, with one of them being the main part, and the others being sub-parts. You can access any sub-part either directly, or via any part above it in the tree. Each part runs a single viam-server instance.
How to configure a sub-part in the Viam appOn your robot’s page on the Viam app, click on the **MAIN PART** button and name your part and click **ADD NEW**.
Alt text: Screenshot of the Viam app with a dropdown below the main part. “SubPart” is written in the textbox.
You will be creating a mock independent computer-controlled sub-part with a motor. This could be anything, let’s say for the purpose of this tutorial, that this motor controls a conveyor belt in front of our mock arm on an assembly line.
Navigate to your new part’s **CONFIG** page and create a new motor using the __fake__ model.
How to add your sub-part as a remoteConnecting your sub-part as a remote from your main robot will allow you to control your sub-parts all from one place inside of your main robot.
From the **CONNECT** tab of your sub-part
- From the **CONNECT** tab of your sub-part
Copy the** Config as Remote Part**.
- Copy the** Config as Remote Part**.
Navigate back to the **CONFIG** and then the **REMOTES** tab of your main robot
- Navigate back to the **CONFIG** and then the **REMOTES** tab of your main robot
Paste your sub-parts configuration.
- Paste your sub-parts configuration.
Alt text: Screenshot from the Viam App showing the CONFIG > REMOTES with the sub-part’s remote config file pasted in.
How to start a new instance of Viam server for your mock sub-partSince every part needs to run an instance of Viam server, you will need to bind the sub-part to a new port so we can run two servers on your machine at the same time. You can do this by going to **CONFIG** and then going to the **NETWORK** tab. Here, you will paste the following:
```JSON
{
"bind_address": "localhost:8081"
}
```
Be sure to save before continuing.
How to run a second instance of Viam server for your sub-partUnder the **CONFIG** tab, click **COPY VIAM-SERVER CONFIG**.
Alt text: Screenshot from the Viam app showing the “Copy Viam-Server Config” button highlighted by a red box.
On your local machine, create a new file called <file>viam-sub-part.json</file> and paste the contents of your server config into that file and save. From the terminal, navigate to the directory where you saved the config file, and run this command to create a new instance of Viam server using this configuration.
```bash
viam-server -config viam-sub-part.json
```
{{% alert title="Note" color="note" %}}
You might need to stop Viam server from running on your main part. You can stop Viam with:```bash
brew services stop viam-server
```
If you are still having trouble getting both instances of Viam server to connect, you can also copy the server config file of your main part, and save that locally (like <file>main.json</file>), and in a new terminal window, run your main server there.
```bash
viam-server -config main.json
```
{{% /alert %}}
If you have two instances of Viam server running on your local machine, you should be able to see both your main robot arm and your new mock sub motor listed on your main robots **CONTROL** tab.
Alt text: Screenshot of Viam app’s Control tab for the main part. List’s the main arm, and the sub motor part.
How to control a sub-part using the Viam Python SDKNow that we have our mock sub-part connected as a remote to our main mock robot, you will be able to control all of your robot’s sub-parts with Viam’s Python SDK. In fact, if you run your Python script again, and you review the output of `print(robot.resource_names)`, you will see that your sub-part should now be listed as an available resource for you to use.
To control your motor sub-part, you will need to import the [MotorClient](https://python.viam.dev/autoapi/viam/components/motor/client/index.html). Paste this at the top of your file:
```python
from viam.components.motor import MotorClient
```
Now in your main function, you will need to instantiate your mock sub motor. Be sure that your motor’s name matches the one that you have listed in your robot’s resource names.
```python
motor = MotorClient.from_robot(robot=robot, name='sub-part:my_sub_motor')
```
Let’s write a function that toggles your mock sub motor on and off every second. You can do that with this function.
```python
# Toggles the motor every second
async def toggleMotor(motor: MotorClient):
while (True):
await motor.set_power(1)
print("go")
await asyncio.sleep(1)
await motor.stop()
print("stop")
await asyncio.sleep(1)
return
```
And now, you must invoke your new function. Your main function should look similar to this snippet:
```python
async def main():
robot = await connect()
print('Resources:')
print(robot.resource_names)
arm = ArmClient.from_robot(robot=robot, name='my_main_arm')
motor = MotorClient.from_robot(robot=robot, name='sub-part:my_sub_motor')
await toggleMotor(motor)
await randomMovement(arm)
await robot.close()
```
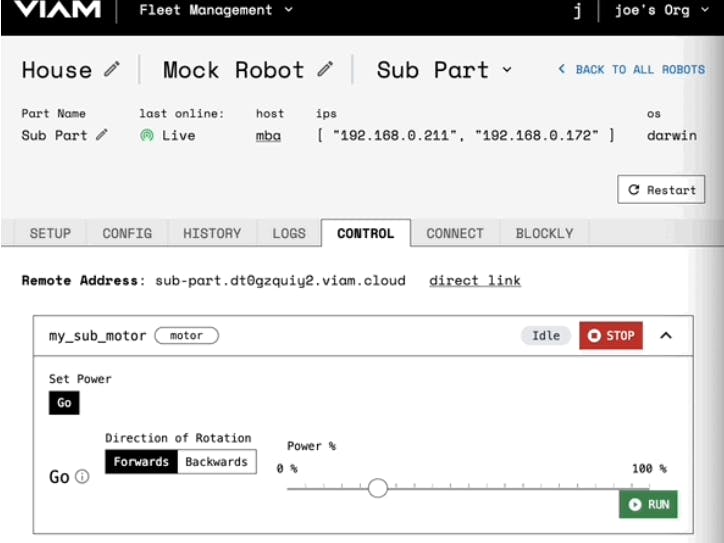
When you run this code, you will see your mock sub motor toggling between running and idle in real time from the Viam app!
Alt text: GIF of the Viam app’s CONTROL tab for the main part on the left, and a terminal window running the toggleMotor script on the right. The terminal window prints the robot’s resources, then prints “go” and then “stop” every second. The Viam App sub motor component shows the state is either “idle” or “running”, in sync with the toggleMotor script.
Next StepsIn this project, we showed you how to set up a mock robot with a sub-part so that you can learn more about using fake components, setting up a local development environment, and writing code using the Viam Python SDK.
If you're ready to get started with building robots with real hardware components, you should pick up a Raspberry Pi or a similar board and try building one of Viam's introductory robots on this Hackster page, or visit https://docs.viam.com/tutorials/for more!
If you have any issues or if you want to connect with other engineers learning how to build robots with Viam, be sure that you head over to the Viam Discord


Comments
Please log in or sign up to comment.