Living in one of the world's largest agricultural community, India, we are heavily dependent upon our farmers. But majority of the farmers are not well educated so very often there is 'distress sale of crops' by the farmers and those greedy distributer exploit farmers. Probing further into this problem I got to know that this problem arises mostly due to 'mismatch between crop selection and demand for the sale in the market'. That leads to surplus production of crops without their direct linkage to the market.Climate, seed price, plants, fertilizers, market rates, water resources and most important health hazards in extreme situations plays major role for farmers and it's our duty to keep them aware and equipped with new developments in above listed things. Sometimes there is fire or wild animal in the farm, by the time everyone is aware, the fire or animal would have destroyed the whole village.
Here is a picture which shows that during 2017 there was huge distress sale of crops leading to increase in debts of farmers.
My idea comes under:
1)The City Slicker
2)The Naturalist
The IoT definition says, "We all are surrounded by large amount of data......", but we fail to extract them in meaningful forms because we try to use a single brain but what if we use a network of brains? That is what I am going to build to solve above problem.The device performing tasks would be categorised in fourways:
1) Farm monitoring, scan QR code and that's all.
2) Real-time market rates, seedrates, crop rates, etc. or any news through Google Sheets
3) Bulletin board to keep farmers updated with latest techs and global demands, the app would also make farmer aware of harsh climatic conditions and their consequences.
4) Emergency mode (which enables to send a common alert message over all network) thus, spreading of information in no time.
A mobile app would guide the farmers and show him above data but I strongly feel that the above solution would become more meaningful if the data is shared among all farmers of that native place i.e. they have a common display unit or Bulletin board where they could see all above mentioned data(except their personal farm monitoring because I don't want their farm's secret recipes to get leaked except when the data is below threshold value) so that overall price of this solution could be brought down. In case if there is fire or any danger (epidemic disease) in any area and if one of the farmer notices it then he make use of emergency mode in the app to display a emergency alert on all devices lcd.
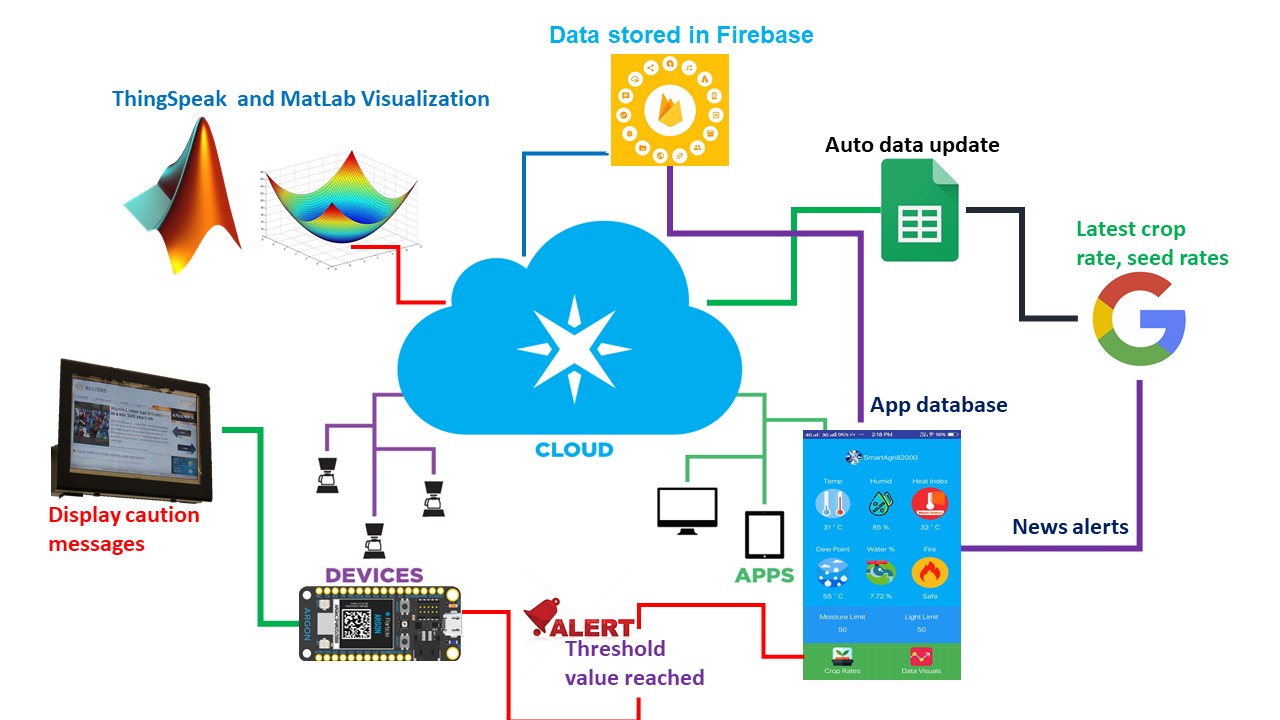
The device would have sensors like temp, humidity, moisture, light intensity connected to it. The sensors would notify the user if the sensors reaches a threshold value. This feature becomes more appropriate if any dangers are seen they would be instantly spread over network nodes and there would be alerts on Bulletin boards or app to make every villager aware. Thus we can save the village from many disasters like earthquakes, drought, epidemic diseases in future by incorporating emergency forecasts regarding disasters (Google Services would help me to implement the feature to live stream news updates from relevant sites). All devices would bring the farm tracking at fingertips. Moreover the major advantage of such interconnected system is that when the season changes or a farmer wants a different crop to be grown (since each crop requires different amount of water, etc.) then the threshold values could be changed over the connection for a single or multiple selected devices(no need of reprogramming each device).
Architecture and Operational ExcellenceCrop monitoring had been evolving since past few years but yet I don't see farmers of my country dependent upon it, maybe the cost, maintenance or the device's complexity would be a major drawback. Thus I tried to make it to beat the underlying problems. Infact, I see Argon not as IoT tool but an AI + IoT = AIoT tool (self healing, intelligent updates makes it more reliable, say with me Particle AIoT)
Cost: Particle Argon are very cheap(25$) plus you get free cloud access for 100 devices per account. You do not have to invest much on cloud data. The price could be brought down more by bulk supplies.
Scalability: The system could be scaled up to many more units depending on demand. If scaled up to 1000's of units running worldwide, Particle IoT integrations could still remain the backbone of how data is collected and distributed.
Reliability: Consistent and accurate measurements that reflect the actual farm data is important to this problem also correct crop prices are a part of this device. The device is robust and very easy to understand and use. The node feature allows to add more and more devices in a well established mesh network. I love the fact that whenever there is network timeout, that data is not lost instead it is saved and pushed to the cloud when the connection is reestablished.
Security: The device is very robust. I put a QR identification method to recognise my farm monitor device ID, the ID would be used to notify over the web in case of emergency or in mesh network.
How I Made This:I tried to minimize the cost of project as low as possible. Instead of 3d printed case I bent the outer metal case of old PSU of my computer and applied sticker on it. You can download the sticker from the link at end of project.
Hardware required:
The heart of this project is Particle Argon and its Integrations. It collect data from all the sensors manipulates them, tests them whether they meet certain conditions or not and publish them to dashboard and other integrations. I have also used a solar panel but I could not make a charging circuit for it so I am using it just for demonstration purpose, however I will make the necessary connections.
Configuring Argon for first time: I would recommend you to first watch a short video on configurations and also proceed to documentations. If done successfully proceed further.
Step1:Hardware Connections:
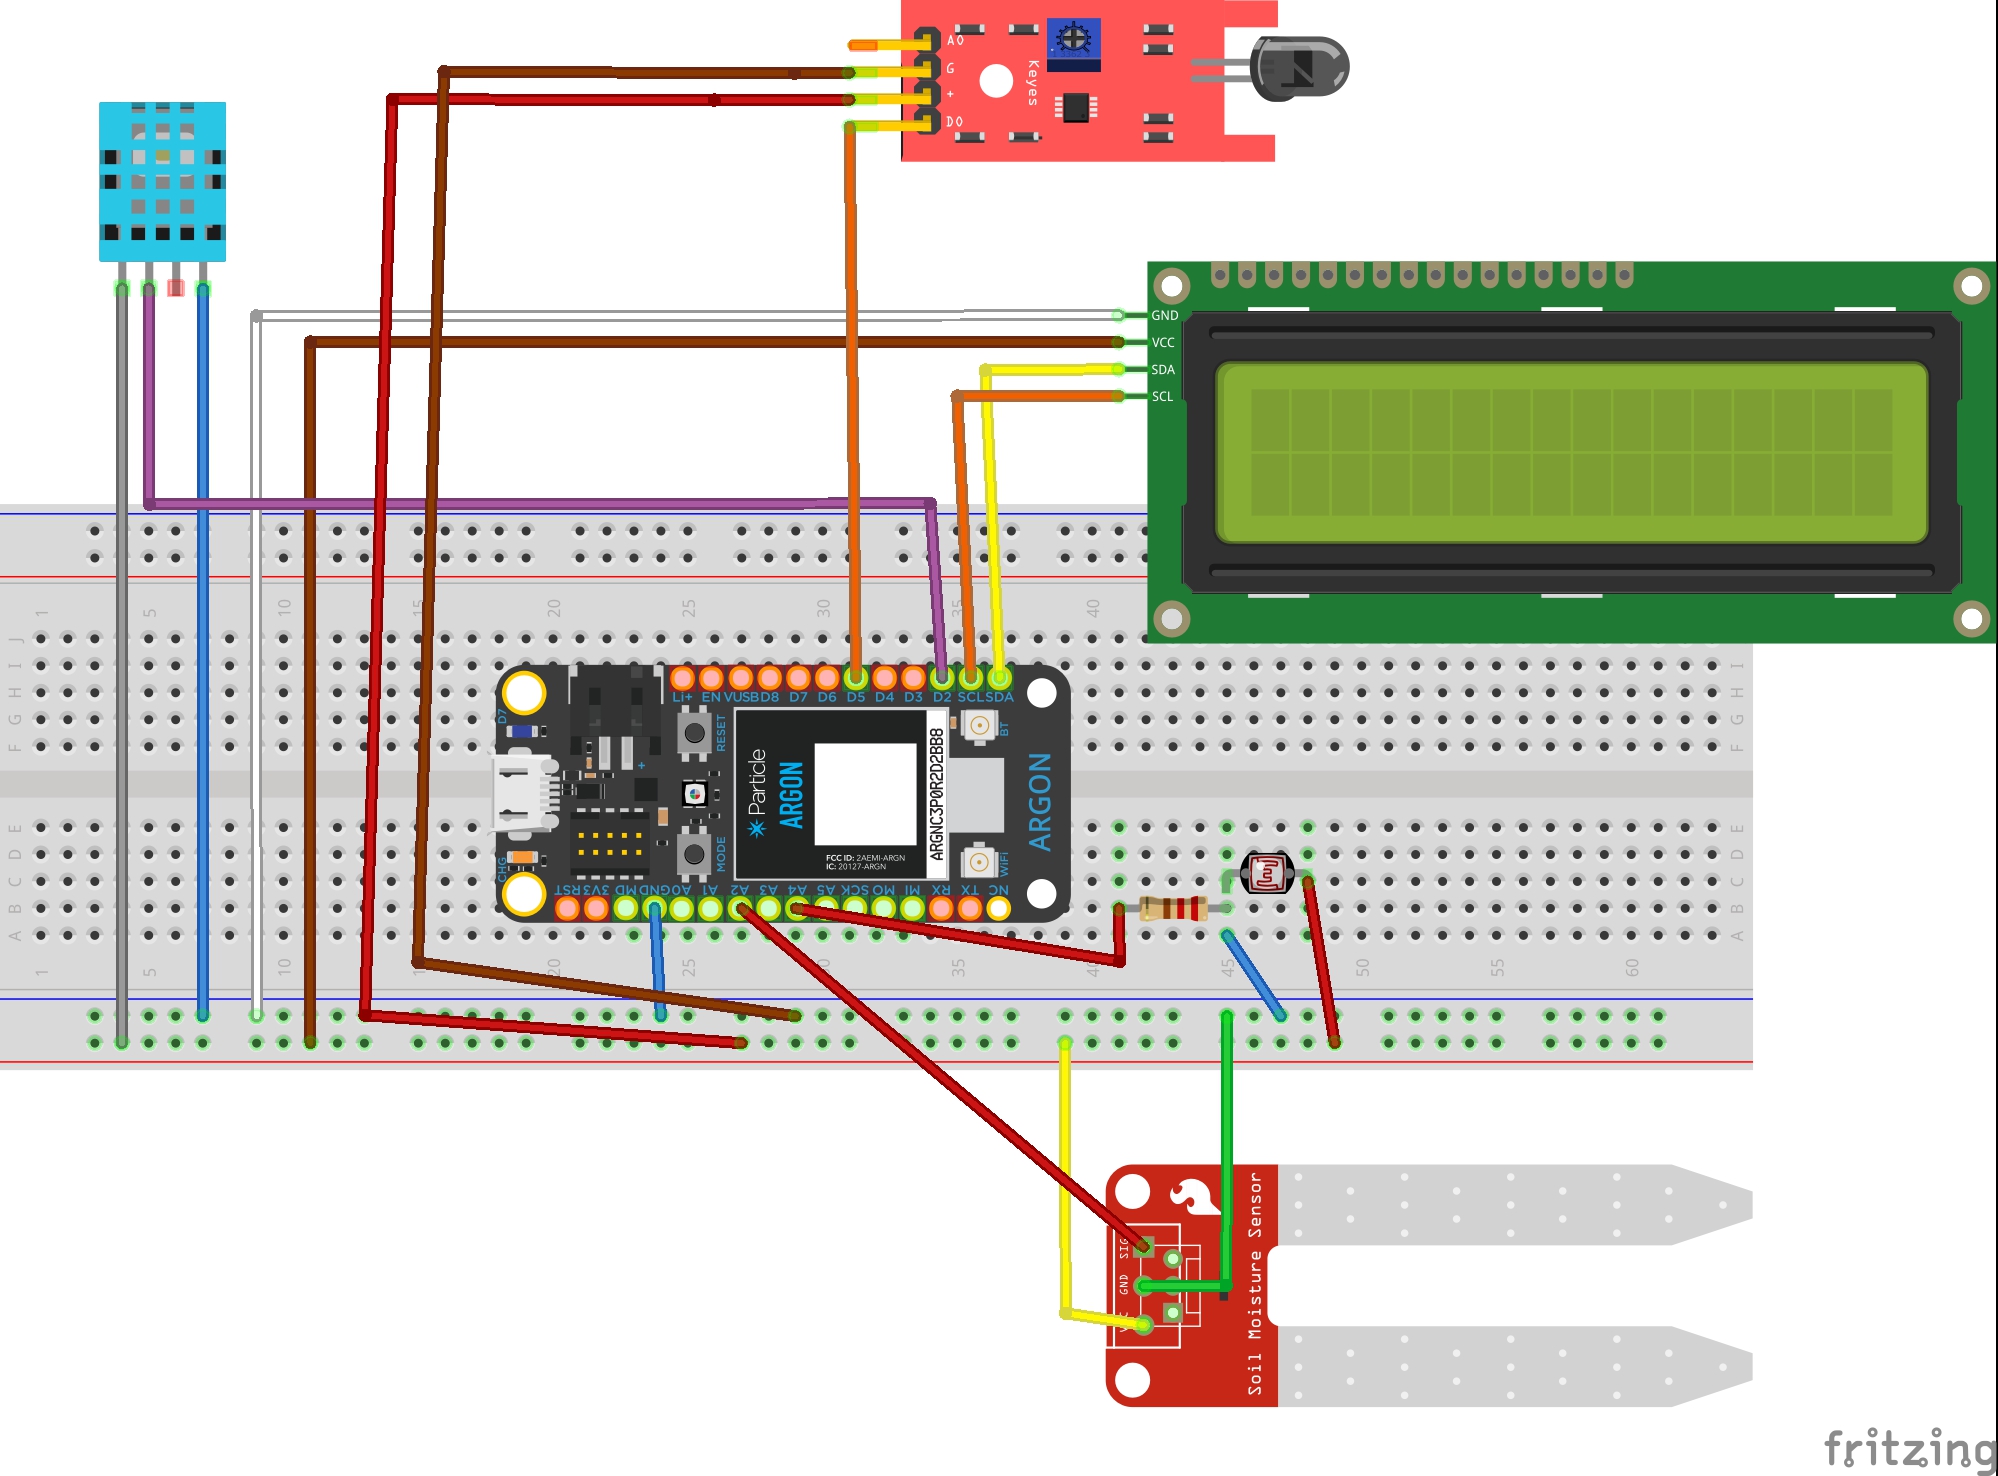
I have connected Data pin of DHT11 to D2 pin, A0 pin of Soil moisture sensor to A2 pin, D0 pin of fire sensor to D5 pin on argon and phototransistor pin to A4 of argon. Before you proccee I request you to look at Argon pinout.
I mounted all three sensors after connection on a foam sheet using double sided tape. Argon is powered by a 3.7v battery, but I am also powering my soil moisture sensor with it(the readings would be correct since it draws very less current). All other sensors and lcd are to be powered by external battery.
However, it took time to play with lcd for me because I did have 5v to 3.3 v logic level converter. So I made pretty basic connection with 4.7 kilo ohms pull-up resistors. Thankfully it works(please read the documentation otherwise you might end up with fried Argon board https://docs.particle.io/support/particle-devices-faq/i2c-faq/).
Step 2: Exploring the IDE and programming
After connecting all the electronics, now let's get our hands on coding our Argon. Particle IDE and devices are amazing, you feel that your work is automated with few steps and lines(especially integrations).
Three external public libraries was used for 16x2 LCD, DHT11 sensor, ThingSpeak and JSON data handling.
#include <LiquidCrystal_I2C_Spark.h>
#include <SparkJson.h>
#include <ThingSpeak.h>
#include "Adafruit_DHT.h"
#include "Particle.h"
The codes are very simple, thanks to particle libraries for good documentation. You might have trouble working with DHT11 since it sometimes gives wrong readings. I made function for reading DHT11, reading light, moisture, battery and fire.
 void readDht()
{
   // Wait a few seconds between measurements.
	delay(2000);
  // Reading temperature or humidity takes about 250 milliseconds!
  // Sensor readings may also be up to 2 seconds 'old' (it's a very slow sensor)
	float h = dht.getHumidity();
   float t = dht.getTempCelcius();                  // Read temperature as Celsius
	float f = dht.getTempFarenheit();           // Read temperature as Farenheit
	if (isnan(h) || isnan(t) || isnan(f))
	{
		Serial.println("Failed to read from DHT sensor!");
		return;
	}
	float hi = dht.getHeatIndex();               // Compute heat index
	float dp = dht.getDewPoint();
	float k = dht.getTempKelvin();
// store in global variables
	humidity = h;
	temperature = t;
	dew_Point = dp;
	heat_Index =hi;
// testing the data in serial monitor
	Serial.print("Humid: ");
	Serial.print(h);
	Serial.print("% - ");
	Serial.print("Temp: ");
	Serial.print(t);
	Serial.print("*C ");
	Serial.print(f);
	Serial.print("*F ");
	Serial.print(k);
	Serial.print("*K - ");
	Serial.print("DewP: ");
	Serial.print(dp);
	Serial.print("*C - ");
	Serial.print("HeatI: ");
	Serial.print(hi);
	Serial.println("*C");
	Serial.println(Time.timeStr());
}
void read_Light()
{
   int lightTemp = analogRead(MOISTURE_PIN);
   Serial.println(lightTemp);
   light = (100 - ((lightTemp/4095)*100)); // each analog pin gives max value of 4095
   Serial.print("light % ");
   Serial.print(light);
   delay(1000);
}
void read_Moisture()
{
 int moisture_analog = analogRead(MOISTURE_PIN); // read capacitive sensor
 Serial.println(moisture_analog);
 moisture = (100 - ( (moisture_analog/4095.00) * 100 ) );
   Serial.print("moisture % ");
   Serial.print(moisture);
   delay(1000);
}
void read_Fire()
{
 state = digitalRead(FIRE_PIN);
 digitalWrite(D7, state);
}
void battery()
{
   voltage = analogRead(BATT) * 0.0011224;
   voltage = map(voltage,0.0,5.0,0.0,100.0);
}
I made another function to check for critical level of data or any alert. The message code is sent to Firebase as I don't want to send string(it consumes lots of memory also makes responses slow) the message code would be decoded in mobile app.
Here is the charts from web, I used to set values to notify on lcd(extreme heat index or high dew point which is very uncomfortable).
 void checkCritical()
{
   if(light_threshold!=0&&moisture_threshold!=0)
   {
       if(light<light_threshold||moisture<moisture_threshold)
       {
            if(moisture<moisture_threshold)
            {
            message="Water LOW";
            messageCode=1;
            }
            else if(light<light_threshold)
            {
            message="Light LOW";
            messageCode=2;
            }
            else
            {
            message="Water Light LOW";
            messageCode=3;
            }
       }
   }
   else if(state==1 || state==HIGH)
   {
       message="Alert Fire";
       messageCode=4;
   }
   else if(heat_Index>27&&heat_Index<32)
   {
   message="! Heat Cramps";
   messageCode=5;
   }
   else if(heat_Index>32&&heat_Index<41)
   {
   message="! Heat Stroke";
   messageCode=6;
   }
   else if(heat_Index>41||heat_Index>54)
   {
   message="!Extreme danger";
   messageCode=7;
   }
   else if(dew_Point<10)
   {
   message="Skin irritation"; // add your own message from the dew point hazard char above
   messageCode=8;
   }
   else if(dew_Point>26)
   {
   message="deadly for asthma patients";
   messagCode=9;
   }
   else if(voltage<1)
   {
   message="battery low";
   messageCode=10;
   }
   else
   {
       message="Normal";
       messageCode=0;
   }
}
I made a bunch of functions to publish data to integrations.
void publishData() //publish to firebase
{
	char buf[256];
	snprintf(buf, sizeof(buf), "{\"temp\":%.2f,\"humid\":%.2f,\"dewpoint\":%.2f,\"heatindex\":%.2f,\"moist\":%.2f,\"volt\":%.2f,\"light\":%.2f,\"message\":%d}",
	temperature, humidity, dew_Point, heat_Index, moisture, voltage, light, messageCode);
	Serial.printlnf("publishing %s", buf);
	Particle.publish(PUBLISH_EVENT_NAME, buf, PRIVATE);
	delay(3000);
}
void writeThingSpeak()
{
   int volt_percent=map((int)voltage,0,5,0,100);
   ThingSpeak.setField(1, (float)temperature);
   ThingSpeak.setField(2, (float)humidity);
   ThingSpeak.setField(3, (float)dew_Point);
   ThingSpeak.setField(4, (float)heat_Index);
   ThingSpeak.setField(5, (float)light);
   ThingSpeak.setField(6, (float)moisture);
   ThingSpeak.setField(7, (float)volt_percent);
   // Write the fields that you've set all at once.
   ThingSpeak.writeFields(myChannelNumber, myWriteAPIKey);
   Serial.println("Thingspeak");
   // Give time for the message to reach ThingSpeak
   delay(3000);
}
Added one more function to read the threshold data from mobile app and update it into Argon.
void getDataHandler(const char *topic, const char *data)
{
	StaticJsonBuffer<255> jsonBuffer;
	char *mutableCopy = strdup(data);
	JsonObject& root = jsonBuffer.parseObject(mutableCopy);
	free(mutableCopy);
	// Because of the way the webhooks work, all data, including numbers, are represented as
	// strings, so we need to convert them back to their native data type here
	 moisture_threshold = atof(root["lightTh"]);
	 light_threshold = atof(root["waterTh"]);
         messageCode = atoi(root["message"]);
	Serial.printlnf("light=%.2f water=%.2f message=%d", light_threshold,moisture_threshold,messageCode);
}
Carefully note the event name for every publish method. Same event name will be used for webhook configuration for particular task. The complete code is attached in code section.The configuration of web services is will be discuss in next section. When you finished the configuration upload the firmware and power up the device. You will observe the following result from ThingSpeak device tab:
You can edit your dashboard as per your choice.
You will observe following output from Firebase console. The PUT method is used update the data without creating additional table.
This is the Google Sheet, note the formula used to update the crop rates. Publish your document to make it accessible to your android app. You can customize it with your own custom graphs.
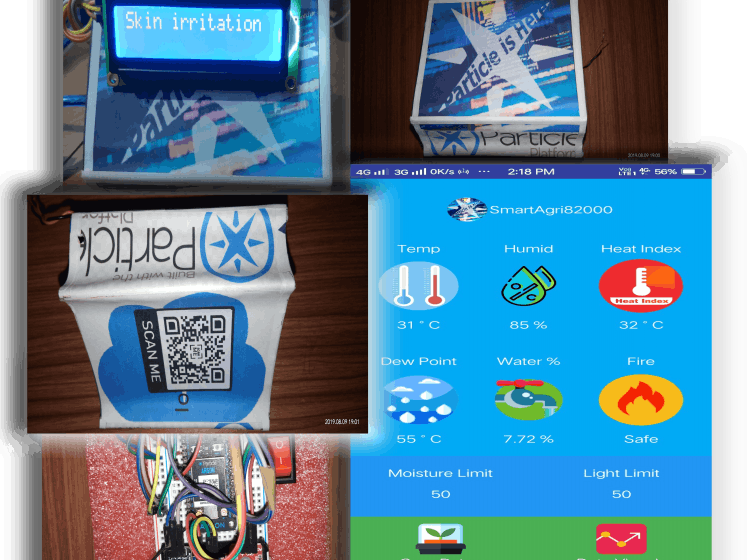
The view of Android app would be as follow. The device ID shown above is from the scanned QR code on enclosure(icon beside device id will be used to signal emergency and thus all argon devices in farm would show emergency text on lcd). I also wanted to add instant messaging from one device to other(mesh network) but I didn't had any Xenon with me so I left that part.
I have used several web services, like ThingSpeak for data visualization, Google Sheets for crop rate, seed rate update. Firebase for storing real time data of farm and receiving encoded messages from device. All web services are connected through particle webhooks.
A webhook is generally a method of altering the behaviour of web page with custom callbacks, simply it connects two different applications, when an event happens on the trigger application, it serializes data about that event and sends it to a webhook URL from the action application—the one you want to do something based on the data from the first application.
It is very easy to configure webhook for Particle device using Particle console. Let's get started.
Configuring Particle webhook for Firebase:Step 1: Log in to Firebase console using your gmail account. Click on "Add Project".
Step 2: Give a project name and accept the terms and click to "Create Project".
Step 3: After creating project go to Database tab and select Create database.
Step 4: Choose Start in test mode and click to Next.
Step 5: Note the URL of the database. It will be required later on configuring Webhook from Particle console as well as making Android app.
Step 6: From the Rules tab set read and write permission as true.
Step 8: Go to Service accounts -> Database secret -> Add secret -> Show and copy it (we will paste this for our app and integrations)
Step 9: Go to Particle console and from the integration start a new webhook integration. Choose Custom Template. Fill up all the fields as follows.
Finally, click on Create webhook to make it final. Webhook for Firebase is now ready.
Step 10: Go to Particle console and from the integration start a new webhook integration(this will be to read the threshold value from mobile app and set it into argon memory). Choose Custom Template. Fill up all the fields as follows. Make sure that your URl and auth token is same.
Finally, click on Create webhook to make it final. Webhook for Firebase read is now ready.
Configuring Particle webhook for Google Sheet :Step 1: I took help from this website, before proceeding further read and understand and follow this first https://diotlabs.daraghbyrne.me/docs/working-with-data/webhooks/google_sheets
Follow my step:Give url and ID of your own Google Sheet.
If all goes well you will get a successful response.
Developing Android App using Thunkable:**You can use MIT App Inventor also.
Making app using App Inventor is very easy. No coding is required. We will read data from firebase using the app. MIT App Inventor has a built in extension for interacting with firebase. We just need to add the extension in our project. Use same url and token you used for webhooks.
Here is the image of blocks for the home screen of our app.
For making enclosure I bent the upper lid of my old PSU from computer in the form of a pentagon and pasted colourful stickers on it. I also stuck solar cell and lcd on it later. I have attached the stickers for you to download, below.
I tried to incorporate SDG Goal 8 in my project because it says "Decent work and Economic Growth", which is exactly what is going to happen if this device is implemented. As stated the fact earlier that in 2017 the overall economy of India went down due to distress sale of crops. Moreover, we will be generating huge amount of data through our devices so we need a strong foundation to take care of our data(more career opportunities). Due to advancement of AI and IoT the work would become a child's play. Now farming would not only decrease a huge gap of labour force between men and women, any lady would love to do farming with these type of devices.


_zhWsCcSEcl.jpg?auto=compress%2Cformat&w=48&h=48&fit=fill&bg=ffffff)


_3u05Tpwasz.png?auto=compress%2Cformat&w=40&h=40&fit=fillmax&bg=fff&dpr=2)
Comments