We love to be able to grow our favorite plants all year round but since each plant has temperature requirements, it isn’t possible to grow them outside; it is possible however to grow them in a greenhouse. The perfect temperature for a greenhouse is 27°C. Most plants and vegetables will grow healthy under this temperature. Greenhouse temperature control is important to keep plants growing even during the off season.
The greenhouse ideal temperature must be maintained because you are growing the plants in artificial conditions and if you don’t manage the greenhouse correctly your plans will die off. Greenhouse temperature can build up fast if you have a lot of plants in the greenhouse so it is important to apply some measures at controlling it. Equipping your greenhouse with temperature control is a good step.
Greenhouse temperature for vegetables depends on the type of crop. But generally optimum greenhouse temperature is kept between 32°C (90°F) and 24°C (75°F).
So with the help of Bolt WiFi module, a temperature monitor system is developed in order to keep track of the temperature inside the greenhouse. This system continuously monitors the temperature with an interval of 5 minutes. It can also send an SMS alert to the specified mobile number warning about the current temperature and asking to take the required measures when the temperature inside the greenhouse goes out of the specified range. Also with the help of Bolt Cloud we can analyze the data in form of a line graph.
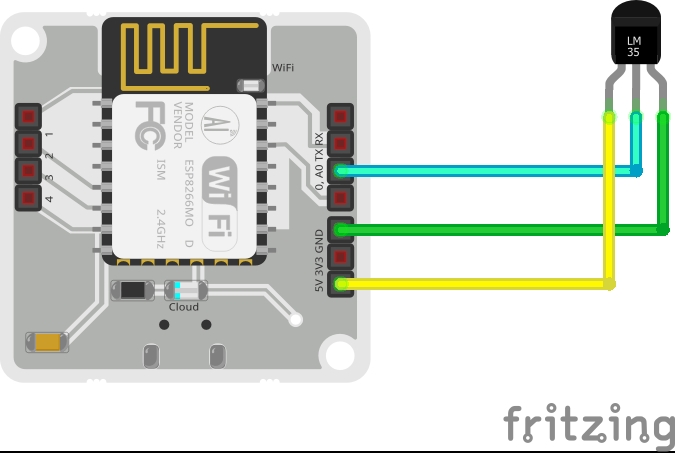
The first step is to connect the LM35 temperature sensor to the Bolt WiFi module.
Step 1: Hold the sensor in a manner such that you can read LM35 written on it.
Step 2: In this position, identify the pins of the sensor as VCC, Output and Gnd from your left to right.
Step 3: Using male to female jumper wire connect the 3 pins of the LM35 to the Bolt Wifi Module as follows:
- VCC pin of the LM35 connects to 5v of the Bolt Wifi module.
- Output pin of the LM35 connects to A0 (Analog input pin) of the Bolt Wifi module.
- Gnd pin of the LM35 connects to the Gnd.
Step 4: Now power up the Bolt WiFi module using the micro USB cable. It can either be connected to a USB port of a PC/Lap or to a 5V mobile adapter.
Configuring the Bolt WiFi module- Using the Bolt IOT app from play store, lets setup internet connectivity to the Bolt WiFi module. In the App, click the 'ADD DEVICE' button and follow the steps as instructed to connect the Bolt WiFi module to a WiFi network/Mobile Hotspot.
Now go to https://cloud.boltiot.com and login with your credentials. Then add your device using the 'ADD NEW DEVICE' button.
Next step is to add a product. Click on 'ADD PRODUCT' option and configure the product as Input Devices, GPIO. Then in the hardware section, select the 'A0' pin and add a variable name. In the code/software section the code is given as shown below in-order to obtain a line graph from the measured data.
setChartLibrary('google-chart');
setChartTitle('Temperature Monitor Graph');
setChartType('lineGraph');
setAnimation(true);
setAxisName('Time','Temperature');
mul(1/10.24);
plotChart("time_stamp","tem");
Note: The language used is JavaScript and the variable name for 'A0' pin is given as "tem".
From the https://cloud.boltiot.com page you will get the API key and Device ID. Ensure to note down the same for further use.
Twilio AccountIn order to send the SMS we will be using a third party application Twilio. Go-to https://www.twilio.com/ and create an account. From there get a trial number. Note down the SSID, Authentication Token, From Number and To Number assigned to you.
CodingFor the coding part we will be using the Virtual Linux System. Set up the virtual system using VirtualBox and Ubuntu Server. Then login to your machine.
Now create a python file conf.py and save the credentials such as:
API key, Device ID (from Bolt cloud)
SSID, Authentication Token, From Number and To Number(from Twilio)
SID='ACXXXXXXXXXXcd43XXXXXXXXXXec65dc4'
AUTH_TOKEN='53XXXXXXXXXXXXXXXXXXXX92018e'
FROM_NUMBER='+19XXXXXXXXX1'
TO_NUMBER='+918XXXXXXXX6'

API_KEY='08XXXXX1-8XX6-4XX8-aXX5-5XXXXXXce20'
DEVICE_ID='BOLTXXXXXXX'
Next, in a separate python file write the main code:
import conf
from boltiot import Sms, Bolt
import json, time
Here the required libraries are imported along with the conf file which we created earlier.
max_limit=32
min_limit=24
mybolt=Bolt(conf.API_KEY, conf.DEVICE_ID)
sms=Sms(conf.SID, conf.AUTH_TOKEN, conf.TO_NUMBER, conf.FROM_NUMBER)
Then maximum and minimum temperature limits are set as 32 and 24 degree celsius respectively and 2 objects are created for Bolt and Sms respectively.
while True:
	print("Reading temperature")
	response=mybolt.analogRead('A0')
	data=json.loads(response)
	print("Greenhouse is : "+str(round(int(data['value'])/10.24,2))+" degree celsius")
	try:
		sensor_value=int(data['value'])
		temperature=round(sensor_value/10.24,2)
		if temperature>max_limit:
			print("Making   request to Twilio")
			respons=sms.send_sms("Greenhouse temperature is "+ str(temperature)+" degree celsius. Temperature exceeded maximum limit. Deploy cooling measures ")
			print("Response received from Twilio is: "+str(respons))
			print("Status of sms is: "+ str(respons.status))
		elif temperature<min_limit:
			print("Making   request to Twilio")
			respons=sms.send_sms("Greenhouse temperature is "+ str(temperature)+" degree celsius. Temperature exceeded minimum limit. Deploy heating measures ")
			print("Response received from Twilio is: "+str(respons))
			print("Status of sms is: "+ str(respons.status))
	except Exception as e:
		print("Error: Details")
		print(e)
	time.sleep(300)
In the while statement:
- First the data is read from the sensor and then printed. While printing the sensor value, it is divided by 10.24 to get the temperature in degree celsius.
- round() is used to round to 2 decimal places.
- Next in the try block, an if statement is provided. If the temperature rises above the maximum limit, a request is made to Twilio to send an SMS indicating the current temperature and instructing to deploy cooling measures.
- Similarly if the temperature decreases below the minimum limit, a request is made to Twilio to send an SMS indicating the current temperature and instructing to deploy heating measures.
- Further, the exception block is used to print the error in any case it may occur.
- Last, a time delay of 5 minutes (300 seconds) is provided to measure the temperature in an interval.
Note: I used hot and cold water in a steel container to stimulate temperature above 32 degree and below 24 degree respectively.


Comments
Please log in or sign up to comment.