


Hardware components | ||||||
 |
| × | 1 | |||
 |
| × | 1 | |||
 |
| × | 1 | |||
Software apps and online services | ||||||
| ||||||
We're going to explore various uses of the Arduino MKR NB 1500 for cellular projects!
By the end of this tutorial you'll be able to create IoT apps in the web with two-way real-time communication with your board from anywhere in the world! The concepts covered here will also enable you to connect to any Internet of Things platform that supports the MQTT protocol!
The Arduino MKR NB 1500 is a Narrowband-IoT and Cat-M1 cellular development board based on the SAMD21 Cortex-M0+ 32bit Low Power ARM MCU and a UBLOX SARA-R410M
There are a lot of similarities between this board and the MKR GSM 1400 .
Key Differences- NB-IoT and Cat-M1 instead of 2G/3G
- Minimum battery requirement of 700 mAh vs 1500 mAh for the MKR GSM 1400
- MKRNB library instead of the MKRGSM library
- Activate Hologram.io SIM card
- Install Arduino IDE along with MKR NB 1500 board definition, MKRNB and ArduinoMQTTClient libraries
- Set up the Arduino MKR NB 1500
- Use MQTT over cellular to connect to an IoT platform
Hologram.io is a cellular network provider perfect for makers. At $0.60 /mo plus $0.40 per mb, you'll have plenty of data for most IoT projects. You can get a free SIM card by going to hologram.io and then activate it at dashboard.hologram.io. Its important to do this part first so that your SIM has time to activate as we set up our coding environment.
Install Arduino IDEDownload the Arduino IDE at the following link. We will not be using the online code editor for this project. https://www.arduino.cc/en/Main/Software
Install MKR 1400 Board Definition- Open Arduino IDE
- Go to Tools > Board > Boards Manager
- Search MKR and an entry for "Arduino SAMD Boards" will show up, install that
- Open the Arduino IDE
- Go to Sketch > Include Library > Manage Libraries
- Search for MKRNB and install it
- Search for ArduinoMqttClient and install it
- Insert the SIM card into the Arduino MKR NB 1500
- Attach the antenna
- Plug in the battery (Needs to be at least 700 maH)
- Connect the USB cable
- Open the Arduino IDE, select "Arduino MKR 1500" in Tools > Board
- In Tools > Port select your board (it should be obvious which one to select)
MQTT (Message Queuing Telemetry Transport) is probably the most commonly used messaging protocol for the Internet of Things.
We're going to connect the Arduino MKR NB 1500 to an MQTT broker to create a very basic IoT application!
Thankfully, the MKRNB library gives us a client object that is interchangeable with WiFi or Ethernet clients. Meaning we can just drop it into existing network libraries. We'll be creating an MQTT connection to a public MQTT broker and using it to publish and subscribe to topics.
The example sketch provided will print out incoming messages from the subscribed topic to the serial console. It will also periodically publish a sensor value to a separate topic. We'll use chirpers.io to interact with the Arduino remotely!
Chirpers is essentially a fork of node-red that runs entirely client-side in the browser and lets you interact with hardware and web services to build IoT applications visually!
Program the sketch!- Create a new sketch
- Copy https://github.com/HologramEducation/hologram-arduino-mkr-1500/blob/master/examples/MKR-1500/MQTT/MKRNB-MQTT.ino into the blank sketch
We're going to add the MQTT server credentials next. These are included near the top of the Arduino sketch.
These are the defaults, you can change them if using a different broker.
IMPORTANT: Edit the topics so that they are unique. Otherwise you'll see messages from everyone!
The subscribeTopic is the topic your board will subscribe to, meaning the messages it "receives"
The publishTopic is the topic we will publish to, meaning any other client subscribed to that topic will "receive" messages FROM the board.
- Verify & Upload the sketch!
- Open the Serial Monitor
We don't need to create an account to use chirpers.com. Since it runs in your browser, it also saves everything in your local storage.
- Go to https://chirpers.com/browser/
- Click the top-left menu icon and click Import -> Clipboard
- Paste in the following
[{"id":"5199e666.cafc58","type":"mqtt-broker","z":"91xN7kD2zjI","server":"wss://iot.eclipse.org:443/ws","clientId":"","username":"","password":""},{"id":"SDgXjXm8EXM","type":"mqtt in","z":"91xN7kD2zjI","name":"","topic":"hologram-YOUR-NAME/from","broker":"5199e666.cafc58","x":330,"y":253,"wires":[["7oz7rvrDqtw","y3MxuNrcNhU"]]},{"id":"mib-Z2IUCWQ","type":"inject","z":"91xN7kD2zjI","name":"","topic":"","payload":"on","payloadType":"str","repeat":"","crontab":"","once":false,"allowDebugInput":false,"x":302,"y":66,"wires":[["TCHX2DIYKn4"]]},{"id":"TCHX2DIYKn4","type":"mqtt out","z":"91xN7kD2zjI","name":"","topic":"hologram-YOUR-NAME/to","broker":"5199e666.cafc58","x":533,"y":115,"wires":[]},{"id":"7oz7rvrDqtw","type":"espeak","z":"91xN7kD2zjI","name":"","variant":"Alex","active":false,"x":531,"y":219,"wires":[]},{"id":"y3MxuNrcNhU","type":"debug","z":"91xN7kD2zjI","name":"","active":true,"console":"false","complete":"false","x":553,"y":293,"wires":[]},{"id":"hknJ5yqYo-E","type":"inject","z":"91xN7kD2zjI","name":"","topic":"","payload":"off","payloadType":"str","repeat":"","crontab":"","once":false,"allowDebugInput":false,"x":301,"y":161,"wires":[["TCHX2DIYKn4"]]},{"id":"K1RAF7aNi1g","type":"voice rec","z":"91xN7kD2zjI","name":"","x":279,"y":114,"wires":[["TCHX2DIYKn4"]]}]
The default broker from the sketch is already configured in this example flow.
You will however need to match the MQTT topics to the unique topics you entered into the sketch.
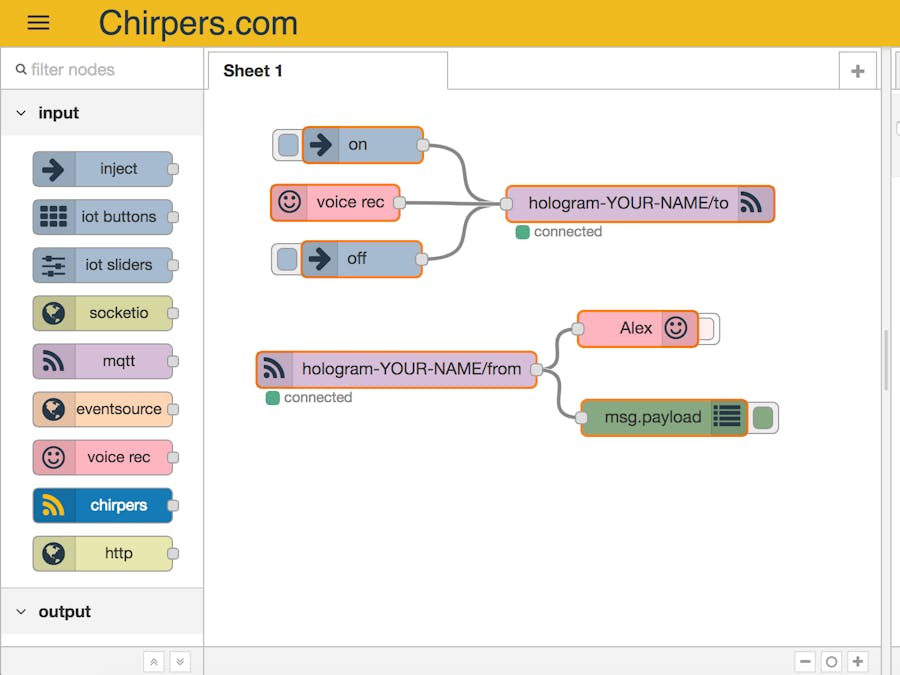
- Double click the MQTT out node and change the topic to match the one you set in the sketch in an earlier step and click Ok
- Repeat for the MQTT in node
Click "Run" in the top right corner to start your flow!
Flow UsageThe inject node labeled "on"/"off" will send a message to turn on/off the onboard LED on your MKR NB 1500. The onboard LED is on pin 6.
Sensor values from your Arduino MKR should show in the Debug tab in the Chirpers flow designer.
Understanding the CodeYour main loop is where we called the publishSensorVal function at a specific interval that can be defined at the top of the sketch. It is currently set at 10, 000 ms which is equivalent to 10 seconds.
// Publish interval
long previousMillis = 0;
long interval = 10000;
Main Loop
void loop() {
 unsigned long currentMillis = millis();
 // call poll() regularly to allow the library to receive MQTT messages and
 // send MQTT keep alives which avoids being disconnected by the broker
 mqttClient.poll();
 // Enforce Interval
 if(currentMillis - previousMillis > interval) {
       previousMillis = currentMillis;
       // Call a function that handles publishing message
       publishSensorVal();
 }
}
The publishSensorVal is where we handle preparing our sensor value to be published using the mqttClient object.
void publishSensorVal() {
   // read the first Analog pin
   int sensorVal = analogRead(0);
   String speak = "The sensor val is " + String(sensorVal);
   // Publish our sensor value to the publish topic
   mqttClient.beginMessage(publishTopic);
   mqttClient.print(speak);
   mqttClient.endMessage();
}
The onMqttMessage function at the end of the sketch handles incoming messages
void onMqttMessage(int messageSize) {
 // we received a message, print out the topic and contents
 Serial.println("Received a message with topic '");
 Serial.print(mqttClient.messageTopic());
 Serial.print("', length ");
 Serial.print(messageSize);
 Serial.println(" bytes:");
 // We want to read each character into a useable String
 String content = "";
 char character;
 // use the Stream interface to print the contents
 while (mqttClient.available()) {
   character = (char)mqttClient.read();
   content.concat(character);
 }
 handleCommand(content); // This function does something with our incoming string
 Serial.println(content);
 Serial.println(); Serial.println(); // double spacing
}
When a message is received in this function it called the handleMessage function which handles the logic of turning the onboard LED on or off.
void handleCommand(String cmd) {
 if (cmd == "on"){
   digitalWrite(LED, HIGH);
 }else if(cmd == "off"){
   digitalWrite(LED, LOW);
 }
}


Comments
Please log in or sign up to comment.