

Hardware components | ||||||
 |
| × | 1 | |||
| × | 1 | ||||
| × | 1 | ||||
Software apps and online services | ||||||
 |
| |||||
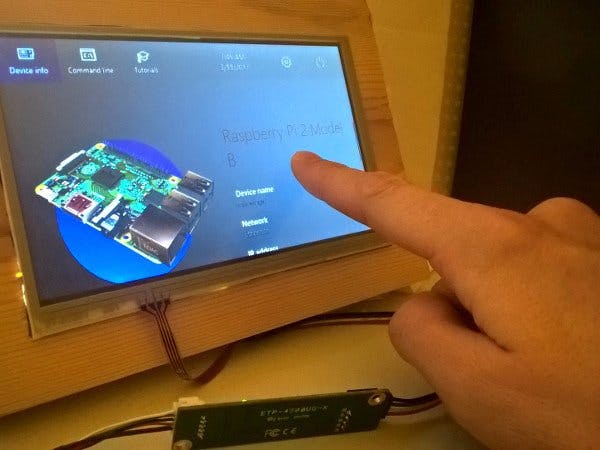
I recently bought a cheap 7" 4-wired touchscreen with ETP-4500UG-X controller connecting to a device using USB. I wanted to use it with my 7" LCD monitor connected with HDMI to my Raspberry Pi2 running Windows 10 IoT.
The touchscreen works perfectly on my Windows 10 desktop computer with "eGalaxTouch" drivers from http://www.eeti.com.tw/drivers_Win.html, but, unfortunately, doesn't work with Raspberry Pi2 "out-of-the-box" as there is no driver for the controller in the default Raspberry Pi2 installation. EETI/eGalax doesn't provide drivers for Windows 10 IoT (ARM).
So the idea was to find some way to use the touchscreen on my Raspberry Pi2.
Connect the touchscreen to Raspberry Pi2 IoTThe controller uses USB bus and reports the following IDs when plugged to the Raspberry Pi2 device:
- VID = 0x0EEF
- PID = 0x0001
The connected touchscreen controller should be visible in the list of USB devices found by the OS. You can use "devcon.exe status USB\*
" command in PowerShell, connected to the device, to request the list of attached USB devices (how to start a PowerShell session with a device you can find here: https://docs.microsoft.com/en-us/windows/iot-core/connect-your-device/powershell). When executed, the command should display the list of all USB devices in the system and one of the devices should be "USB\VID_0EEF&PID_0001\5&3753427A&0&4
". If the device's driver is not installed, then the following message should be there:
USB\VID_0EEF&PID_0001\5&3753427A&0&4
   The device has the following problem: 28
   Problem status: 0xC0000490
As I feel a bit lack of information on driver development for Raspberry Pi2 IoT, so then the main idea was to utilize built-in "WinUSB" driver to work with the touchscreen controller. Information on the WinUSB driver you can find here: https://msdn.microsoft.com/en-us/library/windows/hardware/ff540283(v=vs.85).aspx#inf
The INF file to install WinUSB driver for the ETP-4500UG-X touchscreen controller you can find here: https://github.com/viktorisaev/TouchUsbInject/blob/master/etp4500ugx.inf
Possibly that the same WinUSB driver could be used with other types of USB touchscreen controllers, so then the following line in the INF file should be changed to match the actual touchscreen controller USB ids.In the line above, values "0EEF" and "0001" should be replaced with the corresponding VID and PID for the actual USB touchscreen controller's ids.
To install the WinUSB driver for the touchscreen controller, copy the INF file "etp4500ugx.inf" to the device and use
"devcon.exe install <full name of INF file in the device's file system>"(if you copy the INF file to the root folder of C: drive, then the command should looks like "devcon.exe install C:\etp4500ugx.inf ")
After installing the driver as described above and rebooting the device with "shutdown /r /t 0" command in PowerShell console, the result of the "devcon.exe status USB\*" request should be the following:
USB\VID_0EEF&PID_0001\5&3753427A&0&4
   Name: USB TouchController
   Driver is running.
Which means that the driver for the touchscreen controller is now installed and works correctly.
Emulate mouse with touchscreenSo to control the Raspberry Pi2 device with the touchscreen we will use an IoT background application, which will connect to the WinUSB driver using interrupts, receive touch information from the controller and emulates mouse actions based on this information. To emulate mouse activities I use "InputInjector" API from "Windows.UI.Input.Preview.Injection" namespace (I use Windows 10 IoT version 10.0.15063.0).
The source code for the background application you can find here: https://github.com/viktorisaev/TouchUsbInject. You should build the "TouchUsbInject" project from the solution and deploy it to the Raspberry Pi2 device. Then you can simply start it or even set it as a startup application as described here: https://www.hackster.io/AnuragVasanwala/windows-10-iot-core-setting-startup-app-887ed0. I used simple "Web-Management Portal", the name of the application is "TouchUsbInject".
Calibrate the touchscreenFor a touchscreen to work properly, a calibration procedure should be performed. I haven't implemented a special application for the calibration, so all the calibration should be done "manually" by putting corresponding values into "calibration.txt
" file which you can find in the folder:
"\\yourRaspberryPi2deviceIP>\c$\Data\Users\DefaultAccount\AppData\Local\Packages\TouchUsbInject-uwp_gv059k86xqphm\LocalState"
The file consists of a single text line of 4 comma separated integers like "140,3900,280,3650". The values are: <X min>, <X max>, <Y min>, <Y max>.
The general rule for parameters tweaking is:
If the mouse moves faster than your finger, then decrease minimums and increase maximums.
On my physical touchscreen setup I had to invert Y axis. The calculations for the mouse coordinates based on touch coordinates are the following:
UInt32 mouseX = (x - xMin) * xScreen / width;
UInt32 mouseY = (height - (y - yMin)) * yScreen / height;
where xMin, xMax, yMin, yMax are calibration parameters from the calibration file, width=(xMax-xMin), height=(yMax-yMin) and xScreen and yScreen are number of mouse position units in a screen which is 65536 for both axis (see https://docs.microsoft.com/en-us/uwp/api/windows.ui.input.preview.injection.injectedinputmouseoptions).
IMPORTANT! The application reads the calibration parameters only once at the start, so to see your changes applied you should restart the application using, for example, the same "Web-Management Portal".
ConclusionI would really appreciate for any feedback, especially regarding other types of touchscreen controllers, as well as for any comments or improvements you can suggest for the project.
Enjoy the touch!


Comments