


Hardware components | ||||||
| × | 2 | ||||
 |
| × | 2 | |||
| × | 2 | ||||
| × | 2 | ||||
Software apps and online services | ||||||
 |
| |||||
 |
| |||||
Hand tools and fabrication machines | ||||||
 |
| |||||
This project is a very humble tribute to a mania, a trend I've seen in the Iot-verse since its beginning. #“Valentines”
(you came here to build the actual RotaSenso? skip to this symbol 🔄💙)
A Little Bit of HistoryI think the first project going in this direction (aka connecting to enviromnments enabling the sharing of a feeling, or in this case the sleeping time was "the Good Night Lamp" by Alexandra Des-champs Sonsino
The little lamps used to have cellular connection: I'm not sure it' still so.
We did something similar in Casa Jasmina: the EmojiLamp (2017). In this case we were using Telegram APIs to control the behaviour of a Ws2812 LED Strip.
Later, during the Pandemic, I've seen a wonderful project that still make me smile: the Yo-Yo Machines from Interaction Research Studio (2020).
In this case, you could build yourself for different devices, out of paper and glue: The Light Touch, the Speed Dial, the Knock Knock and the Flutter By. they were using wifimanager as Captive Portal and Socket.IO.
And then it's time for the RotaSenso!Well, my project (still) doesn't have a Captive Portal (that would be amazing when we deliver the RotaSenso to somebody allowing adding an unknown Wifi Network: in my TODO list!
What RotaSenso doed is sharing the position of the potentiometer in a public or private MQTT channel (I've teste many, and many are free). The Other RotaSenso move the Servo in the correspondingo postion.
Here is a little short explaining it!
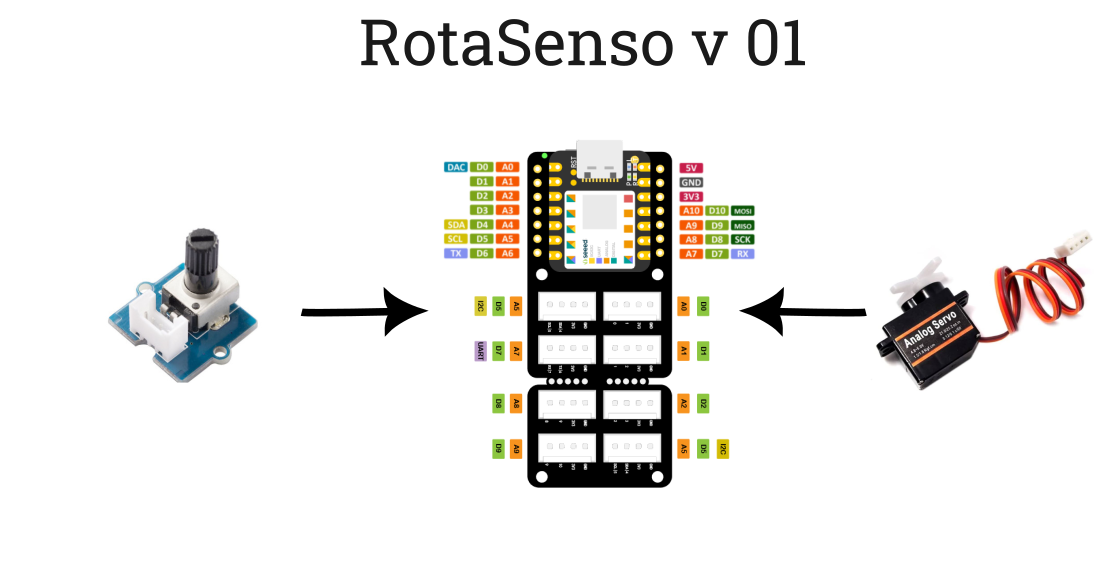
🔄💙Lets Start!Hardware BuildThe hardware is very simple and doesn't need soldering. The Servo will be hooked up to pin DO/A0, the Potentiometer to pin A5/D5.
1. Installing Arduino IDE and Required Libraries
- Download and Install Arduino IDE:Visit the Arduino website and download the latest version of the Arduino IDE suitable for your operating system. Install the software following the instructions provided on the website.
- Install the ESP32 Board Package:Open the Arduino IDE, go to File > Preferences, and add the following URL to the Additional Board Manager URLs field:
https://dl.espressif.com/dl/package_esp32_index.json- Next, navigate to
Tools > Board > Boards Manager, search for "ESP32, " and install the package. - Add Required Libraries:Go to
Sketch > Include Library > Manage Libraries..., and search for and install PubSubClient and ESP32Servo
2)Calibrate the positions
You will hae to create two similar boards or little "things" to put the RotaSenso in. Feel free to amaze us. Once you are done you will need to calibrate the two RotaSensos in order to know where are the 8 numbers
Here is the code for calibrate the two RotaSenso.
#include <ESP32Servo.h>

// 2025 Gomba San Valentine's Special RotaSenso project
// Calibrating the sheet: pot movement to servo movements

static const int servoPin = 1;         // servo pin
static const int potentiometerPin = A5; // pot pin

Servo servo1;

int lastMappedValue = -1;  // Stores the last recorded value
int stableCount = 0;       //Count how many cycles the value is stable
const int stabilityThreshold = 10;  // Number of stable readings before printing

void setup() {
Serial.begin(115200);
servo1.attach(servoPin);  // Connetti il servo al pin 1
}

void loop() {
int servoPosition = map(analogRead(potentiometerPin), 0, 4096, 0, 180);
servo1.write(servoPosition);
// Get the value from 0 to 7
int mappedValue = mapTo8Intervals(servoPosition);
// If the value has changed, reset the counter
if (mappedValue != lastMappedValue) {
stableCount = 0;  // Resetta il contatore di stabilità
lastMappedValue = mappedValue;
} else {
stableCount++;  // Incrementa il contatore se il valore è stabile
}

// Print only if value is stable for X cycles
if (stableCount == stabilityThreshold) {
Serial.print("Servo Position: ");
Serial.print(servoPosition);
Serial.print(" -> Mapped Value: ");
Serial.println(mappedValue);
}
delay(20);
}

// Function that maps the servo value in 8 intervals from 0 to 7
int mapTo8Intervals(int value) {
return value / (180 / 8);  // 180° divided by 8 intervals
}
We are Ready to go
Here is the code for the two RotaSensos.Please remember to:
- Add your wifi and password!
- Change the MQTT Broker (line 14) with others (HiveMQ or EMQX are two of many) is that one is giving you problems
- the First will publish to test/SV02 (line 113) and receive on test/SV01 (line 51). The second RotaSenso will need to have these two variables in the opposite positions (be carefule about this!
- Increase the number of time the message is sent! On lin 110 I sent the data 3 times. You can increase this numeber in order to be mor sure the data was sent correctly. Possibly in the future we should sort out a way to have the two devices handshake.
// 2025 Gomba San Valentine's Special RotaSenso project
// Calibrating the sheet: pot movement to servo movements

#include <WiFi.h>
#include <PubSubClient.h>
#include <ESP32Servo.h>

// Credenziali WiFi
const char* ssid = "YourSSID";
const char* password = "Your-Wifi";
// MQTT broker
const char* mqtt_server = "public-mqtt-broker.bevywise.com"; // the other brokers if is not responding properly
// WiFi and MQTT client creation
WiFiClient espClient;
PubSubClient client(espClient);
// Interval for sending MQTT messages (we'll send based on the pot position though)
unsigned long lastMsgTime = 0;
const long msgInterval = 5000;
// Servo and Potentiometer Management
static const int servoPin = 1;           // servo pin
static const int potentiometerPin = A5;  // pot pin
Servo servo1;
int lastMappedValue = -1;           // Stores the last recorded value
int stableCount = 0;                // Count how many readings are stable
const int stabilityThreshold = 10;  // Number of stable readings before updating
// Servo 8 middle positions
float medianValues[] = { 11.25, 33.75, 56.25, 78.75, 101.25, 123.75, 146.25, 168.75 };
// Function for handling received MQTT messages
void callback(char* topic, byte* payload, unsigned int length) {
Serial.print("Messaggio ricevuto su topic: ");
Serial.println(topic);
// Convert the payload in a string
String message = "";
for (unsigned int i = 0; i < length; i++) {
message += (char)payload[i];
}
Serial.println("Contenut: " + message);
// If the message arrives at ‘/SV02’, check the value received
// IMPORTANT: CHANGE ‘/SV02’ to ‘/SV01’ for allowing the two devices to talk to each other
if (String(topic) == "test/SV01") {
int index = message.toInt();  // convert message to number
Serial.println(index);
// Checks that the index is valid (between 0 and 7)
if (index >= 0 && index < 8) {
float servoPos = medianValues[index];
servo1.write(servoPos);  // Moves the servo to the required position
Serial.print("Moved the servo to: ");
Serial.println(servoPos);
} else {
Serial.println("Error: Value out of range");
}
}
}
void setup() {
Serial.begin(115200);
servo1.attach(servoPin);  //  Initialise the servo
//  WiFi connection
WiFi.begin(ssid, password);
while (WiFi.status() != WL_CONNECTED) {
delay(1000);
Serial.println("Connecting to WiFi...");
}
Serial.println("Connected to WiFi");
// Set up MQTT server and callback for receiving messages
client.setServer(mqtt_server, 1883);
client.setCallback(callback);
// Initial connection to MQTT
reconnect();
}
void loop() {
// read pot
int servoPosition = map(analogRead(potentiometerPin), 0, 4096, 0, 180);
//servo1.write(servoPosition);
// Get the value from 0 to 7
int mappedValue = mapTo8Intervals(servoPosition);
// If the value has changed, reset the counter
if (mappedValue != lastMappedValue) {
stableCount = 0;  // reset counter for stability
lastMappedValue = mappedValue;
} else {
stableCount++;  //Increases the counter if the value is stable
}
// Print only if value is stable for X cycles
if (stableCount == stabilityThreshold) {
Serial.print("Servo Position: ");
Serial.print(servoPosition);
Serial.print(" -> Mapped Value: ");
Serial.println(mappedValue);
// send message 3 times for redundancy
for (int i = 0; i < 3; i++) {
// IMPORTANT: CHANGE ‘/SV02’ to ‘/SV01’ for allowing the two devices to talk to each other
client.publish("test/SV02", String(mappedValue).c_str(), true);
delay(50);
}
}
// Mantieni la connessione WiFi
if (WiFi.status() != WL_CONNECTED) {
Serial.println("WiFi lost! Reconnecting...");
WiFi.begin(ssid, password);
delay(5000);
}
// Maintain MQTT connection
if (!client.connected()) {
reconnect();
}
// Keep MQTT active
client.loop();
// for testing purposes
/*    // Send messages every 5 seconds without blocking the loop
if (millis() - lastMsgTime > msgInterval) {
lastMsgTime = millis();
Serial.println("Sending MQTT message...");
client.publish("test/SV01", "4");
}*/
}
// Function for MQTT reconnection
void reconnect() {
while (!client.connected()) {
Serial.print("Attempting MQTT connection...");
String clientID = "ESP32-" + String(random(1000, 9999)); // we are generating a random client id in order to have it different from the others
if (client.connect(clientID.c_str())) {
Serial.println("Connected to MQTT broker");
client.subscribe("test/SV01");  // subscribe to /SV01
client.subscribe("test/SV02");  // subscribe to /SV02
} else {
Serial.print("Failed, rc=");
Serial.print(client.state());
Serial.println(" Retrying in 5 seconds...");
delay(5000);
}
}
}
// Function that maps the servo value in 8 intervals from 0 to 7
int mapTo8Intervals(int value) {
return value / (180 / 8);  // 180° divided by 8 intervals
}


Comments
Please log in or sign up to comment.