


Hardware components | ||||||
 |
| × | 1 | |||
| × | 1 | ||||
| × | 1 | ||||
 |
| × | 1 | |||
 |
| × | 1 | |||
 |
| × | 1 | |||
 |
| × | 1 | |||
Software apps and online services | ||||||
 |
| |||||
 |
| |||||
 |
| |||||
Hand tools and fabrication machines | ||||||
 |
| |||||
 |
| |||||
| ||||||
| ||||||
Entrance doors are architectural elements we get through multiple times a day and still they use a very old technology: the key. As anyone, we were exhausted by the worries of taking care of a key, the difficulties of getting the keyhole right at night - not to say to allow one of our guests in while we were away (think of an airbnb house! we'll explore that soon!).
Fear no more, we managed to find a Solution! (and it's a cool one)
OverviewIn order to smarten our door, we have evaluated different kinds of authentication technologies and we thought that using a alphanumeric passcode is the best match of simplicity and security. Developing our project around the Arduino MKR WiFi 1010 enables WiFi and BLE connectivity, allowing us to connect it to our MQTT broker and integrate it in our favourite home automation software.
SetupThe first step is to modify your door by installing an electronic door lock. There are several models on the market ranging from very cheap to very expensive, choose in base of your needs. We had a door with a Keyless lock and we modified the electronics to fit our requirements. (exposing the opener contact)
The second step is to locate an accessible and permanent location for the keypad and the electronics. You can mount them together or not, depending on your situation. In our case, we had a ringbell box near the door, so we used it.
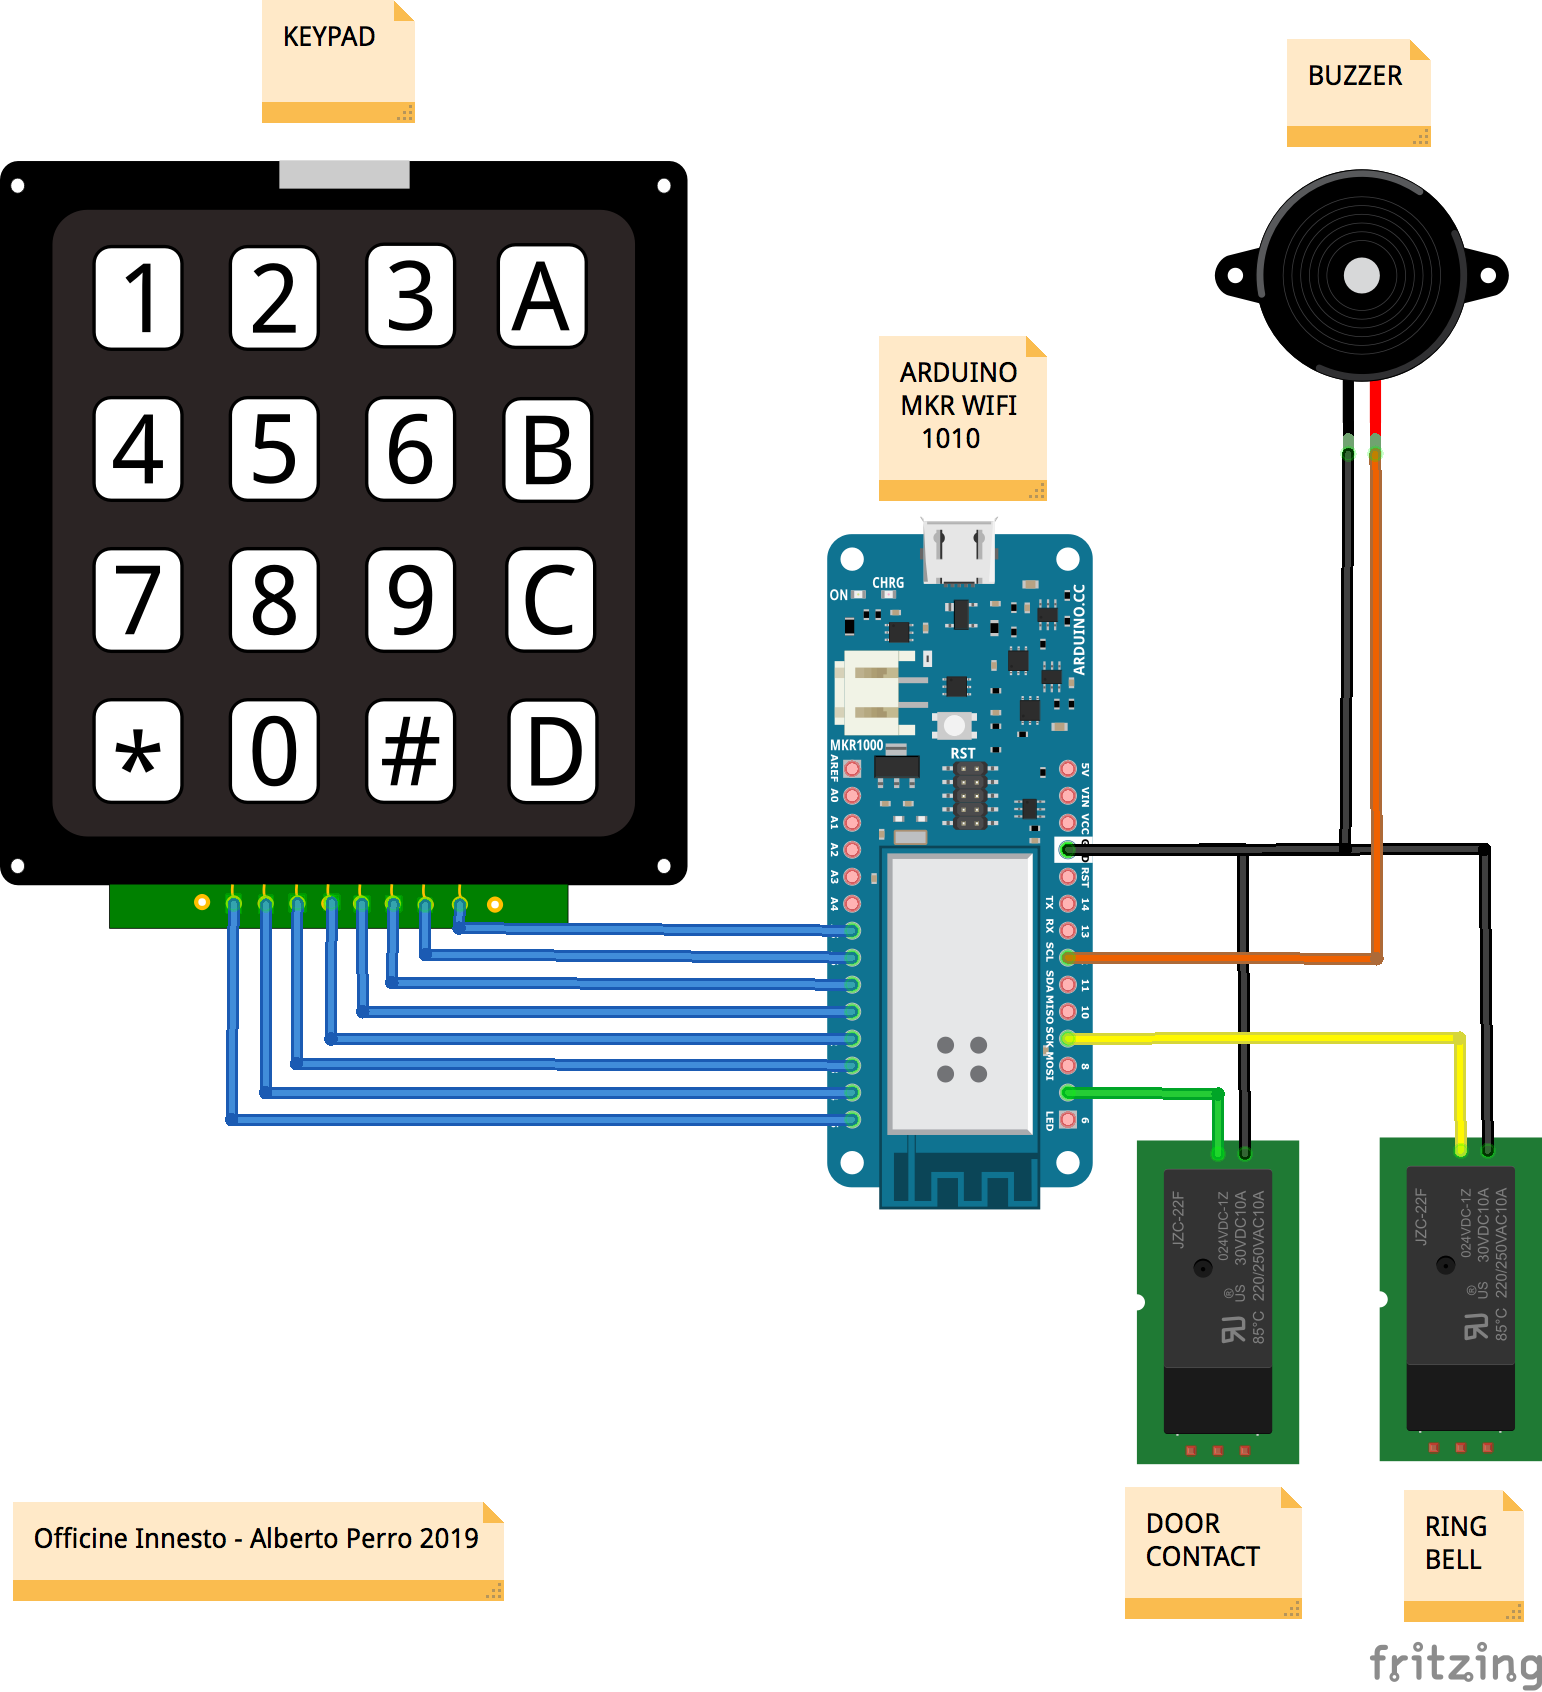
Then we start prototyping on a breadboard with some jumper wires. We hooked up the keypad all on one side and the outputs on the other to keep things tidy. Depending on your lock model, you could have to use octocouplers or relays in order to control the door. In our case the Arduino is powered by the lock circuitry and the lock is 3.3v compatible, so there is no problem hooking it up directly.
To test the circuit we've released a simple code that interfaces the keypad and the lock, without all the network mess. This is pretty straightforward and is fast to check if your circuit is configured correctly.
As you can see in the code below, you can configure the matrix layout and pins, a door opener contact and a ring output; there is also a buzzer pin to give a sound feedback to the user: change the code according to your setup.
// Officine Innesto - Alberto Perro 2019
// keypad settings
const byte ROWS = 4; //four rows
const byte COLS = 4; //four columns
char keys[ROWS][COLS] = { //keypad mapping
 {'1','2','3','A'},
 {'4','5','6','B'},
 {'7','8','9','C'},
 {'*','0','#','D'}
};
byte rowPins[ROWS] = {1,0,A6,A5}; //connect to the row pinouts of the keypad
byte colPins[COLS] = {5,4,3,2}; //connect to the column pinouts of the keypad
Keypad pad = Keypad( makeKeymap(keys), rowPins, colPins, ROWS, COLS );
//lock definitions
const int doorOpener = 7; //opener contact
const int doorRing = 9;   //ring contact
const int buzzer = 12;    //buzzer pin
char master[] = {'2', '6', '7', '8'}; //master key
The firmware accepts the Master Code (you'll see why it's called Master later) which can be an infinite-long char array. The code supports just numbers since we've used the other buttons as special functions.
A brief explanation of the firmware: Enter the digits and press # to confirm, if the code is right or wrong it will make a sound; if you entered the wrong digit, press C to cancel the code otherwise it will self-reset after 10 seconds. To drive the ring output press the D key. You can implement your own variation now, using the remaining keys!
// Officine Innesto - Alberto Perro 2019
// keypad settings
if(key){
   timer = millis();
   Serial.println(key);
   if(key=='D'){               //key to ringbell
     Serial.println("RING");
     digitalWrite(doorRing, LOW);
     tone(buzzer,784,500);
     delay(500);
     tone(buzzer,659,500);
     digitalWrite(doorRing, HIGH);
     resetKeys();
   }else if(key=='C'){         //key to reset
     resetKeys();
   }else if(key=='#'){         //key to open
     checkKey()?openTheDoor():tone(buzzer,500,500);
     resetKeys();
   }else if(key!='A'&& key!='B'){ // buffer manager
     temp[keyCount]=key;
     keyCount++;
 }
}
Since this project is intended for a semi-permanent installation and should be manteinance-free, we built a proto-board to keep the things safe, compact and tidy. This can take up to one hour and a good amount of soldering and design skills; if you're not familiar with the tools, this is not a project to start with. By the way, the result is great and the time making it is well spent.
Here it goes the real stuff you've been waiting for: the complete firmware.After having double checked that your circuit is fully working using the first code, you can now transfer the configuration stuff into the new one. As you can see, it also ask for Wi-Fi network credentials and an MQTT broker configuration.
New firmware enables remote control of the door lock: it supports an open command by publishing ON in the /open topic and a guest code, maximum 10 digits long, that can be set by publishing the code in the /code topic. This code will not be saved on the device, so if the power goes out, it will reset and accept the hardcoded master key only; to keep it you can set the retain flag in your MQTT message and the broker will send it every time the device subscribes to the topic, however this procedure is less secure because if someone subscribes to all topics of your MQTT broker, it will get the code, too.
The lock also publishes infos in some topics: whenever the door has been opened by digiting the code or by MQTT, it will send a YES on the /open topic. If you don't have a ringbell contact handy, the lock will publish a YES under /ringbell/pressed topic. Another handy feature is an OK message under /alive/status topic every 10 seconds, so you will know if anything has gone wrong.
Home Assistant IntegrationAs an example of integration, we've added the door lock to our Home Assistant istance; this way you can have a simple user interface to open the door and to set the guest code.
First, we need to add a switch and a text field. To do so, edit the configuration.yaml and add the following lines.
//text field for the guest code
input_text:
 guest_code:
   name: "Guest Code"
   icon: mdi:login
//door opener switch
switch:
 - platform: mqtt
   name: "Open the door"
   state_topic: "door_lock/door_lock/status"
   command_topic: "door_lock/door_lock/open"
   optimistic: false
   icon: mdi:lock-open
Reload Home Assistant and you should see them in the dashboard.Now we need to write the automation that publish the input code via MQTT. Open your automation.yaml file and edit.
 - id: guest_code
   alias: guest_code
   trigger:
    - platform: state
      entity_id: input_text.guest_code
   action:
    - service: mqtt.publish
      data_template:
        topic: 'door_lock/door_lock/code'
        payload_template: '{{states.input_text.guest_code.state}}'
By using this automation, Home Assistant checks when the text field is updated and publishes the input text on the desired MQTT topic. To make this happen, just reload automations in Settings > General, reload the page and try it out!
This tutorial has finished, now it's up to you to improve it and add your own custom features: happy making!


_3u05Tpwasz.png?auto=compress%2Cformat&w=40&h=40&fit=fillmax&bg=fff&dpr=2)
Comments
Please log in or sign up to comment.