Wemos D1 is an ESP8266 development board with an onboard ESP8266-12E module and a USB to Serial converter chip. It is an inexpensive way to build connected things and is Arduino compatible. In this project, we're going to build a simple Weather station monitoring Temperature and Humidity using a DHT11 sensor (you can also use DHT22 for the same). We are going to define this device as a public device in the IOStash platform so that we can share our device data to the world in a nice interface with charts and graph.
BasicsWe will be using the MQTT connectivity interface of IOStash for this project and I suggest you going through the API documentation of MQTT interface to better understand the concepts used in this project. Click the link to read the API documentation.
To use Wemos D1 with the Arduino library, you'll have to use the Arduino IDE with ESP8266 board support. If you haven't already done that yet, you can easily install ESP8266 Board support to your Arduino IDE by following this tutorial by Sparkfun.
After installing the board to Arduino IDE, install the PubSubClient library and the relevant drivers for the USB to Serial converter chip on the WeMos D1, select the port and then select the Board from Arduino tools menu:
You're good to go now!
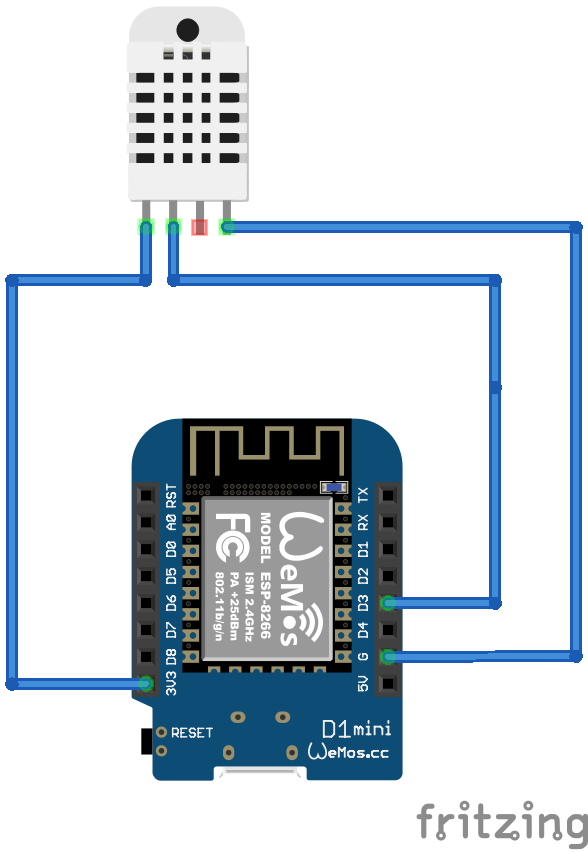
Wiring UpFollow the below wiring schematic for this project:
You can use a breadboard or you can directly hook up the sensor to your WeMos D1 using jumper wires/direct soldering. Thats it!
Setup IOStashThe wiring is done, now we can concentrate on creating a device on the IOStash platform. For that, login to your dashboard from https://app.iostash.io. Create an account if you don't have an account, its free!
On the left menu bar on your dashboard, click on Add Device under Devices.
Add Device page will open up, fill in the basic information like Device name and description. Make sure that you check the option "Device is public" so that the feed of the device will be accessible for the public to see.
Add 2 data points, temperature and humidity. After that, click on Create Device button and that's it! You've created a device on IOStash! Your device page will be presented to you.
Connecting Up EverythingNow that we've completed our hardware connection and the device definition on IOStash, we can now connect up both. To do that, go to your newly created device page (if you haven't navigated away, you should be on the new device page once you click on 'Create Device' button).
Note down your Device ID, this ID is used to identify your device on the IOStash platform. Now, go to you profile page and copy your X-Access-Token, this is your MQTT username. For MQTT password, use the Device Secret you gave while creating your device. Refer to the code on IOStash Github and make relevant changes to the variables defined on top of the program:
If you go through the code, you'll see that its fairly simple with code for reading data from the DHT11 sensor, connecting to wifi and publishing to IOStash in JSON format. If you look at the Arduino loop() you'll see the following:
We're checking for an active connection, if not connected we're trying to reconnect using the reconnect() function. The client.loop() is looking for any publish backs from the MQTT server, refer to the Arduino MQTT Pub/Sub client for more details: https://github.com/knolleary/pubsubclient
The function getTemperature() is reading the temperature and humidity values from the DHT11 sensor and storing those into the temp_f and humidity variables. We're then building a JSON string and publishing it to IOStash via MQTT. The loop is repeated every 60 seconds.
If you go to the public feed of your device, you'll see that the device data is getting updated in real time as the data comes in. You can share this page with others and they'll also be able to see the data without logging in.
You see the public feed of the device we created in this tutorial by visiting this link: http://app.iostash.io/feeds/5734997f8680bc62de000006/
You can easily build connected IoT devices using the ESP8266 and IOStash to control or automate. Use IOStash Android or JS libraries to create mobile applications that can control devices without writing any backend code. You can listen to device updates, pass on control commands and do more! Go through our API documentation for more: http://docs.iostash.io
Special NoteIf you're trying to use this example as a base and trying to send more than 3 data points, please note that there is a 128 byte size limit defined for the MQTT Packets by the Arduino PubSubClient library. To send more data points, change MQTT_MAX_PACKET_SIZE macro to 256(It'll be 128 by default) or more. For that, you'll have to edit the PubSubClient.h file located inside the <Arduino User Library Folder>\PubSubClient\src and look for line number 26.


_3u05Tpwasz.png?auto=compress%2Cformat&w=40&h=40&fit=fillmax&bg=fff&dpr=2)
Comments
Please log in or sign up to comment.