


Hardware components | ||||||
 |
| × | 1 | |||
Software apps and online services | ||||||
| ||||||
In March 2016, BBC started delivering a micro:bit to every 11-year-old kid in Britain, as part of the BBC Make it Digital initiative. They should have provided nearly 1 million of devices for free. BBC micro:bit is quite a nice piece of hardware: small, low-power, embedded device with inputs, outputs, and a processor. It includes a variety of sensors, 25 LED lights, two programmable buttons, and Bluetooth, with power provided either through an external battery pack or an attached USB device. It can be used with JavaScript, Python, or Scratch programming languages and is perfect for education in engineering and electronics.
What would you create, if you could easily build an iOS/Android app to interact with your micro:bit? With Blynk you can!
The whole tutorial should not take more than 30 minutes.
Install required software- Download and install the latest Arduino IDE.
- Install nRF5 support package for Arduino. Follow instructions here.
- Install the latest Blynk libraries. Our instructions.
- Install BLEPeripheral library. You can use Arduino Library Manager or install manually.
- Install Blynk app on your smartphone, and create an account (if you don't have one).
In Arduino IDE:
- Select Tools -> Board -> BBC micro:bit
- Select Tools -> SoftDevice -> S110
- Select Tools -> Programmer -> CMSIS-DAP
- Connect your Micro:Bit
- Select: Tools -> nRF5 Flash SoftDevice (read and accept the license)
It should flash Nordic SoftDevice firmware onto your board.
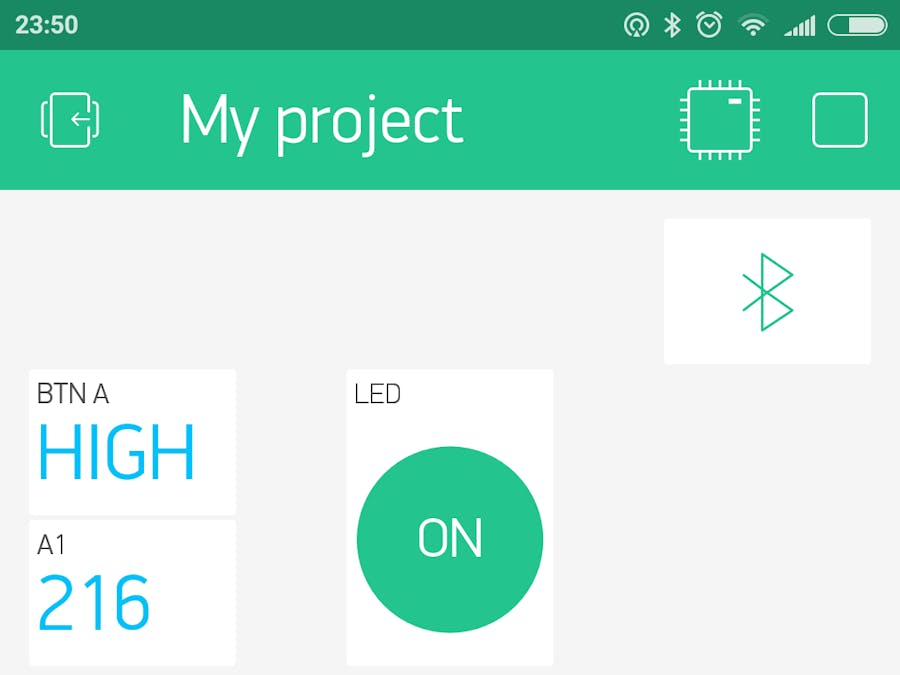
Upload your first sketch!Using Blynk smartphone app, create a New Project. Select BBC Micro:bit device, BLE connection type.
A new Auth Token for this device will land in your email box. Open our example for micro:bit in Arduino IDE: File > Examples > Blynk > Boards_Bluetooth > BBC_MicroBit
Inside of the sketch, replace "YourAuthToken" with the token you have received:
That's it! Click "Upload" button.In your project, add BLE widget and tap on it to open BLE Settings.
- Click "Connect BLE device" button.
- Select "Blynk" device.
- Blynk App should report that the device is connected.
In Blynk App, add a Value Display widget and attach it to Analog Pin 1.>After you run the project, you should see the value of analog sensor.
Reading Button StatusAdd these lines on the top of setup
function, and upload it to the board.
  // Configure on-board buttons
  pinMode(PIN_BUTTON_A, INPUT_PULLUP);
  pinMode(PIN_BUTTON_B, INPUT_PULLUP);
Add a Value Display widget and attach it to Digital Pin 5. This is the pin of Button A, for Button B use pin 11 (see the pin map).
Run your project to see the button status.
Switching some LEDs on and offFor this, you will have to add more code to your sketch. Add this above your loop and setup functions (not inside of them):
#define LED_ROW2 27
#define LED_COL3 10
BLYNK_WRITE(V0)
{
  pinMode(LED_ROW2, OUTPUT);
  pinMode(LED_COL3, OUTPUT);
  if (param.asInt() == 1)        /* When button widget is "ON" */
  {
    digitalWrite(LED_ROW2, 1);
    digitalWrite(LED_COL3, 0);
  }
  else
  {
    digitalWrite(LED_ROW2, 0);
    digitalWrite(LED_COL3, 0);
  }
}
Why do we need to use 2 pins to drive a single LED? That's a legitimate question! Actually, this trick allows us to control all 25 LEDs by toggling just 12 GPIO pins in total. Read more about how micro:bit display works.
Now add a Button widget (select mode: Switch), assign it to Virtual Pin 0.
Run the project, and try clicking the Button widget. The middle LED should light up.
Did you like it? Please post your comments!
What next?Read about Virtual Pins concept and unleash full power of Blynk.
Blynk supports huge amount of board types. Check if your favourite is on the list!
Our library is Open Source Software. Give us a star on GitHub.
ChallengesWhile micro:bit is working quite well in this mode, there are no default drivers currently available.
For example, no convenient functions to work with the on-board LED array. However (with some efforts) these drivers can be ported to Arduino IDE: https://github.com/lancaster-university/microbit-dal/
The pin mapping for Arduino IDE core can be found here. And here is some advanced information on low-level C/C++ programming on micro:bit.


Comments
Please log in or sign up to comment.