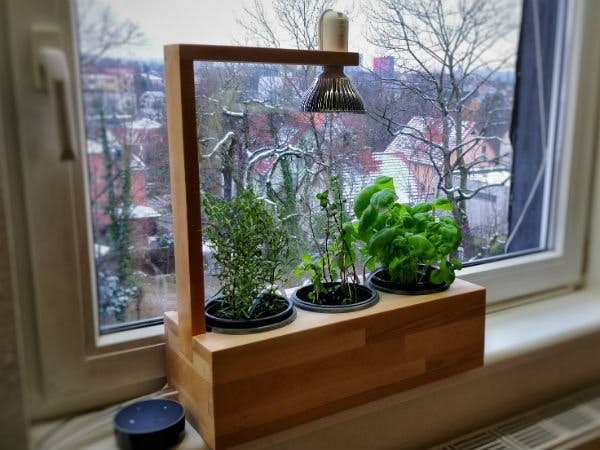
Since my plants do always suffer from too much or less water and I like to put a lot of herbs into my dishes, I decided to create a custom irrigation system. The box for my herbs should be configurable and work automatically or manually. Therefore an interface to a website exists to enable a setup and show the humidity in a nice chart. The last step was the integration of voice control to ask Amazon Alexa for humidity, switch a plant growing lamp on/off, and start the irrigation, if automation is deactivated. Click here for find the result.
I started with the technical part of the project and bought an Arduino. After some tutorials, i was firm with the software and controlling the Arduino. I ordered a wifi controller, some moisture sensors, pumps, a plant growing lamp and additional required hardware (relais shield to separate the circuts for the lamp and pumps from the Arduino, some wires and beech wood for the frame). The Arduino code of the result is provided in this tutorial, beside some information of how to use the components in your projects. The website/api code is not provided (unless the demand is very high ;) ).
Step One: Moisture SensorThe first milestone was to read the humidity with my Arduino. The moisture sensor YL-69 was easy to connect with the Arduino. You need to connect he VCC pin to a GPIO pin (in my example pin 06), ground to ground and the A0 to an analog pin (in my example pin A1) of the Arduino.
Tutorial: Soil Humidity Sensor
byte vccPin = 6;
byte dataPin = A1;
void setup() {
 pinMode(vccPin, OUTPUT);
 digitalWrite(vccPin, LOW);
 Serial.begin(9600);
 while (!Serial);
}
int readHumidity() {
 digitalWrite(vccPin, HIGH);
 delay(500); // you need to test how long you pre-power before measurement
 int value = analogRead(dataPin);
 digitalWrite(vccPin, LOW);
 return 1023 - value;
}
void loop() {
 Serial.print("HumidityLevel (0-1023): ");
 Serial.println(readHumidity());
 delay(10000);
}
The next goal was to install a relay shield (4 relais) for separating the circuits of the lamp, pumps and Arduino. The Arduino runs on 5V, the pumps use 12V and the plant growing lamp 230V. The shield needs to be connected to the 5V and Ground pins on the Arduino. Each relay further needs a GPIO pin of your choice to switch on and off. Lastly, you can use a jumper for VCC JC to VCC on the shield, or use an extra battery (which would be best, but i don't have any battery inside my project, yet).
It is important to understand, that my shield switches "On" with "LOW" on the pin. As soon as my pin is defined as OUTPUT, it automatically switched to active. In the code you should always switch to INPUT and LOW, if you want the relay to be off. By default, the Arduino pins are INPUT and LOW.
Information: Why relay OUTPUT + LOW = Active?
byte pump1 = 11;
byte pump2 = 10;
void setup() {
 Serial.begin(9600);
 while (!Serial);
 pinMode(pump1, OUTPUT); // variant low/high
 digitalWrite(pump2, LOW); // variant input/output
}
void loop() {
 digitalWrite(pump1, HIGH); // pump1 deactivated
 pinMode(pump2, INPUT); // pump2 deactivated
 delay(1000);
 digitalWrite(pump1, LOW); // pump1 activated
 pinMode(pump2, OUTPUT);  // pump2 activated
 delay(1000);
}
Connecting the espressif ESP8266 ESP-01 to the Arduino for WiFi was the most difficult part. It took me hours to get the wifi running in my script.
The ESP is connected to: VCC = 3.3V, GND = GND, CH_PD = 3.3V, TX = Pin 02, RX = Pin 03. For productive usage, you should use at least a level converter from 5V to 3.3V for the pin 02 and pin 03, too. In my case, it worked fine.
Similar to the Arduino, the ESP-01 is another microcontroller. If you want both controllers to communicate, you have to use serial communication. The Arduino UNO uses by default the pins 01 and 02 for RX and TX. But they are also used for USB debugging and therefore it's suggested to include SoftwareSerial.h and define custom pins.
#include <SoftwareSerial.h>
SoftwareSerial espSerial(3,2); // RX, TX
void setup() {
 Serial.begin(9600);
 espSerial.begin(115200); // switch to 9600 after AT+UART_DEF=9600,8,1,0,0
 while (!Serial);
}
void loop() {
 if (espSerial.available()) {
   Serial.write(espSerial.read());
 }
 if (Serial.available()) {
   espSerial.write(Serial.read());
 }
}
Running the script above, you can enter AT-commands into the serial monitor and see the results. Serial communication is prone to failure, therefore i decreased the communication baud rate used by the ESP from 115200 to 9600.
Tutorial: ESP8266 + Arduino | Tutorial: General ESP8266 (german)
- A usefull helper class (but used too much memory): Library: WiFiEsp
- Memory check tool: Library: MemoryFree
The script uses HTTP 1.0, because with HTTP 1.1 the bytes are part of the response. It's important to take care about the line breaks for the command to be send after AT+CIPSEND. If they are wrong, you will receive a byte send error.
#include <SoftwareSerial.h>
SoftwareSerial espSerial(3,2); // RX, TX
const char* ssid = "<YOUR-WIFI-SSID>";
const char* pass = "<YOUR-WIFI-PASSWORD>";
void setup() {
 Serial.begin(9600);
 espSerial.begin(9600);
 while(!Serial);
 while(!connectToWiFi());
 // request website and print result
 if (httpRequest("my.server.com", "/site/subsite/index.php")) {
   while (espSerial.available()) { Serial.write(espSerial.read()); }
 }
}
void loop() { // run over and over
 if (espSerial.available()) {
   Serial.write(espSerial.read());
 }
 if (Serial.available()) {
   espSerial.write(Serial.read());
 }
}
bool connectToWiFi() {
 delay(2000;)
 espSerial.setTimeout(3000);
 while (espSerial.available()) Serial.write(espSerial.read());
 Serial.println(F("[ESP] Connecting to WiFi"));
 espSerial.println(F("AT+CIPSTATUS=2"));
 if (!espSerial.find("OK")) {
   espSerial.setTimeout(10000);
   Serial.println(F("[ESP] Reset Module"));
   espSerial.println(F("AT+RST")); if (!espSerial.find("ready")) { Serial.println(F("[ESP] Reset failed")); return false; }
   Serial.println(F("[ESP] Set CWMode"));
   espSerial.println(F("AT+CWMODE=1")); if (!espSerial.find("OK")) { Serial.println(F("[ESP] Mode failed")); return false; }
   Serial.println(F("[ESP] Connect to Router"));
   espSerial.print(F("AT+CWJAP=\""));
   espSerial.print(ssid);
   espSerial.print(F("\",\""));
   espSerial.print(pass);
   espSerial.println("\"");
   if (!espSerial.find("OK")) { Serial.println(F("[ESP] WiFi connection failed")); return false; }
 }
 espSerial.setTimeout(3000);
 Serial.println(F("[ESP] WiFi is connected"));
 return true;
}
bool httpRequest(String server, String site) {
 String cmd = "";
 cmd += "GET " + site + " HTTP/1.0\r\n";
 cmd += "Host: " + server + "\r\n";
 cmd += "Connection: close";
 int cmdLength = cmd.length() + 4;
 // Serial.println(cmd);
 espSerial.print(F("AT+CIPSTART=\"TCP\",\""));
 espSerial.print(server);
 espSerial.println(F("\",80"));
 if (!espSerial.find("OK")) { Serial.println(F("[ESP] TCP Connection Error")); return false; }
 espSerial.print(F("AT+CIPSEND="));
 espSerial.println(cmdLength);
 if (!espSerial.find(findGT)) { Serial.println(F("[ESP] Send State Error")); return false; }
 espSerial.print(F("GET "));
 espSerial.print(site);
 espSerial.print(F(" HTTP/1.0\r\n"));
 espSerial.print(F("Host: "));
 espSerial.print(server);
 espSerial.print(F("\r\n"));
 espSerial.print(F("Connection: close\r\n"));
 espSerial.println();
 if (!espSerial.find(":")) { Serial.println(F("Bytes not sent")); espSerial.print(F("AT+CIPCLOSE")); return false; }
 char status[32] = {0};
 espSerial.readBytesUntil('\r', status, sizeof(status));
 if (strcmp(status, "HTTP/1.1 200 OK") != 0) { Serial.print(F("[ESP] Unexpected response: ")); Serial.println(status); return false; }
 if (!espSerial.find("\r\n\r\n")) { Serial.println(F("[ESP] Invalid response")); return false; } // Skip HTTP headers
 // if (!espSerial.find(\r\n)) { Serial.println(F("[ESP] Bytes not found")); return; } // skip bytes (for http 1.1)
 return true;i
}
The frame was planned to store all electronics and three herb pots from the supermarket. I measured the sizes of all components and structured the positions. Four moisture sensors, two pumps, the Arduino + shield, a 4x relay shield and an USB plug and some wires need to fit in the box. It was made out of beech wood, to make it strong and last waterdrops without additional glaze.
The circles were sawed out with jig saw on a self made jig saw table. The plant mounts are glued inside the circles with hot glue. The sides of the box are glued by wood glue (D3 for water resistance). Besides the electronic, I didn't use any screws or nails beside the lower panel fixing.
I put all the circuits, wires and water tubes inside the box, pulled the sensors out and the tubes for the additional water tank. Before closing the box, I added saucers to prevent water drowning inside the box to protect the electronic.
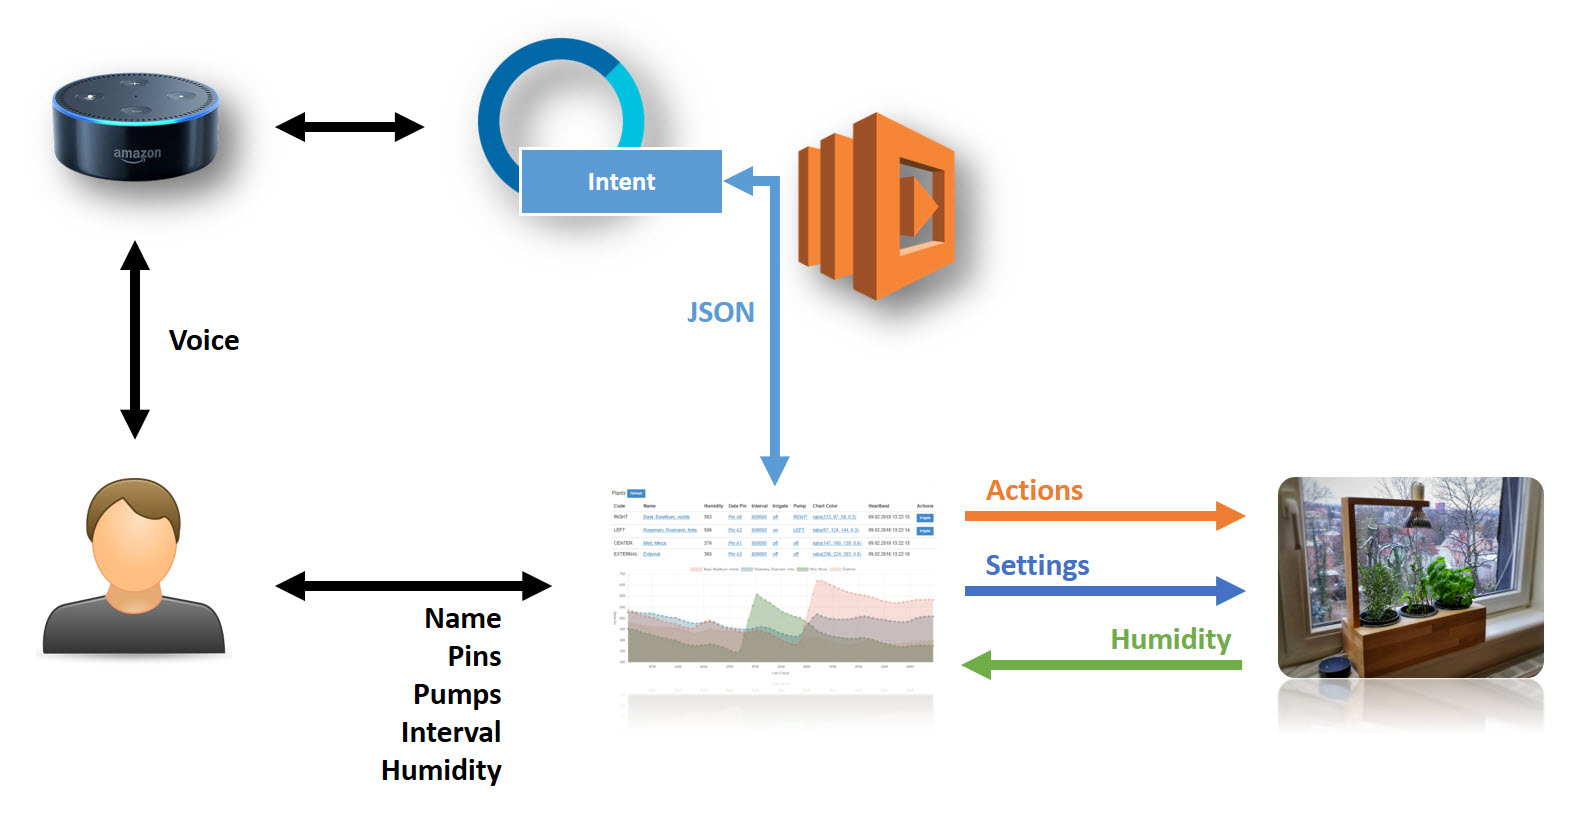
The API and website is based on jQuery, Bootstrap, X-editable (for inline ajax forms) and Chart.js (for the humidity chart), coded in php. On the website you can define the settings for the Arduino (e.g. sensor pins, humidity check interval, pumps per plant, pump VCC pins, light VCC pin) and find the current humidity + chart.
The configuration is provided by JSON for the Arduino. After starting and in a frequent interval, the herb box checks for new settings. For parsing the JSON with the Arduino, I used the library ArduinoJson. For polling interval I used StensTimer.
Library: ArduinoJson | Library: StensTimer
Step Six: Alexa IntegrationThe website provides an API for Alexa communication. It serves as a hub to receive the request JSON by Alexa and translates it into a custom JSON used by the Arduino (e.g. lamp on, irrigate plant 1, ...). The Arduino polls for new actions and executes them.
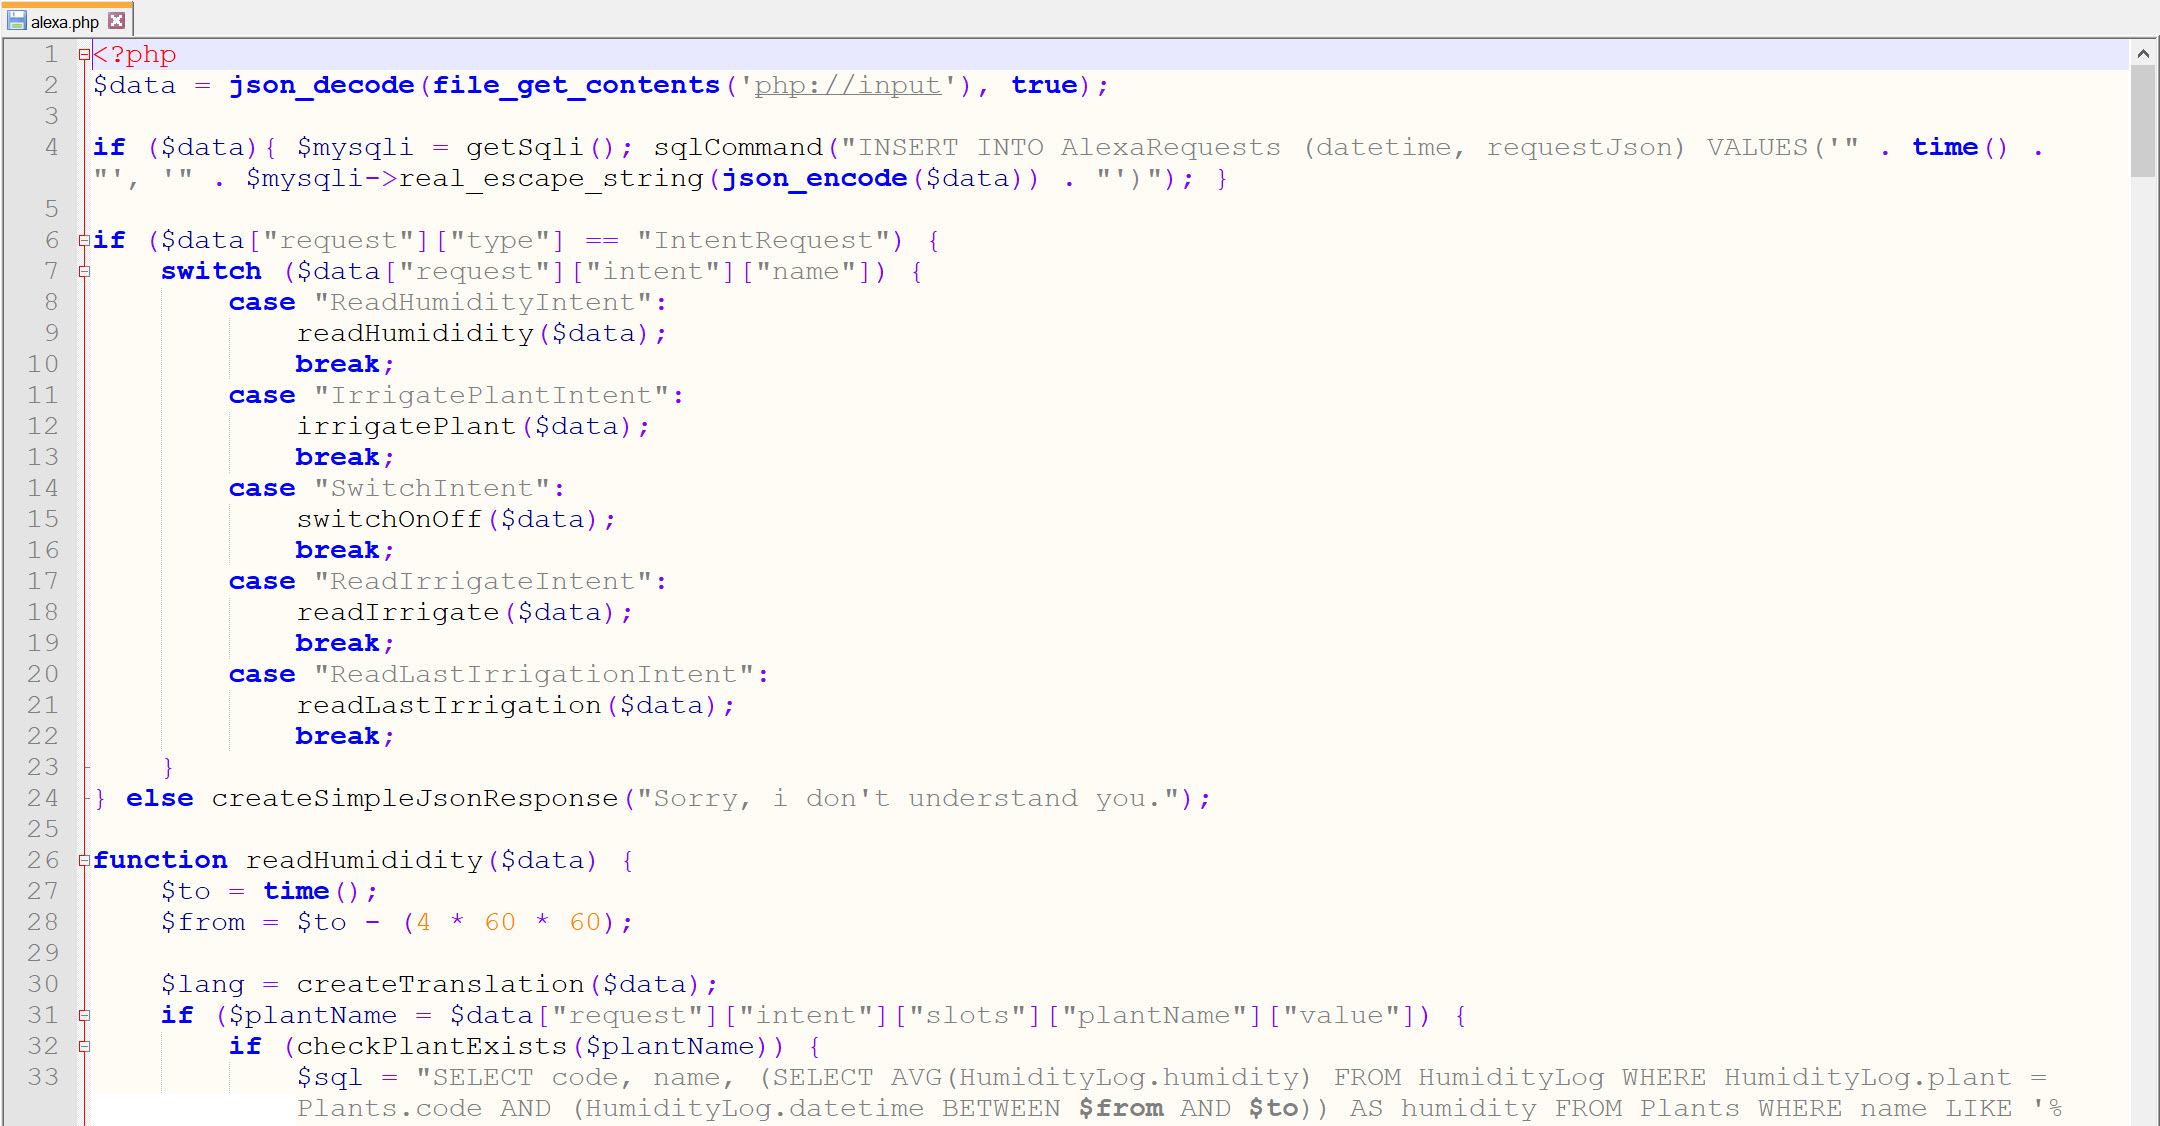
Because the voice requests are more than just on/off, I implemented an Alexa Skill and no Alexa Smart Home. The AWS Lampda forwards the request JSON to my API, which parses the intents.
var https = require('https');
exports.handler = (event, context, callback) => {
   var postData = JSON.stringify(event);
   var options = {
       host: '<MY-SERVER>',
       path: '<MY-API-SITE>',
       port: 443,
       method: 'POST',
       headers: {
           'Content-Type': 'application/json',
           'Content-Length': postData.length,
       }
   };
   // set up the request
   var postRequest = https.request(options, function(res) {
         res.setEncoding('utf8');
         res.on('data', function (chunk) {
             console.log('Response: ' + chunk);
             // console.log(chunk);
             callback(null, JSON.parse(chunk));
         });
   });
   // post the data
   postRequest.write(postData);
   postRequest.end();
};
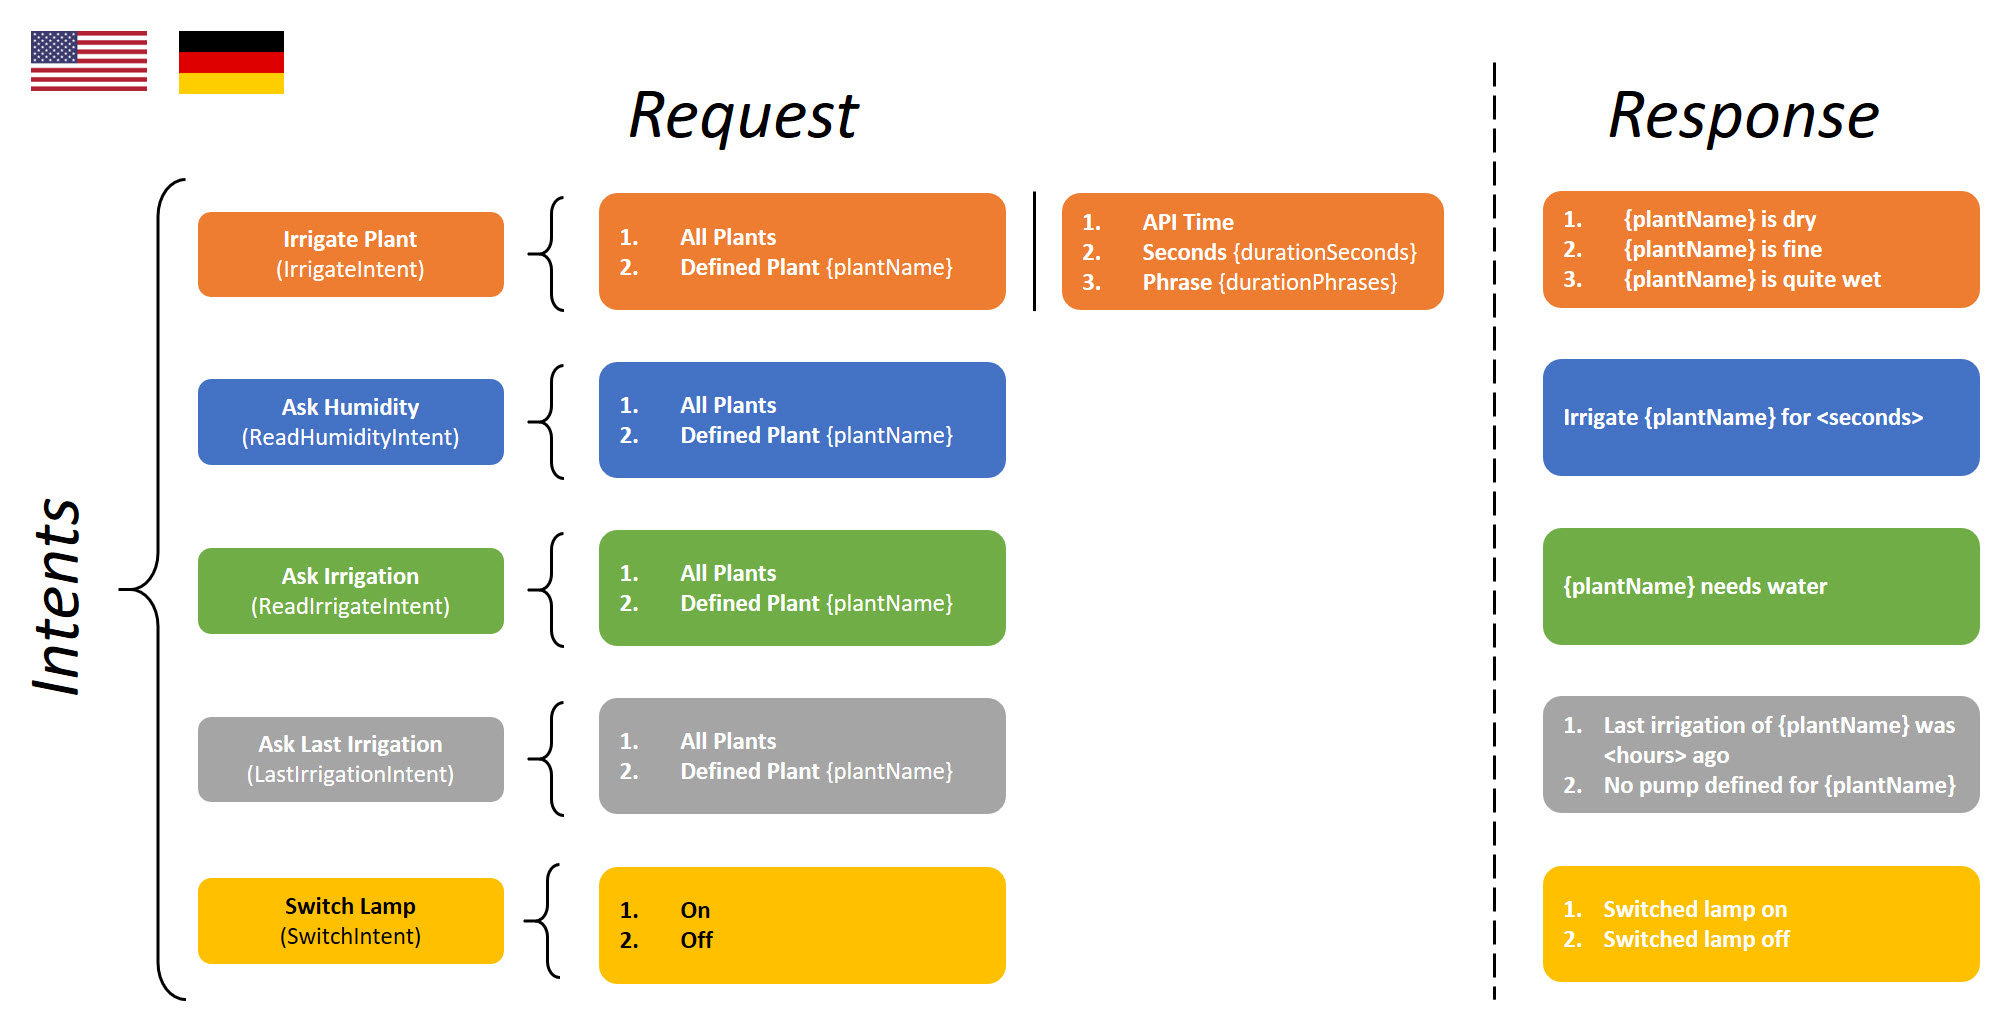
An excerpt of the intents i used by my skill:
- ReadHumidityIntent How are my plants
- ReadHumidityIntent How is my {plantName}
- IrrigatePlantIntent Irrigate my plants
- IrrigatePlantIntent Irrigate my {plantName} for {durationSeconds} seconds
- SwitchIntent Switch the lamp {switchState}
- ReadIrrigateIntent Which plants need water
- ReadLastIrrigationIntent When was the last irrigation of my {plantName}
Last, but not least, i added locale support for german and english usage.
The ResultAs result, i do have a wooden box to put supermarket herb pots into, take water tubes and moisture sensors in the soil and the tubes in an external water tank. With Alexa intergration, i can say the following sentences:
- "Alexa, ask herb box how my plants are" - Response: "Plant 1 is fine, Plant 2 is dry, ..."
- "Alexa, tell herb box to irrigate my basil for 5 seconds" - Response: "Irrigating basil for 5 seconds"
- "Alexa, ask herb box which plants need irrigation" - Reponse: "Plant 1 is dry, Plant 3 is dry, ..."
- "Alexa, ask herb box when was the last irrigation of my basil" - Response: "Last irrigation of basil was 36h ago"
- "Alexa, tell herb box to switch the lamp on" - Response: "Switched plant growing lamp on"
Asking Alexa for the humidity of my plant and irrigating it afterwards (german):
Asking Alexa to turn the plant growing lamp on:
GIFs showing the result without the videos:
The following features are not yet implemented but planned for future:
- Power saving mode for the Arduino source code
- Add external Arduino Nanos with wireless communication (2,4 GHz) for moisture measurement of other plants in the house (the box is the hub for WiFi) - using batteries only
- Extend API for multiple instances of the herb box, for friends (and whomever, if you are interested?!)
- Add a button to irrigate and switch lamp on the box without website or Alexa
- Alexa images (card in skill response)
I have added two new intents. One of them is important for the planned feature of external Adruino Nanos who just log the humidity.
- Which plants are dry
- When was the last irrigation


_ztBMuBhMHo.jpg?auto=compress%2Cformat&w=48&h=48&fit=fill&bg=ffffff)


Comments