


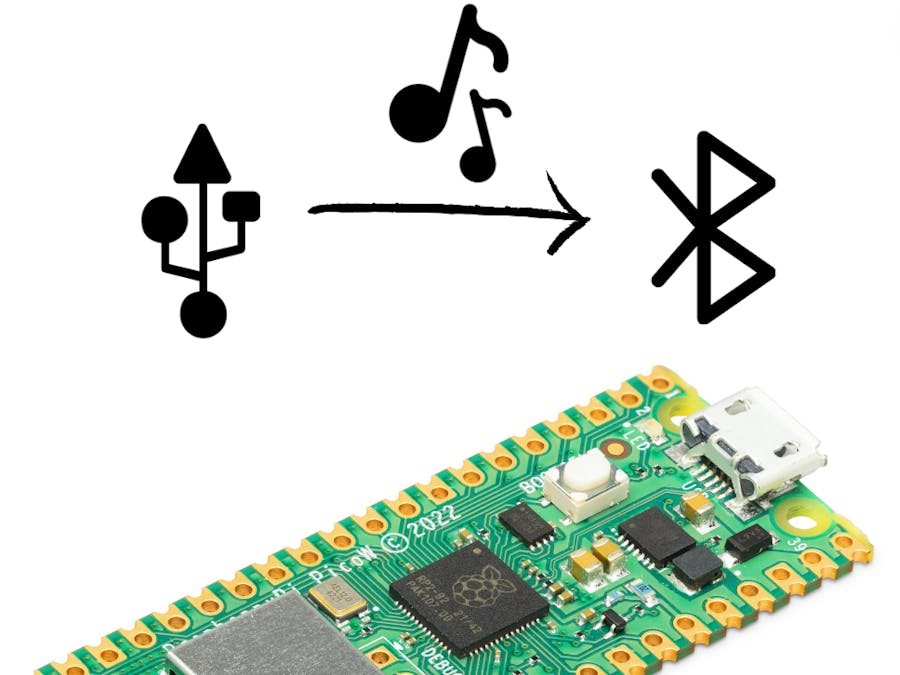
The Pico W USB Audio to Bluetooth Adapter transforms your Raspberry Pi Pico W into a high-quality, hassle-free audio streaming device. It allows any device with a USB input, including MacOS, Windows, Linux, Nintendo Switch, PS4/PS5, and more, to gain Bluetooth Audio capability. With Pico W Adapter, you can easily transmit audio wirelessly from your USB audio source to your Bluetooth headphones or speaker, enhancing your listening experience.
To make sure we can keep working on free and open-source projects like this,please consider becoming a :heart: Sponsor via PayPal or support us via :coffee: Ko-fi.
Driver-Free SetupSetting up PicoW requires no driver or software installation. Simply plug the Pico W into your device's USB port, set your Bluetooth headphones or speakers to pairing mode, and an automatic connection will be made.
Bluetooth SBC CodecPico W Bluetooth Adapter utilizes the sbc codec to deliver high-quality audio. It can steam with stereo sound.
Video demoInstalling the Pico W USB Audio to Bluetooth Adapter firmware involves flashing a UF2 (USB Flashing Format) file onto your Raspberry Pi Pico. Follow these steps:
Download the UF2 file: You can find the latest firmware for the PicoW USB Audio to Bluetooth Adapter on the releases page of the GitHub repository. Download the .uf2 file from the latest release.
- Download the UF2 file: You can find the latest firmware for the PicoW USB Audio to Bluetooth Adapter on the releases page of the GitHub repository. Download the
.uf2file from the latest release.
Connect the Pico to your computer: First, ensure that your Pico is not connected to your computer. Then, hold down the 'BOOTSEL' button on the Pico while you plug it into your computer using a micro USB cable. It will appear on your computer as a mass storage device (like a USB flash drive).
- Connect the Pico to your computer: First, ensure that your Pico is not connected to your computer. Then, hold down the 'BOOTSEL' button on the Pico while you plug it into your computer using a micro USB cable. It will appear on your computer as a mass storage device (like a USB flash drive).
Copy the UF2 file: Simply drag and drop (or copy and paste) the downloaded UF2 file onto the Pico.
- Copy the UF2 file: Simply drag and drop (or copy and paste) the downloaded UF2 file onto the Pico.
Reset the Pico: Once the UF2 file has been copied onto the Pico, it will automatically reset and start running the new firmware.
- Reset the Pico: Once the UF2 file has been copied onto the Pico, it will automatically reset and start running the new firmware.
Using the PicoW USB Audio to Bluetooth Adapter is a straightforward process. Here are the steps to follow:
Connect your Pico W to your audio source device: Use a USB cable to connect your Raspberry Pi Pico W to the device that you want to stream audio from.
- Connect your Pico W to your audio source device: Use a USB cable to connect your Raspberry Pi Pico W to the device that you want to stream audio from.
Set the audio output on your source device: On your audio source device, go to your sound settings and change the audio output device to USB Bluetooth Audio.
- Set the audio output on your source device: On your audio source device, go to your sound settings and change the audio output device to
USB Bluetooth Audio.
Pair with a Bluetooth audio device: Put your Bluetooth speakers or headphones into pairing mode. The adapter will automatically connect to the Bluetooth device when it's in pairing mode.
- Pair with a Bluetooth audio device: Put your Bluetooth speakers or headphones into pairing mode. The adapter will automatically connect to the Bluetooth device when it's in pairing mode.
Start playing audio: Once everything is set up, you can start playing audio from your source device. The audio will be streamed to your Bluetooth device via the Pico W.
- Start playing audio: Once everything is set up, you can start playing audio from your source device. The audio will be streamed to your Bluetooth device via the Pico W.
Resolving noise issues: Due to a known issue with the current firmware, the audio stream may have noise when the connection is out of sync. If this happens, you can resync the connection by short pressing the 'BOOTSEL' button on the Pico W several times until the sound becomes clear.
- Resolving noise issues: Due to a known issue with the current firmware, the audio stream may have noise when the connection is out of sync. If this happens, you can resync the connection by short pressing the 'BOOTSEL' button on the Pico W several times until the sound becomes clear.
Pairing a new device: To pair a new device, long press the 'BOOTSEL' button on the Pico W and release it. Then, put the new Bluetooth device into pairing mode. The Pico W will automatically connect to it.
- Pairing a new device: To pair a new device, long press the 'BOOTSEL' button on the Pico W and release it. Then, put the new Bluetooth device into pairing mode. The Pico W will automatically connect to it.
Reconnecting a device: If you disconnect the Bluetooth headphone but do not power off the Pico W, you can reconnect the headphone by short pressing the 'BOOTSEL' button.
- Reconnecting a device: If you disconnect the Bluetooth headphone but do not power off the Pico W, you can reconnect the headphone by short pressing the 'BOOTSEL' button.
Blinking: When the Green LED light is blinking, it indicates that audio is currently streaming.
- Blinking: When the Green LED light is blinking, it indicates that audio is currently streaming.
On (Steady Light): When the Green LED light is on, it means that the PicoW Adapter is in pairing mode, ready to connect with a Bluetooth audio device.
- On (Steady Light): When the Green LED light is on, it means that the PicoW Adapter is in pairing mode, ready to connect with a Bluetooth audio device.
In order to compile the PicoW USB Audio to Bluetooth Adapter firmware from source code, you need to follow these steps:
Prepare your environment: Make sure that you have a working development environment for Raspberry Pi Pico projects. This includes having the required compiler and tools installed. You may refer to the Getting started with Raspberry Pi Pico guide for detailed instructions.
- Prepare your environment: Make sure that you have a working development environment for Raspberry Pi Pico projects. This includes having the required compiler and tools installed. You may refer to the Getting started with Raspberry Pi Pico guide for detailed instructions.
Set the necessary environment variables: Before you can build the project, you need to set two environment variables: PICO_SDK_PATH and PICO_EXTRAS_PATH. For example:
- Set the necessary environment variables: Before you can build the project, you need to set two environment variables:
PICO_SDK_PATHandPICO_EXTRAS_PATH. For example:
export PICO_SDK_PATH=~/pico-sdk
export PICO_EXTRAS_PATH=~/pico-extras- Build the project: After setting up your environment, navigate to the project directory in a terminal and run the provided build script:
./build.shThis script should compile the project and produce a UF2 firmware file that you can flash onto your Pico W.
- Debug Serial input/output: You can use uart to see the debug info. Connect the GPIO 0 and 1 as TX and RX. To enable BTstack's serial input, you can uncomment
HAVE_BTSTACK_STDINunder btstack_config.h
This project wouldn't have been possible without the foundational work provided by the following projects:
- usb-sound-card: It served as a valuable reference for handling USB audio data with the Raspberry Pi Pico.
- a2dp_source_demo: The Advanced Audio Distribution Profile (A2DP) source demo provided by the BTstack.
This project is licensed under the terms of the Apache License 2.0.

Comments
Please log in or sign up to comment.