


Hardware components | ||||||
_ztBMuBhMHo.jpg?auto=compress%2Cformat&w=48&h=48&fit=fill&bg=ffffff) |
| × | 1 | |||
 |
| × | 1 | |||
 |
| × | 1 | |||
 |
| × | 1 | |||
 |
| × | 1 | |||
Software apps and online services | ||||||
 |
| |||||
Hand tools and fabrication machines | ||||||
| ||||||
Welcome back to my Arduino Tutorial Course, designed to take you from ZERO to HERO. If you weren't here for the last one, I suggest you either go back or if you already know what I talked about in it. So let's have a recap.
RecapHere's a recap of the last part in the course. We learnt about the basic elements in Arduino- theArduino Uno, the LEDs, jumper wires, the pushbutton, and of course, the fabulous BREADBOARD! What we made, was two LED lights that turned off when someone pressed a button. We also made a digital switch to control the circuit.I'm sure that the project was very instructive and educational for some, while the actual outcome probably wasn't very useful.
IntroductionIn this project, we're going to be using a potentiometer.
Have a look at this picture of one. What do you reckon it does?
Before I tell you the answer, remember something.
This is going to become useful in a lot of future circuits, so keep it afterwards.
So what does it do?Imagine you have a torch. Now this torch is rather special. It has, instead of an ON/OFF switch, a knob. Adjust the knob one way, and the light gets brighter, and if you adjust the other, it dims. Turn it the other way enough, and the light goes out. The mysterious knob is a Potentiometer. Let's see how it works.
What you can see it the diagram above it the cross section of the potentiometer the blue, black and green things sticking out are the pins. Remember last time how we discussed what current and ground were? Well in this picture the green pin saying +VCC is current. In future you might also it represented as VCC, +, 5V, 3V, or*something* V. The blue (GND) pin is ground, which anchors the current. No current will work without it. This can be represented as GND, ground or earth.The middle pin is black, and is labelled Output. This is the most interesting pin. It's job is to go
"HMM...thewiper(theblack line on the inside) isthreequartersalongtheresistivestrip(theredbitinside),soI'llsendback0.75backthroughtheoutputpin."
It basically reads the wiper and transmits the info through itself. So that's a potentiometer for you.The wiper is connected to the knob, so when you turn it, it reads the position of the knob.
Inputs and OutputsIn this section, I'm going to cover what inputs and outputs are, because they are CRUCIAL in this tutorial. Let's say that you are listening to music being played from a speaker. This scenario demonstrates INPUT/OUTPUT very well. Have a look at this.
So that's what input and output is. The input is the receiver, and in this case the human, and to be more specific, the ear. The output is the speaker, which creates a signal, in this case, it's the sound. Now let's look at how this ties in with our goal for this project.
Input/Output and Our ProjectIf we do the project right, then the light should get turn off or on depending on which way we turn the potentiometer.
But have a look at this.
Let's START!
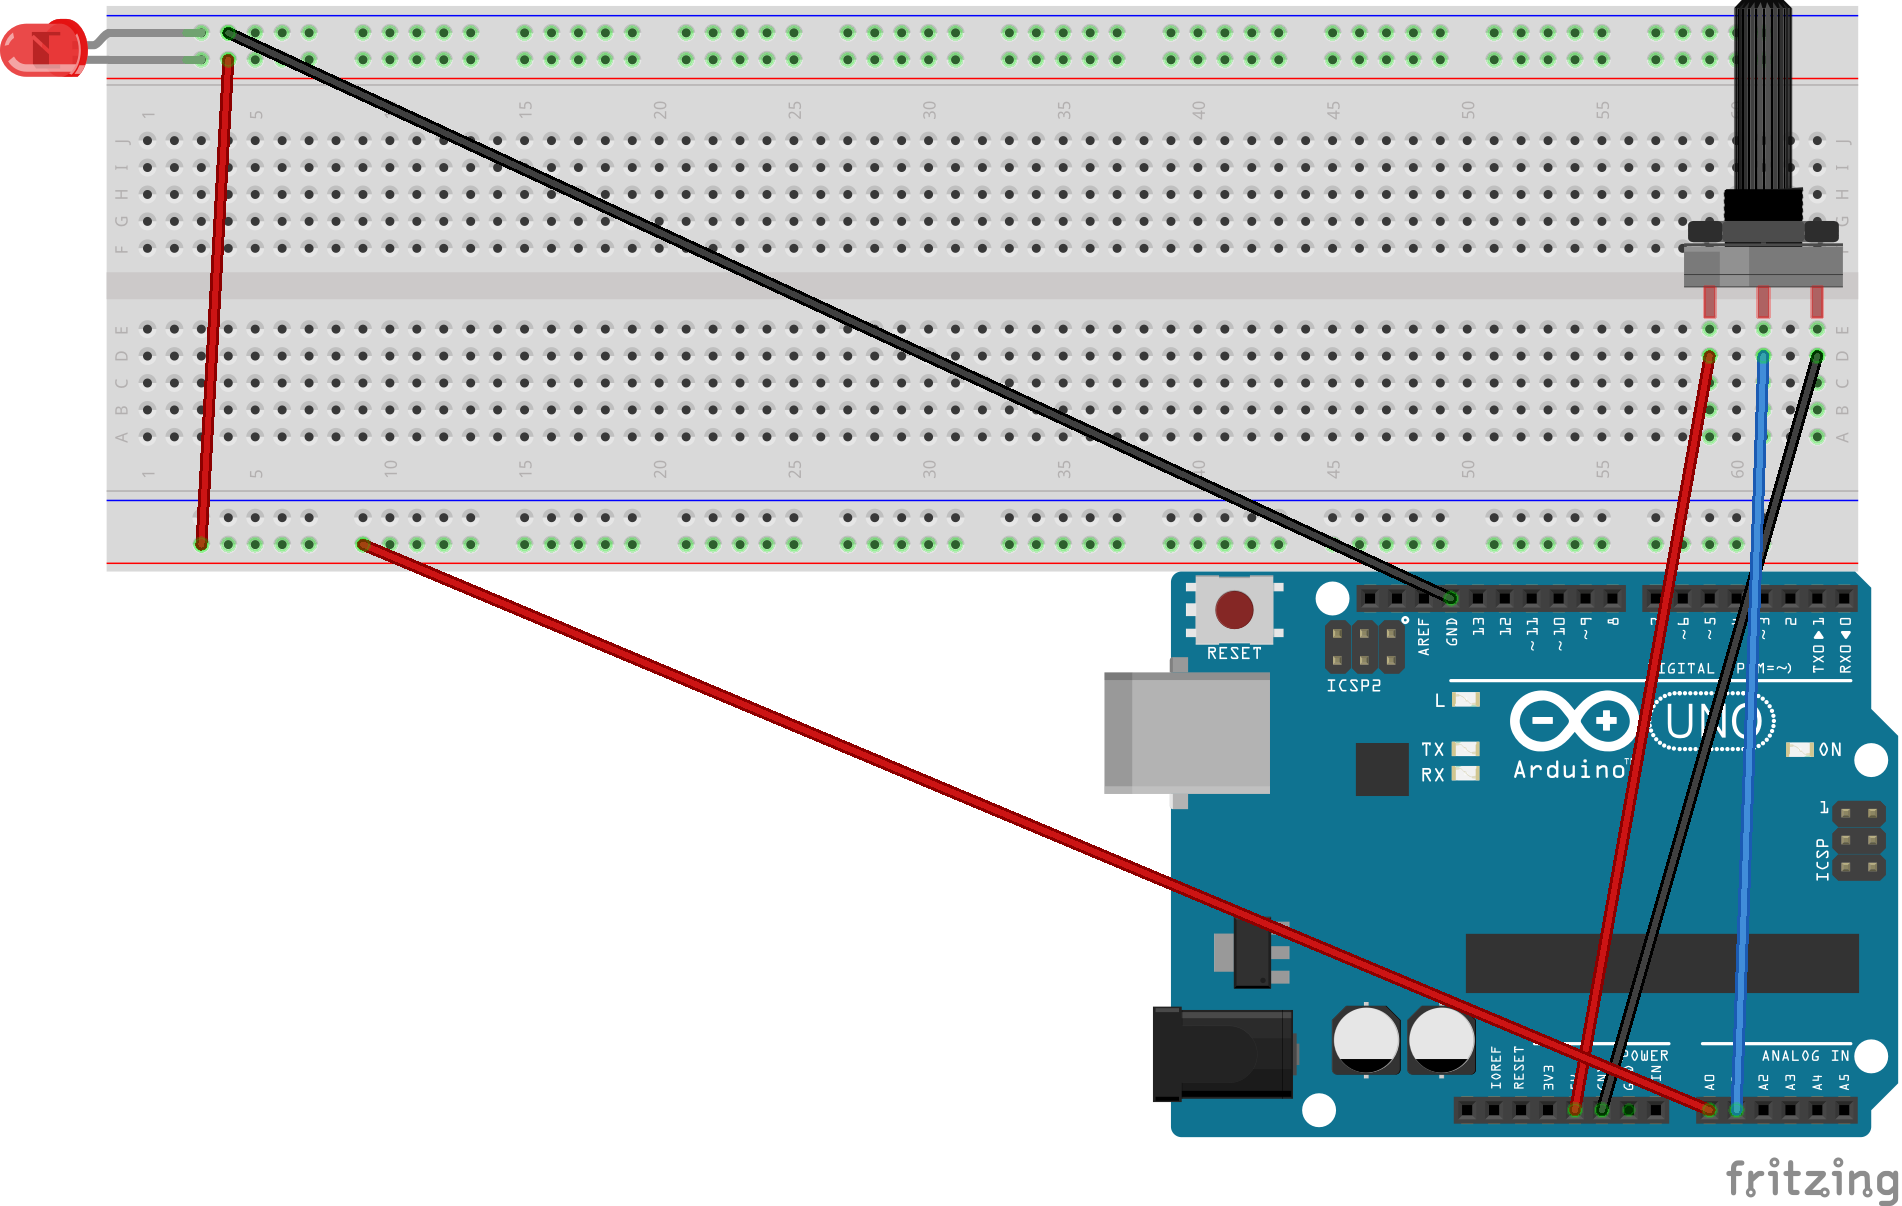
Now we're all briefed on the thing that will make our project's gears run like clockwork, we can safely start assembling.
I'd imagine that you'll all be pretty good at wirework after the last tutorial, so try and copy this image.
Well done. You've now wired the circuit.
You can now plug in your Uno board with the USB connector and open Arduino IDE. Paste the code down the bottom into there.
Now, turn the knob on the potentiometer all the way RIGHT. As far as you can- until it stops moving.Now you can hit that UPLOAD button and wait for your code to be uploaded. I fall worked properly, the LED should remain off. Now, slowly turn the knob LEFT.Soon, the LED should turn on! WELL DONE! You've just completed the second lesson in the tutorial.
Why it HappenedI've really said all of this embeddedly. What really happened was that the potentiometer was acting as an output, and telling the Uno what the value of the wiper was then, the Uno gave that value to the LED, which went on if the potentiometer was LEFT enough.
Next Time:I won't tell you all about the next lesson, but let ME tell YOU. It will be very fun, and, for those eager to know more, it will include the MaxMatrix
.

Comments
Please log in or sign up to comment.