Small board - great value (for how a little Arduino Nano is improving our Toastmasters meetings).
For those who are still wondering what Toastmasters means, it is a non-profit organization which helps people develop their communication and leadership skills. Take a look, you'll probably find a club near you that you can visit to learn a little more.
Anyway, one of the things we learn at Toastmasters is to deliver speeches and, on top of other evaluation criteria, we have a person controlling the time of your speech, as we have to keep it between specified thresholds.
This timing process often is manual, error-prone and a little boring. That's when I decided to find a nice project for my Arduino Nano.
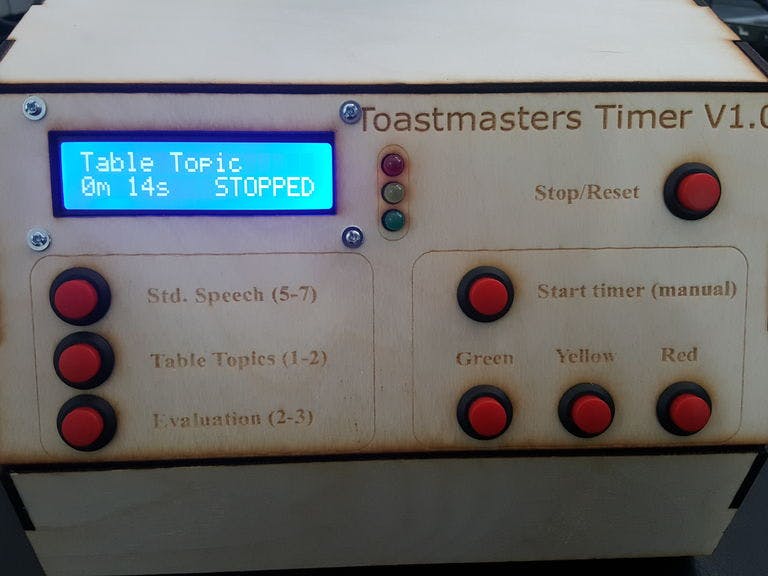
Toastmasters Timer is basically a timer-controlled traffic light with some presets for specific tasks which are time-bound at any Toastmasters meeting. For instance a Standard Speech should be between 5 and 7 minutes: you get a green light when you reach the 5 minute mark, a yellow light at 6 minute and red one after 7 minutes. This project automates this process of turning lights on and off for the most common tasks.
I added an LCD screen to show the type of preset being used, and also a custom/manual timer for any specific need not covered by the presets.
Step 1: What Will You Need- 8 x Generic Buttons (Uxcell 10 x Momentary SPST NO Red Push Button Switch AC 250V/1.5A 125V/3A)
- 1 x 330R resistor
- 2 x 15 pin female header (to hold the Arduino Nano)
- 1 x Snappable PC BreadBoard for all the wire soldering an to hold the Arduino Header
- 18 LEDs: 6 Red, 6 yellow and 6 green for both the panel and the traffic light that goes on top of the device so people speaking can see it.
- 2 pieces: 1/8" X 12" X 12" (3 X 300 x 300 mm) Baltic Birch Plywood
- 5V power supply for the Arduino
A note about cardboard prototyping:
One thing I love to do is to create cardboard prototypes of everything I build so I can get a sense of what works and what doesn't, from an aesthetics perspective as well as usability. Then I use/test it for some time, adjust if necessary (moving buttons in cardboard is easy), and once I reach a model I like, I'll move the project to an official enclosure.
By the time I took these pictures it was a work in progress. Electronics and code were fine and didn't change. I ran several tests both at home and during Toastmasters meetings.
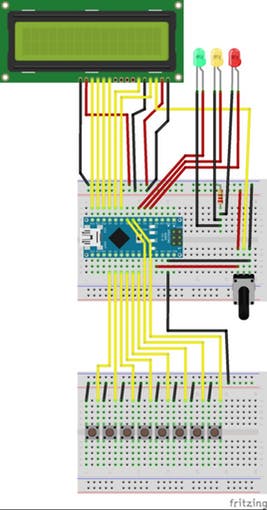
Step 3: The CircuitTimer circuit is not a complex one. It is just a little tricky given you'll have to connect the LCD, 8 buttons and 3 LEDs to a single Arduino board. I used female headers in the board to keep the Arduino away from the mess of soldering, connecting it later on, as seen in the pictures.
Step 4: Lasercut the BoxAs I said before, this project's case was made with 1/8" - 3mm plywood. I used the file attached to lasercut the wood. Then I glued the pieces together (in the pictures with tape to keep the parts in place right after gluing).
You'll need two 12x12 - 300x300mm wood pieces to do this, and the SVG file comes with all the models. It worked fine for me. I left two small gaps in the back: one for the traffic light wiring and another for the USB cable. If you'd like, you can make that part bigger and drill some holes in the back panel.
Step 5: Traffic LightAs I moved from the prototype to the final version, I thought about several possibilities for this part, but I decided to keep it simple: I just reused the LED wiring I had before, drilled some holes for the LEDs, used hot glue to keep them in place and used a heavy blue paper to do the finishing, a.k.a. hiding the wiring mess.
I also added a little round frame for each set of LEDs to make it more evident.
An idea for the future is to 3D print this, instead of using paper as I did (my 3D printer is currently offline for some improvements).
Step 6: Coding for the NanoThe code is straightforward and I added comments to the major sections of it.
You may use Arduino IDE. The only libraries needed are SPI and LiquidCrystal (you should have that as part of you Arduino IDE basic installation).
Ideas for next versions:
- Replace the 16x2 LCD for a bigger one, 20x4, so we'll have space to show if we're in the grace period or not as well as other useful information.
- Add a relay-board so we can control some bigger traffic lights with 127 V light bulbs. I know some clubs have cool/bigger traffic lights controlled by switches.
- Add the relay board remotely, by adding radio capabilities with the nRF24L01 boards. Then we would be able to control the traffic light without the need for additional wiring.
- Replace this interface (LCD, buttons and LEDs) for a 7" touch screen, completely revamping the user interface.
The image shows a quick reference card I created to help people using the timer. I intend to print it out and place it along with the timer. I believe that by playing with the timer for a minute or two, folks will figure out how to deal with it.
I know this is a VERY specific project useful for Toastmasters out there, but if you need a timer with a traffic light, you might find this useful. It will just be a matter of changing the code and the box engraving to your needs.
I hope you enjoy!


_3u05Tpwasz.png?auto=compress%2Cformat&w=40&h=40&fit=fillmax&bg=fff&dpr=2)
Comments
Please log in or sign up to comment.