This project creates a real-power energy monitor using a NodeMCU module with ESP8266-12 and ADS1115.
Wiring up the circuitThis basic version is for apparent power only. To keep component count low and the circuit as simple as possible the ADS1115 is used in differential mode eliminating the need for bias resistors. The hard part is getting a licensed electrician to wire up the clamp on current sensor to the main wire coming into the premises. Since we have only 1 channel we are going to monitor overall power rather than power per circuit. Follow the Fritzing diagram below to wire up the prototype on a breadboard. Powering the NodeMCU near the switchboard might be an issue as well, so I installed a DIN rail power socket, this will come in handy for real power measurement later on.
I chose to use the Arduino IDE to program the NodeMCU due to the easy availability of relevant libraries and my personal familiarity with the platform. You can get started quite easily using the latest incarnation of the Arduino IDE and the instructions here. The code running on it for basic apparent power is available here.
This is adapted from the great Emonlib source.
Connecting to ThingspeakConnecting to Thingspeak makes it easy to plot the current and save the data being gathered continuously. Create an account and fill in the API key in the Arduino sketch above.
Using a 12V DIN-Rail transformer real power can be measured as long as loading power-factor issues are calibrated. The Fritzing diagram below shows how this may be achieved. The NodeMCU can be powered in this setup using a bridge rectifier as shown.
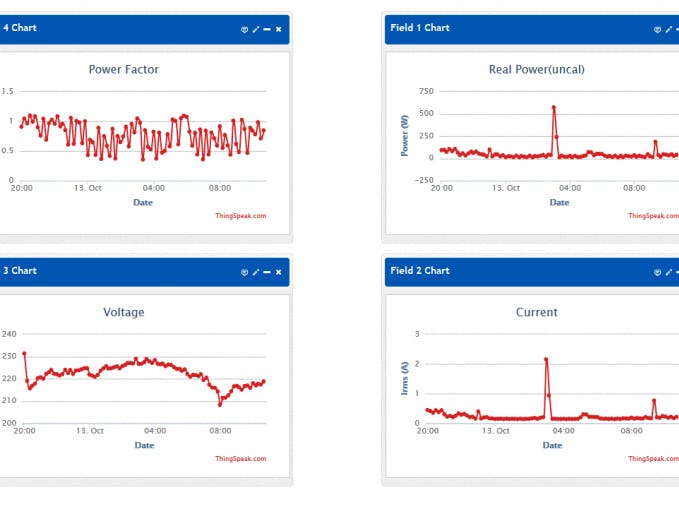
Care has to be taken to avoid overloading the ADC when sampling AC voltage. The maximum peak-to-peak voltage the ADC can handle with scale factor 1 is about 8V, the RMS AC voltage is about 2.8V. When wired up in this mode, various other variables including power-factor, true and apparent power and line voltage are also measured. The sketch to upload true-power to Thingspeak can be found here.
Putting it on a PCBAfter prototyping on the breadboard and making sure everything is working, we can transfer the design to a PCB. I have made the Schematic and PCB available here. I will iterate through the design and update them as I progress. Improvements can be made by putting in a drop-in replacement for the 7805, such as the Murata and by adding a 50-60Hz Lowpass or Bandpass filter to suppress any noise in the measurements.
The final assembled system is now complete and available on Tindie.
As


Comments
Please log in or sign up to comment.