There are many share-workspaces in the office, restaurant, library. People come and go. In this COVID-19 pandemic, we need to make sure that these workspaces are clean and sterilize before other people come to use them. This project will apply AWS IOT Technology with H/W M5Stack CORE2 for AWS to control the robot that will spray Alcohol and clean the floor with UV-C Light after people left the workspace.
Project descriptionsWe plan to build a small robot that can spray tiny drops of alcohol and at the same time robot will carry UV sterilizer to make sure that the workspace is clean and safe. Users start using workspace by scan QR code at the table, when they finished just press the FInished button on the mobile Web. The AWS IOT will calculate the usage duration time and command the robot to start cleaning with UV-C ray and Alcohol spray. At the same time this usage will be kept in Dynamo DB. This DB will useful for history tracking in case someone with infected COVID-19 used this workspace before.
(Note *** we planned to use PIR sensor to detect person coming and use Alexa to get the name of users. but PIR sensor is quite not reliable and users need to sit at the table all the time which is not practical. For Alexa, there is no easy way to transform Voice to Text. Because the limit of time, we choose to change the solution from the proposed solution little a bit. )
System ArchitectureThere are two parts in this project.
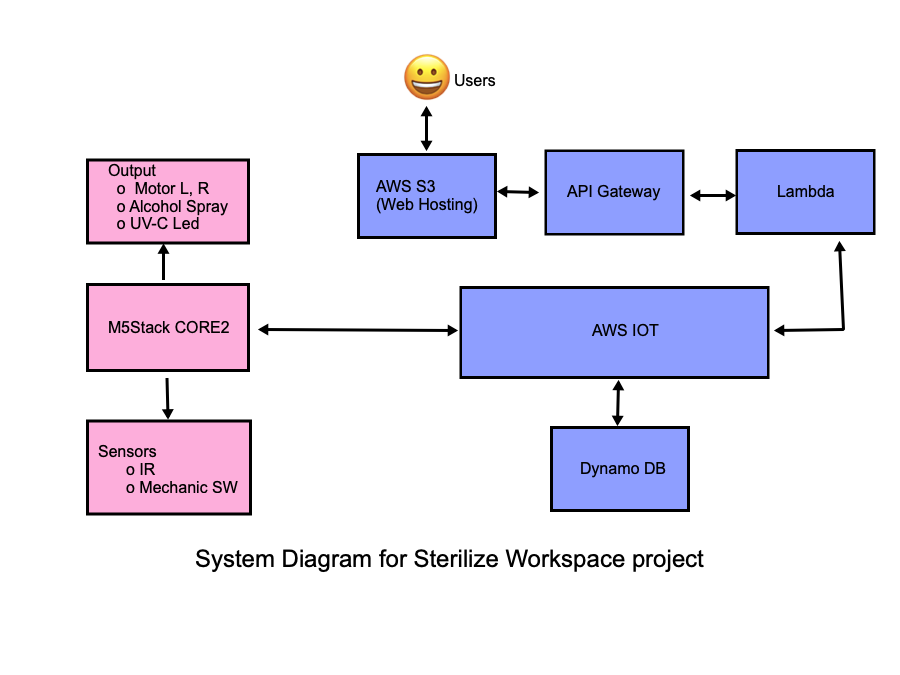
1) Client-side which uses M5 stack Core 2 to control all the robot activitis such as moving forward, backward, turn left and right, spray the alcohol and control UV light. Check all the sensors to prevent collision with objects and fall detection. This robot will be controlled by the AWS IOT when users finished use workspace. AWS IOT will update workspace occupancy flag to false ( mean workspace now available) The CORE2 will update the usage time and start robot cleaning. After finished cleaning, the robot will stop and workspace is ready to use for the next person.
2) Server-side uses some services on AWS. Users start to scan QR code which show on the table to register name. This website is a simple static website that stores on Amazon S3 AWS. When users press register button, javascript will pass information to Restful API which stores on API gateway. API gateway will call AWS lambda to update-device or get-device status of device-shadow on AWS IOT. AWS IOT update the status of both Workspace and Robot and post to Dynamo DB when users finished using theworkspace.
We can summarize all the activities with the following diagram
Because this project needs the basis for many technology. You should familiar with these technologies by complete the tutorials below.
- AWS Services ( S3, API gateway, Lampda, AWS IOT) you may need to go to tutorial for each service. Google tutorial for these AWS services.
- Familiar with development environmet with platformIO and Core2forAWS. Goto https://edukit.workshop.aws/en/getting-started.html for tutorial follow the instruction until topic 3 Smart Thermostat. This will make sure that you can connect to AWS service and pass all the securit checking. Our project expands from this project.
- Flow of Application from S3 -> API-> Lampda->AWS IOT. This tutorial is very useful to make you understand the flow between each AWS services. https://iot-esp32.workshop.aws/en/module3.htmlProject Implementation
Hardware implementation
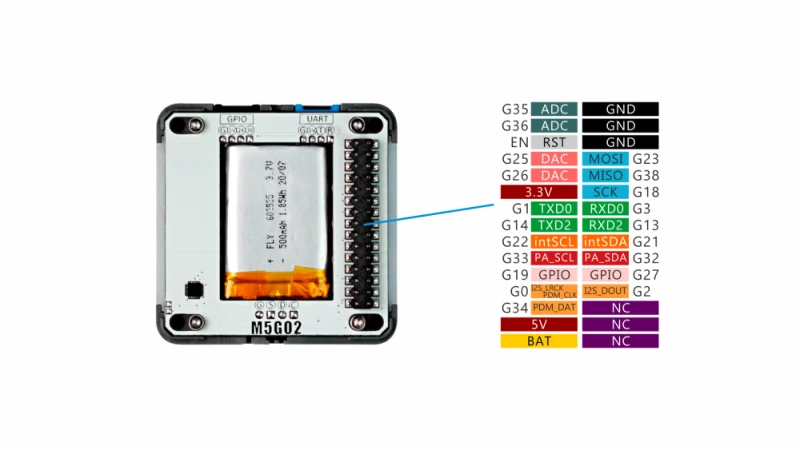
For hardware construction, we need to add extra two M5stack modules (M5Stack DC Motor and M5Stack Proto) DC motor module comes with four connectors for Lego motors which are perfect for our fast prototype. We use proto modules to wiring from CORE2 bus to 14 pins socket. These modules can stack in order but be careful with the order of stack which is
Core 2 -->Proto -->DC Motor --> M5GO2 (come with core2)
**********************************Use < > to see more pictures *********************************
The ports that we used in this project are
- GPIO32 for UV-C Led
- GPIO27 for Alcohol Spray
- GPIO13, GPIO36 for IR sensor
- GPIO 33, 26 for Fall detection
- GPIO 19 for PIR
- GPIO3, GPIO1, GPIO35 ( not used)
- 5V pin
- 3V pin
- GND pin
using GPIO on Core2 is very tricky for me. There are many restrictions you need to consider. Here is some info that I can collect from Datasheet.
- Should avoid these ports GPIO1, GPIO3, GPIO12, GPIO15 because they may use for debug and flash.
- Port 34 - 39 can use for I/P only and have no Pull Up/Pull down
- Ports are not 5V tolerance which means you need to use level converter if your sensors are 5V sensors type. And some level converter is not working, make sure buy the quality one if you want to avoid problems.
For level converter, I put it in a separate box which includes PIR sensor, relays modules and all the connections for the sensors and peripherals as shown here.
There are two devices that need two relays to turn on/off. Because we use the commercial that sales in the market. Some modification are needed.
Alcohol spray
We use portable Alcohol spray which can buy easily just 2 US$. This equipment comes with built-in battery. We are just wiring parallel from the push button switch to our socket as shown here.
UV-C Led
Please note that not all UV can kill Virus. You need to use product with UV-C which is more expensive than normal UV Led. UV-C is danger to eye and skin. Please make sure you do not expose to this light during the experiment. I bought UV-C box for mobile phone and take out the UV-C module. For this module, I need to connect external battery ( 1x 18650 Battery 3.7V ) Because battery is in the box which is too big. I wiring parallel from the start switch to the socket as shown in the picture.
Battery Box
Core 2 cannot supply enough power to two motors. We need to have a separate battery to drive DC motor. I choose battery box for 2x 18650. This will connect to DC motor module. And you must tab battery for 3.7 V to drive UV-C module. I don't have pictures of this. You can choose any battery box you like.
Robot Frame
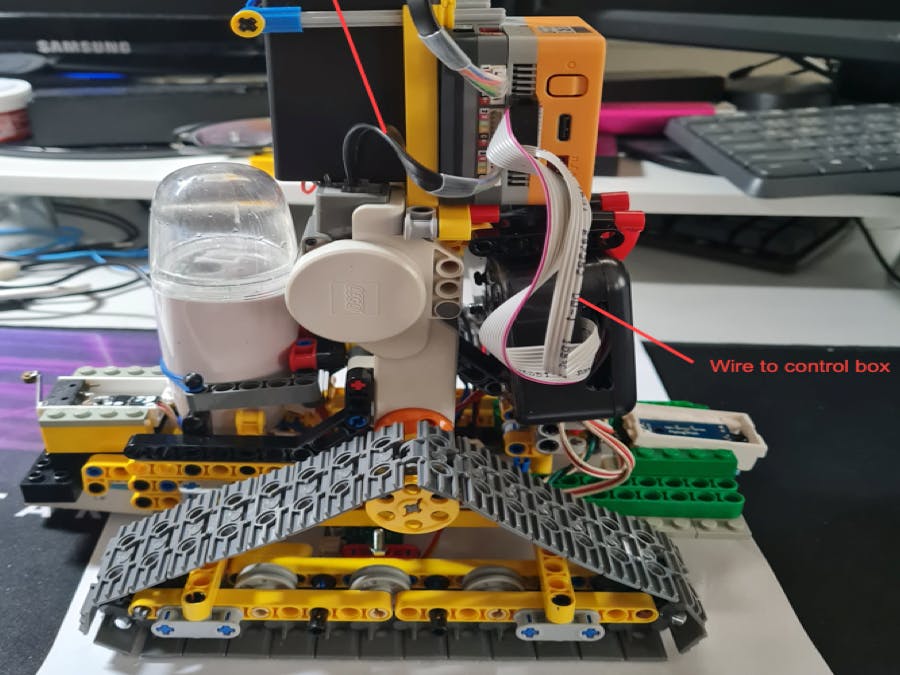
Because we use Lego Motor, I choose to build robot frame by using Lego. If you are not Lego fan. You can choose any motors and frame depend on your available material and imagination. Here is the picture of my robot frame using Lego.
Sensors
There are four sensors use in this project two at the front for fall detection and collision detection, another two at the back. I used two different types of IR sensors for fall detection and collision. As shown here in the picture.
To make it compatible with Lego. I stick Lego plate at the back of the sensor. For the trick, you can use small plastic cover for home's light switch for the box.
After all wiring and install all sensors, components. Here is the final instruction of Sterilize Robot.
Software Implementation
There are many parts in software implementation. To understand more on concepts. You may need to start working on these two tutorials
- Understand more on AWS IOT concepts and tools used in this project.
https://iot-esp32.workshop.aws/en/introduction.html
- Understand more on the flow of many AWS services.
https://iot-esp32.workshop.aws/en/module3.html
For more complete source code, please go to github https://github.com/wtos03/HealthySpaces
I will pull out only some code snippets for explanation only.
Web page
This page will be used for registration the workspace as show in the following pictures
Users start to choose location to register. This option menu will help translate name to Thingname used in AWS IOT.
<select name="roomNames" id="roomNames"  style="padding: 8px;">
            <option value="0123a8024945e75c01">    Binary Room</option>
            <option value="TT">    Analog Room</option>
</select>
After users enter their name and press Registration button. Web page will post request with data in Jason format (Name and wsOccupancy flag for worksapce status) to predefine web API shadow-state (see url: below)
$("#register").click(function(event){

            currentvalue = document.getElementById('register').innerHTML;
            yourName = document.getElementById('name').value;

            // trying to add the value from text box
            thingName = document.getElementById("roomNames").value;
            console.log(thingName);
            var mydata={"action":"on","wsOccupancy":true,"userName":yourName, "thingname":thingName};
            console.log(mydata);
            document.getElementById("status").innerHTML= `Workspace Usage : ${yourName}`;
            document.getElementById("status").setAttribute("class","button is-rounded is-large is-fullwidth is-loading");
            $.ajax( {
                type: 'POST',
                url:'https://u2gtqb6j39.execute-api.us-west-2.amazonaws.com/Dev/shadow-state',
                contentType: 'application/json',
                crossDomain: true,
                processData: false,
                dataType: "json",
                data: JSON.stringify(mydata),
                success:function(data) {
                console.log(" on success");
                document.getElementById("status").setAttribute("class","button is-success is-rounded is-large is-fullwidth");
                },
                error:function(data) {
                    console.log(" on fail;");
                    document.getElementById("status").setAttribute("class","button is-success is-rounded is-large is-fullwidth");
                }
            });
        });
If user press Finished button, the wsOccupancy flag will set to false and post to the same API as registration process.
If user press Occupy button to check status of Workspace, Web page will send get request to predefined Web API shadow-state. This API will return the status of Workspace either Available or Occupied.
$("#status").click(function(event){
            console.log("Checking Workspace status");
            //check the status of Shadow
            // thingName = "ESP32"
            thingName = document.getElementById("roomNames").value;
            console.log(`thingname=${thingName}`);
            $.ajax( {
              type: 'GET',
               url:'https://u2gtqb6j39.execute-api.us-west-2.amazonaws.com/Dev/shadow-state',
               contentType: 'application/json',
               crossDomain: true,
               processData: false,
               dataType: "json",
               data: `thingname=${thingName}`,
               success:function(data) {
                console.log("success");
                console.log(data.status);
                document.getElementById("status").innerHTML=data.status;
                if (data.status == "Available" )
                {
                  document.getElementById("status").setAttribute("class","button is-success is-rounded is-large is-fullwidth");
                }
                else{

                  document.getElementById("status").setAttribute("class","button is-danger is-rounded is-large is-fullwidth");
                }
               },
               error:function(data) {
                 console.log("error");
               }
            });
        });
Static web page has the advantage that you can run it on local web page under any web browser that supportsJavascript. No need for Web Server to host this service. But to share this webpage, we can upload to S3 bucket and mark them as static webpage. By upload this file (index.html) to S3 bucket and enable as static website hosting. Define permission for public access or only specific group. and copied the Bucket website endpoint for use on web page. In this example are
http://cleanws.com.s3-website-us-west-2.amazonaws.com
We can translate this URL to create QR code or put in NFC tag for people to access when they come to the workspace.
Lampda function
We need to create Lampda first before creating API gateway. Because API needs Lampda function name to point to.
We need to create two Lampda function
- Shadow_Status_Check This function check status for the AWS IOT by get value of wsOccupancy flag. If true will return value "Occupied" to show on Webpage. If false will return value "Available". This flag will read from Reported Shadow State.
- Shadow_Update This function update status of IOT device shadow with value of wsOccupancy and userName.
These source code are wrote in python 3.8. Make sure that these two functions have permission to access AWS IOT services ( Under configuration and permissions tab on left
All source code is located under LampdaFunctions directory
API gateway
To make web page easily access to AWS IOT services. We can define API which connect to Lampda function. Lampda function can connect to AWS IOT service. We cannot create Web API to direct connect to AWS IOT. ( I don't know the reason but I think it's security issues) To create API, you need to create resource shadow-state and two methods get and post.
"Get method " link to "Shadow_Status_Check" Lampda function.
"Post method" link to "Shadow_Update Lampda" function.
AWS IOT
We did not config much on AWS IOT server. Most of the tasks done on client side which done by CORE2 Module. To make sure that all configurations and security are set properly. Please run these two tutorials Cloud Connected Blinky and Smart Thermostat at https://edukit.workshop.aws/en/getting-started.html before start working on this part.
ThingName will create automatically by using ID of devices which unique for each devices.
CORE 2 will start to connect AWS IOT Shadow service and register delta change on data userName and wsOccupancy flag
// register delta callback for workSpaceActuator and nameActuator
rc = aws_iot_shadow_register_delta(&iotCoreClient, &nameActuator);
if(SUCCESS != rc) {
ESP_LOGE(TAG, "Shadow Register userName Delta Error");
}
rc = aws_iot_shadow_register_delta(&iotCoreClient, &workSpaceActuator);
if(SUCCESS != rc) {
ESP_LOGE(TAG, "Shadow Register wsOccupancy Delta Error");
}
This two Actuator will register call back functions as below data structure.
jsonStruct_t nameActuator;
nameActuator.cb = userName_Callback;
nameActuator.pKey = "userName";
nameActuator.pData = &userName;
nameActuator.type = SHADOW_JSON_STRING;
nameActuator.dataLength =  MAX_NAME_LENGTH;

jsonStruct_t workSpaceActuator;
workSpaceActuator.cb = occupancy_Callback;
workSpaceActuator.pKey = "wsOccupancy";
workSpaceActuator.pData = &wsOccupancy;
workSpaceActuator.type = SHADOW_JSON_BOOL;
workSpaceActuator.dataLength = sizeof(bool);
To calculate time difference between start and stop usage time. We need to set time correctly first. For easy set up and convenience we use ntp protocol to set time which is defined in ntptime.h and implement in ntptime.c. When CORE2 get update delta status of wsOccupancy from false to true, CORE2 will turn on RED on LED bar, get startUsagetime and change robotStatus to "Stop Clean"
if (*(bool *)(pContext->pData)) //True mean workspace is used
{
Core2ForAWS_Sk6812_SetSideColor(SK6812_SIDE_LEFT, 0xFF0000);
Core2ForAWS_Sk6812_SetSideColor(SK6812_SIDE_RIGHT, 0xFF0000);
Core2ForAWS_Sk6812_Show();
// Add starttime
getTimeStructure(&startTime);
strftime(startUsageTime, sizeof(startUsageTime), "%c", &startTime);
ESP_LOGI(TAG, "The current date/time in Thailand is: %s", startUsageTime);
strcpy(robotStatus,"Stop Clean");
}
If user finished using workspace. The delta flag of wsOccupancy will change from true to false, this will trig to get stopUsageTime, calculate the time difference in HH: MM format, stop the LED bar and change robotStatus to "Start Clean"
else
{
Core2ForAWS_Sk6812_Clear();
Core2ForAWS_Sk6812_Show();
// Add stoptime
getTimeStructure(&stopTime);
strftime(stopUsageTime, sizeof(stopUsageTime), "%c", &stopTime);
ESP_LOGI(TAG, "The current date/time in Thailand is: %s", stopUsageTime);
// Find time difference
diffTimePeriod (stopTime,startTime,&diffTime);
sprintf(durationTime,"%d Hr: %d Min: %d Sec",diffTime.tm_hour,diffTime.tm_min,diffTime.tm_sec);
ESP_LOGI(TAG, "The workspace usage time  is: %s \n", durationTime);
strcpy(robotStatus,"Start Clean");
}
CORE2 will send report Device shadow every specific time specify on line 461
vTaskDelay(pdMS_TO_TICKS(1000)); Line 461Dynamo DB
This DB will keep usage of workspace. We will post to DB once users finish using workspace and CORE2 finishes calculate usage time. You need to create Table for saved data, define the primary key. For more information, go to this website for understand more how to store device data in Dynamo DB
https://docs.aws.amazon.com/iot/latest/developerguide/iot-ddb-rule.html
To post into DB, we need to define Rules to process IOT data under Rules tab on left side. Rule query will using SQL statement to start posting to DB. This need to improve on SQL statement to post when users finish only.
SELECT state.reported.userName, state.reported.temperature, state.reported.startUsageTime, state.reported.stopUsagetime, state.reported.durationHandler FROM '$aws/things/0123a8024945e75c01/shadow/update/accepted'Robot Control
This is another task that we register separate process from aws_iot_task
xTaskCreatePinnedToCore(&robot_task, "robot_task", 2048, NULL, 3, NULL, 1);
xTaskCreatePinnedToCore(&aws_iot_task, "aws_iot_task", 4096*2, NULL, 5, NULL, 0);
robotStatus flag will use to control the state of robot. If user leave workspace, the status will change to start clean and robot will start to clean until finished or another users come in. This section has not been completely implemented. Just simple service like move forward, backward, turn left, turn right and U turn when robot hit something or nearly to fall. Implement robot moving algorithm need more time to develop and test.
DC Motor driver using i2c protocol is implemented in directory component /dc-motor/m5-dcmotor.c
Project testing
Because my device stop working three days before the deadline. ( CORE2 cannot reprogram. Booting message show PSRAM read error) Screen come to garbage like this.
I cannot have a video to show final working of the project. However during development period. All functions ( Motor movement, Sensors. and Relays to turn on devices had been tested and working well. except GPIO that sometimes read error on sensor.
The logic between AWS and CORE2 had been tested. Robot start working when user press finished button and stops working when new registration occurs. The only one thing that misses testing is working with sensor check while turn on UV-C and Alcohol Spray.
AWS parts working fine as you can see in this Video.
Lesson Learn
There are some tricks that I learn from this project. It will be useful for others to develop further and not trial and error again.
- Many devices in CORE2 share same i2C bus and this sometime cause problems. For example, my DC motor control and MPU6886 have problem in working together.
- To upgrade the development environment or pull new library when project nearly finished is a bad idea. This cause my project tocompletely stop. I cannot solve the issue in time.
- Port ESP32 is not 5v tolerance. You cannot connect 5 V sensor directly.
- FreeRtos is depend on task schedule. This can affect your real-time operation. I have problems which read value from input ports and when I adjust time delay or add more tasks. I got different behavior from reading the port.
- There are many security setting in AWS. This causes me a lot of problems until I decide to open all security. This will be a big security hole. Hacker can use your API to manage AWS IOT. I hope amazon will have improve more on security setting to make it central and easy to setup and understand
I hope you find this project useful. Copy and paste some part of this project is recommended to help you develop your project faster. I will happy to hear that. Thank you.


Comments