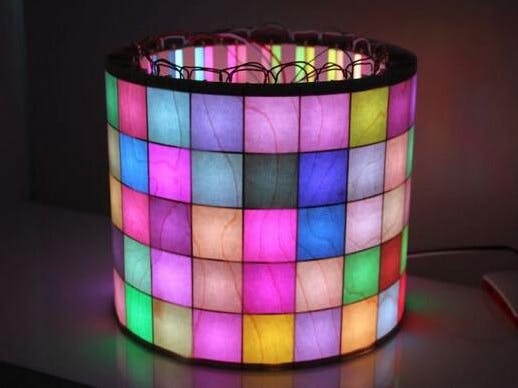
This matrix colored light uses standard WS2812B LEDs to form a cylindrical lamp body, which is finally combined by a wooden frame. The lighting effect is pretty good, let's try to make it.
Materials790×384 cardboard×a few (1.5mm wood board is used here)
WS2812b LED×100 (30 pcs / m)
Raspberry Pi or Arduino ×1
Wooden patches or other flexible materials × several
Wire × several
Outline Design and Laser CuttingThe main design parameters is the thickness of the material used.
1) This version uses 1.5 mm cardboard, which is easy to cut. By the way, if the thickness is changed, the CAD data must be changed accordingly.
2) 3D design helps avoid problems in the assembly process and save time and money.
3) For laser cutting, the placement of parts must be convenient for cutting. The size of the cardboard used is 790×384 cm.
4) It is recommended to use Inkscape as a tool. The attached SVG file contains information about all parts of the project.
Note: You can adjust the thickness of the material and generate your own laser cutting file.
The link to the model is: https://a360.co/2OC2kvZ
Please download the SVG file for laser cutting in the project file library.
Laser Cutting and Local AssemblyThe following parts by laser cutting:
C-shaped horizontal part×12
Vertical card slot×18
Vertical connection parts × 2
LED carrying parts×20
8 C shapes, 9 card slots and 1 connecting part can be combined into a semicircular shape.
In this step, all parts are connected by card slots without glue.
LED WiringThere are five LED lights on each light bar, which are glued to the main carrier.
1) The DI (data input) and DO (data output) pins of the light strip are connected in Z manner, connect the DO of the first strip to the DI of the next strip, and so on.
2) Each semicircle requires 10 strips. 5V and GND are connected only on one side of the strip. The length of the wires matches the length of the wiring required by the strips of the matrix.
3) Before installing the LED light bars in place, all nodes must be fixed with glue.
4) Fix ten light bars to each half of the cylinder with glue. One semicircle DO is connected to the other semicircle DI. The first semicircular DI will be the input of Raspberry Pi or Arduino.
TestTo ensure that everything is in order, the LED lights will be tested for normal use. Using Arduino and Neopixel should be the easiest way.
Wooden DecorationAfter measuring the diameter and height of the cylinder, install the wood decoration in place.
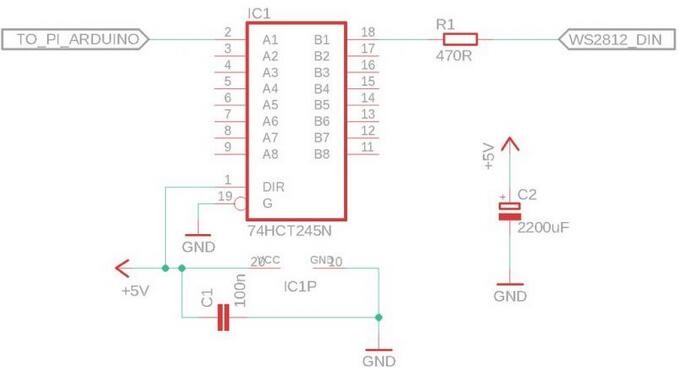
Raspberry Pi, Arduino and Power SupplyIn order to write beautiful matrix effects in Python, you can use Raspberry Pi. Raspberry Pi Zero can do it, which is connected to the matrix through GPIO pin 18, and through the 74HCT245 converter, the Raspberry Pi's 3.3V can adapts to the WS2812's 5V. When using more Neopixel / WS2812 LED lights, larger capacitors (2200 uF) and series resistance (470 ohms) will be used.
Power Supply
The maximum power of 100 WS2812b LEDs is 100x60mA = 6A. Of course, if the brightness is reduced, the power loss will also be greatly reduced. The 5V power supply can achieve the brightness you want.
Arduino
This matrix can directly use Adafruit's NeoPixel library and NeoMatrix library on Arduino devices. If you use the following case, you must modify the PIN and initialize:
NeoMatrix:
Adafruit_NeoMatrix matrix = Adafruit_NeoMatrix(20, 5, PIN, NEO_MATRIX_TOP + NEO_MATRIX_LEFT+ NEO_MATRIX_COLUMNS + NEO_MATRIX_ZIGZAG, NEO_GRB + NEO_KHZ800);
You can use Adafruit's GFX library, which can download different bitmap fonts with a height of 5 pixels. Please use the attached Arduino sketch as a starting point (use PIN 4 as the starting point of the matrix). It is an adapted version of the Neomatrix sample sketch.
NeoPixel:
Adafruit_NeoPixel strip = Adafruit_NeoPixel(100, PIN, NEO_GRB + NEO_KHZ800)
SimulationThe Python source code can be downloaded from the Github repository.
ProgrammingTwo modes are set here. The PI variable is defined at the beginning of cylinder.py.
1) PI=False, which is the simulation mode. A Python program will be started to test all animation effects. You need to install all the libraries that the program required (such as pygame, numpy, etc.). In simulation mode, the cylinder is displayed as a 5×20 pixel matrix.
2) PI=True, this will drive the GPIO 18# pin of the Raspberry Pi. You can freely add other effects using parameters.
The text uses a 3×5 pixel font. Due to the limited height, not all letters can be displayed completely.


Comments
Please log in or sign up to comment.