Project updated to beta 1.12.0.0 (released on May 28th, 2024)
In this introductory project we're going to learn how simple is to control an RGB LED on a Meadow board with a .NET MAUI app using Bluetooth!
Meadow.Foundation a platform for quickly and easily building connected things using.NET on Meadow. Created by Wilderness Labs, it's completely open source and maintained by the Wilderness Labs community.
If you're new working with Meadow, I suggest you go to the Getting Started w/ Meadow by Controlling the Onboard RGB LEDproject to properly set up your development environment, including flashing your board to the latest version of MeadowOS.
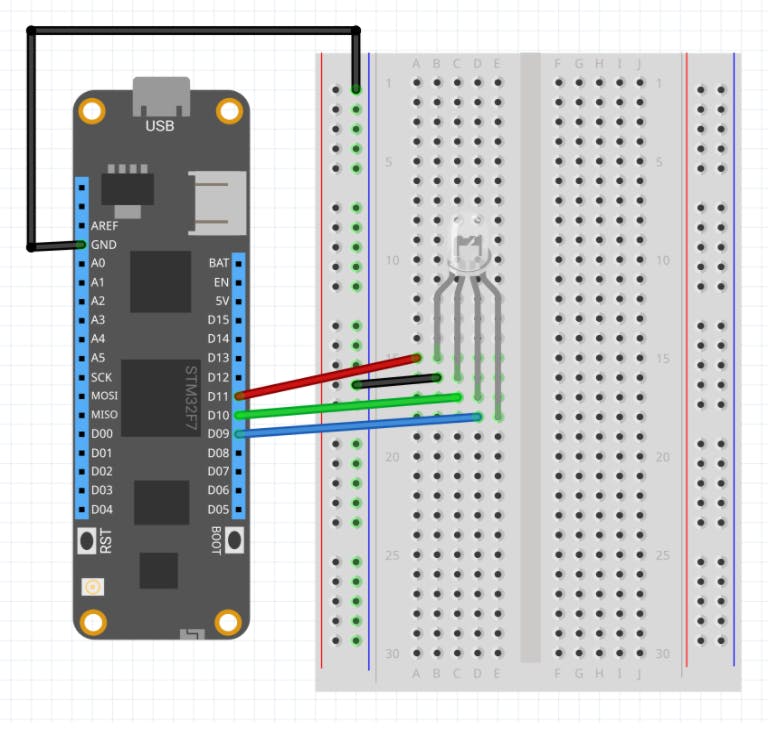
Step 1 - Assemble the circuitWire your project like this:
Optionally, you can just use Meadow's onboard RGB LED.
Step 2 - Create a Meadow Application projectCreate a new Meadow Application project in Visual Studio 2019 for Windows or macOS and name it MeadowBleLed.
Step 3 - Write the code for MeadowBleLedCopy the following code below:
public class MeadowApp : App<F7Micro, MeadowApp>
{
    Color selectedColor;

    RgbPwmLed onboardLed;

    Definition bleTreeDefinition;
    CharacteristicBool isOnCharacteristic;
    CharacteristicInt32 colorCharacteristic;

    readonly string IS_ON = "24517ccc888e4ffc9da521884353b08d";
    readonly string COLOR = "5a0bb01669ab4a49a2f2de5b292458f3";

    public MeadowApp()
    {
        Initialize();

        PulseColor(Color.Green);
    }

    void Initialize()
    {
        onboardLed = new RgbPwmLed(device: Device,
            redPwmPin: Device.Pins.D11,
            greenPwmPin: Device.Pins.D10,
            bluePwmPin: Device.Pins.D09);
        PulseColor(Color.Red);

        bleTreeDefinition = GetDefinition();
        Device.BluetoothAdapter.StartBluetoothServer(bleTreeDefinition);

        colorCharacteristic.ValueSet += ColorCharacteristicValueSet;
        isOnCharacteristic.ValueSet += IsOnCharacteristicValueSet;
    }

    void IsOnCharacteristicValueSet(ICharacteristic c, object data)
    {
        if ((bool)data)
        {
            PulseColor(selectedColor);
            onboardLed.IsOn = true;
            isOnCharacteristic.SetValue(false);
        }
        else
        {
            onboardLed.Stop();
            onboardLed.IsOn = false;
            isOnCharacteristic.SetValue(true);
        }
    }

    void ColorCharacteristicValueSet(ICharacteristic c, object data)
    {
        int color = (int)data;

        byte r = (byte)((color >> 16) & 0xff);
        byte g = (byte)((color >> 8) & 0xff);
        byte b = (byte)((color >> 0) & 0xff);

        PulseColor(new Color(r / 255.0, g / 255.0, b / 255.0));

        colorCharacteristic.SetValue(color);
    }

    void PulseColor(Color color)
    {
        selectedColor = color;
        onboardLed.Stop();
        onboardLed.StartPulse(color);
    }

    Definition GetDefinition()
    {
        isOnCharacteristic = new CharacteristicBool(
            name: "On_Off",
            uuid: IS_ON,
            permissions: CharacteristicPermission.Read | CharacteristicPermission.Write,
            properties: CharacteristicProperty.Read | CharacteristicProperty.Write);

        colorCharacteristic = new CharacteristicInt32(
            name: "CurrentColor",
            uuid: COLOR,
            permissions: CharacteristicPermission.Read | CharacteristicPermission.Write,
            properties: CharacteristicProperty.Read | CharacteristicProperty.Write);

        var service = new Service(
            name: "ServiceA",
            uuid: 253,
            isOnCharacteristic,
            colorCharacteristic
        );

        return new Definition("MeadowRGB", service);
    }
}
In the Initialize method, we create a RgbPwmLed object and build our bluetooth definition tree, which we then pass in when starting the bluetooth server. Finally, we create event handlers for the two characteristic we're exposing here:
isOnCharacteristic- a boolean with read/write permissions to turn on or off the LED.colorCharacteristic- a 32 bit integer with read/write permissions to set the color on the LED.
As we mentioned, in this project we included a .NET MAUI app that runs on iOS and Android.
The basic things we need to understand here are:
If you check their official GitHub docs, you'll see how to add the required permissions in the Android's manifest file and iOS's info.plist file, how to scan for devices and handle the event of discovered devices.
If you check the BaseViewModel class, in the AdapterDeviceDiscovered event handler we have:
void AdapterDeviceDiscovered(object sender,
    Plugin.BLE.Abstractions.EventArgs.DeviceEventArgs e)
{
    if (DeviceList.FirstOrDefault(x => x.Name == e.Device.Name) == null &&
        !string.IsNullOrEmpty(e.Device.Name))
    {
        DeviceList.Add(e.Device);
    }

    if (e.Device.Name == "MeadowRGB")
    {
        IsDeviceListEmpty = false;
        DeviceSelected = e.Device;
    }
}
In every device discovered, if its named MeadowRGB, it'll be set as DeviceSelected, which you'll see it selected automatically in the device Picker.
Connecting/Disconnecting to Meadow
Once MeadowRGB is selected, you can now tap on the connect/disconnect toggle button on the right next to the search for devices button.
async Task ToggleConnection()
{
    try
    {
        if (IsConnected)
        {
            await adapter.DisconnectDeviceAsync(DeviceSelected);
            IsConnected = false;
        }
        else
        {
            await adapter.ConnectToDeviceAsync(DeviceSelected);
            IsConnected = true;
        }
    }
    catch (DeviceConnectionException ex)
    {
        Debug.WriteLine(ex.Message);
    }
    catch (Exception ex)
    {
        Debug.WriteLine(ex.Message);
    }
}
Once connected to the Meadow board, IsConnected property becomes true, and you'll see the connected icon, and the Set Color and Turn On/Off buttons are enabled.
Step 5 - Run the projectWhen running both the MAUI app and Meadow app, once connected successfully, you should be able to change the color on the RGB LED by selecting it from the wheel color, or turn it on and off. It should look like to the following GIF:
This project is only the tip of the iceberg in terms of the extensive exciting things you can do with Meadow.Foundation.
- It comes with a huge peripheral driver library with drivers for the most common sensors and peripherals.
- The peripheral drivers encapsulate the core logic and expose a simple, clean, modern API.
- This project is backed by a growing community that is constantly working on building cool connected things and are always excited to help new-comers and discuss new projects.


Comments
Please log in or sign up to comment.