


Hardware components | ||||||
 |
| × | 1 | |||
 |
| × | 1 | |||
Software apps and online services | ||||||
| ||||||
Hand tools and fabrication machines | ||||||
 |
| |||||
Have you ever wanted to control your Hue lights with the tap of your finger? Now you can with a piezo sensor and Particle Photon. Attach a piezo sensor to any flat surface, and it can detect the vibrations of your finger tapping the surface. Using Particle Photon to process the tap data, we can then change the state of the lights based on different tap patterns.
Step 1: Get Familiar with the Hue APIIn order to tell our lights to change states, we need to know what data to send them. Philips Hue provides a Getting Started guide on their website, which guides you through turning a light on and off. Take a few minutes to follow that guide so that you'll be a little more familiar with the format of the requests we'll be making.
Important: Save the username it generates for you because we will use it later.
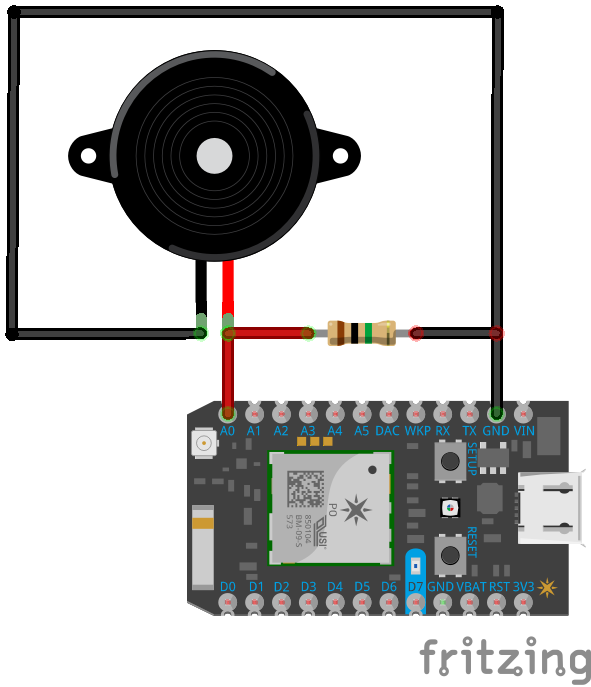
Step 2: Connect Piezo to ArduinoUse the following diagram to connect a piezo sensor to the Photon. The resistor is 1MΩ. Any of the analog pins (A0-A5) will work, but we're going to use A0 in the example code.
Find any flat surface you'd like, and attach the piezo sensor flush with the bottom of the surface (if you want it to be hidden). You can use hot glue, tape, or any other material to hold it in place. Now you're ready to program the Photon.
Step 4: Program the Photon (Part 1)We're not ready to start sending requests to the Hue API yet. First, we need to teach the Photon what is considered a tap.
Create a new Particle App in Particle Build. We're just making an app that reads the values from the piezo sensor.
void setup() {

}

void loop() {
    int intensity = analogRead(A0);

    // Publish an event with an associated value (intensity) to Particle Console
    Particle.publish("intensity", intensity);

    // Delay so that we do not exceed the event publishing limit
    delay(1000);
}
Flash this to the Photon and head over to the Particle Console to check your values. Keep track of the highest value, and we will use it as a minimum when setting our threshold for what is considered a tap.
Step 5: Programming the Photon (Part 2)Use the comments to configure this code for your setup. Tune your threshold value so that it doesn't miss any taps but also doesn't sense any that didn't happen. After tuning the parameters, flash the code to the Photon and try it out. After three taps in sequence, the lights should toggle between on and off.
#include <HttpClient.h>

// Configuration

// 1. Replace this with your API username from Step 1
const String API_USERNAME = "OOeV6cZg0zhTu4wLriaTSYMU1VfnttWYzwlZtiPx";

// 2. Replace this with your bridge's IP address from Step 1
IPAddress hueIP(10,0,0,167);

// 3. Replace with the path to the lights you want to control. Use webpage from Step 1 to verify it works.
const String LIGHT_PATH = "/groups/2/action";

// 4. Replace this with the body of your request for turning the lights on.
const String REQUEST_BODY_ON = "{\"on\":true,\"bri\":254}";

// 5. Replace this with the body of your request for turning the lights off.
const String REQUEST_BODY_OFF = "{\"on\":false,\"bri\":254}";

#define PIEZO_PIN A0                // Analog input for piezo sensor
#define INTENSITY_THRESHOLD 117     // Threshold (0-1023) at which an intensity value is considered a tap
#define TAP_DECAY_TIME 100          // How long (milliseconds) to wait for sensor to settle (stop vibrating) after a tap
#define MIN_TIME_BETWEEN_TAPS 50    // Minimim time between taps in milliseconds
#define MAX_TIME_BETWEEN_TAPS 750   // Maximum time between taps in milliseconds
#define TRIGGER_NUM_TAPS 3          // Number of taps in a sequence that will trigger a light event

// Keep track of light state in this program
bool lightsOn = true;

// HttpClient object used to make HTTP requests to the Hue bridge
HttpClient http;

// Default header for HTTP requests
http_header_t headers[] = {
   { "Accept" , "*/*"},
   { NULL, NULL } // NOTE: Always terminate headers will NULL
};

// Request and response objects
http_request_t request;
http_response_t response;

void setup() {
   request.ip = hueIP;
   request.port = 80;

   // Onboard LED as indicator light for sensed tap
   pinMode(D7, OUTPUT);
}

void loop() {
 static int tapsInSequence = 0;
 static unsigned long lastTappedTime = millis();

 unsigned long currentTime = millis();

 if (isBeingTapped()) {
   digitalWrite(D7, HIGH);
   if (tapsInSequence == 0)
     tapsInSequence++;
   else {
     if (currentTime - lastTappedTime > MAX_TIME_BETWEEN_TAPS) {
       tapsInSequence = 1;
     } else {
       // within range
       tapsInSequence++;
     }
   }
   if (tapsInSequence == TRIGGER_NUM_TAPS) {
     toggleLights();
     tapsInSequence = 0;
   }
   lastTappedTime = currentTime;
   while (isBeingTapped()) delay(TAP_DECAY_TIME);
   delay(MIN_TIME_BETWEEN_TAPS);
   digitalWrite(D7, LOW);
 }
}

void setLights(bool on) {
   if (on) {
       request.path = "/api/" + API_USERNAME + LIGHT_PATH;
       request.body = REQUEST_BODY_ON;
   } else {
       request.path = "/api/" + API_USERNAME + LIGHT_PATH;
       request.body = REQUEST_BODY_OFF;
   }
   http.put(request, response, headers);
}

void printInfo() {
   Serial.print("Application>\tResponse status: ");
   Serial.println(response.status);
   Serial.print("Application>\tHTTP Response Body: ");
   Serial.println(response.body);
}

bool isBeingTapped() {
 return (analogRead(PIEZO_PIN) >= INTENSITY_THRESHOLD);
}

void toggleLights() {
 lightsOn = !lightsOn;
 setLights(lightsOn);
}
This code can be modified to cycle through scenes and even change colors. Please leave comments describing any improvements you made or would like to see in the future. Good luck!


Comments
Please log in or sign up to comment.