My prayers go out to the good people at PCBway.com that helped make this project possible as well as all of everywhere that are effected.
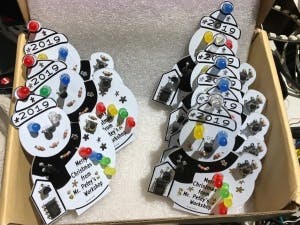
The first post of the New Year and it is covering my (last minute) Christmas gift I gave out this year. I was helped out by PCBway with the creation of the PCB boards. The quick turn around time really helped out with a short prototyping and production period.
I had been doodling and playing around with an idea for a handmade gift. It started out with a 555 timer and some LEDs on a wooden Christmas tree. This was a simple blinking setup one set on, one set off. I spruced it up a bit with a 4027 I get some additional blinking action going on. While this setup works, it is a little big and a hog on power. The plan is to have one smaller that can be hung from a tree or place somewhere.
The snowman 2019 idea was born; and then shelved for a bit. I’ll get back to that I kept saying. Next thing I know, oops, let get to working on this before it becomes Christmas 2020. I was trying to figure out how to program it so that it would go into sleep and wake up only when the button is pressed. In my travels I stumbled upon this site. His project was very useful. He has a very clean coding solution for deep sleep and running the lights, I slightly modified his code and used it with this project. I headed over to Adobe Illustrator 5 to create the artwork. It took a couple of tries to get the import process and scaling down. A quick check, yeah, yup, sure, all good, yeah. And off it goes to PCBway.com to be printed. While waiting I placed my order with Digikey to make sure I had all the parts. Since it was a gift, I splurged and purchased the components from a reputable source and not eBay.
The boards came in and looked great! Save I soldered up the first one and two lights turned on and nothing happened. Oh no. I pull up KiCAD and the board and start running traces using the continuity checker on my Fluke. Well, those yeah, yeah, yeahs, just cost me time. I made an error, big error in how one of the 2N4770’s was wired. Well, while I was at it, I took the time to clean up some of the artwork. I didn’t like how the lines came out, but that was due to the designer.
An evening worth the work and things looked much better in KiCAD. I set it aside for two days, like I used to do with term papers. It gives my mind a rest and (hopefully) see it with some fresh eyes. Cool, time to send it off, this time just in proto-green.
Being so very confident this time I pop open the new version and solder it up. Yes, hit the button, nothing!??! What the... OK, this is bugging me as I know I went over everything; or did I. For giggles and to test, I ran a wire to test the button. Sure enough I put the connection on the wrong post. Brother. The good news was that this fixed it and everything was working.
The final design was sent off. It was a squeaker getting them all done. Luck was not on my side though. I was programming the ATTinys and then checking them on my master.
I wired one of them up with a socket for the chip so I can test them. They all made the lights blink, but by time they made it to the board and soldered, it no blinky.
I pulled out a little sobering wick and pull them out and reprogrammed them. Second time was a charm.
Last check was the battery check.
Now they were all lined up like good little snowmen.
Waiting to be delivered.
I would like the again thank the generous people at PCBway.com that made this project possible. I already have a second project using their services and will have more on it soon.


Comments
Please log in or sign up to comment.