433MHz remote controllable devices such as power sockets or fairy lights all use seperate remote controls. This leads to a bunch of remote controls laying around the house and furthermore to a lot of plastic- and electronical waste that could be avoided.
Zentorro Home is a Smart Home system that uses 433MHz communication for these kind of devices. It centralizes all the controllers in one system, which allows for a simple operation with any smartphone or computer. Additionally, the system is able to operate through voice commands to further increase comfort.
Zentorro Home is driven by a Raspberry Pi and the open-source smart home software Home Assistant.
System OverviewFirst you need to add new devices and states (Add 433MHz Device)
- Specify an arbitrary device name (e.g. Lamp 1 kitchen) and what state (on or off) you want to teach.
- To start the learning process, press the button on the bottom left.
- Press the corresponding button on the remote control until the learning status feedback shows "off". You will need to press it at least 3 times.
- Repeat that process for every button you want to teach. The device name must stay the same and the state has to be different or it will be overwritten.
- Learning process will stop automatically and the learning status will turn off (see in the 3rd picture).
The second card is for controlling your learned devices.
To control a device, enter the device name and state and press the button on the bottom left. In the current development state, you need to remember all devices and states you taught and the names must match exactly.
The learning status shows whether the ESP8266 is listening for new remote control codes or not. When you start the learning process, it will turn on. It should turn back off after you have pressed an RC button multiple times. Even though the status appears to be a toggle button, changing it's state by hand will not do anything.
If something went wrong, you can clear the database, erasing all devices: Press the button next to "Clear database".
This is the appearance of the whole user interface. After setting up, there is a custom dashboard on the left for Zentorro Home, but you can build your own or customize it to fit your needs.
It's possible to integrate the devices into automations. The two automations shown below ensure the default behavior of Zentorro Home. Feel free to modify them or build new automations to combine it with other devices already integrated in your smart home.
The Code implemented on the NoceMCU contains an MQTT-Client and further additional functions to control a 433MHz communication. It is necessary for the NodeMCU to be connected to a local WiFi network. This way it can receive and transmit instructions using the MQTT-protocol.
The information for the local network and the MQTT-Broker that you are using must be entered manually in the code:
The MQTT-Client is designed to subscribe to specific topic messages coming from your personal Home Assistant. The Software decrypts the messages and executes the appropriate command.
learn:
If a message with a "learn" command is received, the software goes into a receive state in which incoming radio protocols are awaited. The incoming logs from the remote control are then stored in a local JSON database in combination with the received device name and status given from the Home Assistant message.
control:
The control command contains information about the desired device and its status. The message is analyzed, and the corresponding radio log is read from the database. Afterwards the send command gets executed.
clear:
The clear command is a simple message to empty the local database.
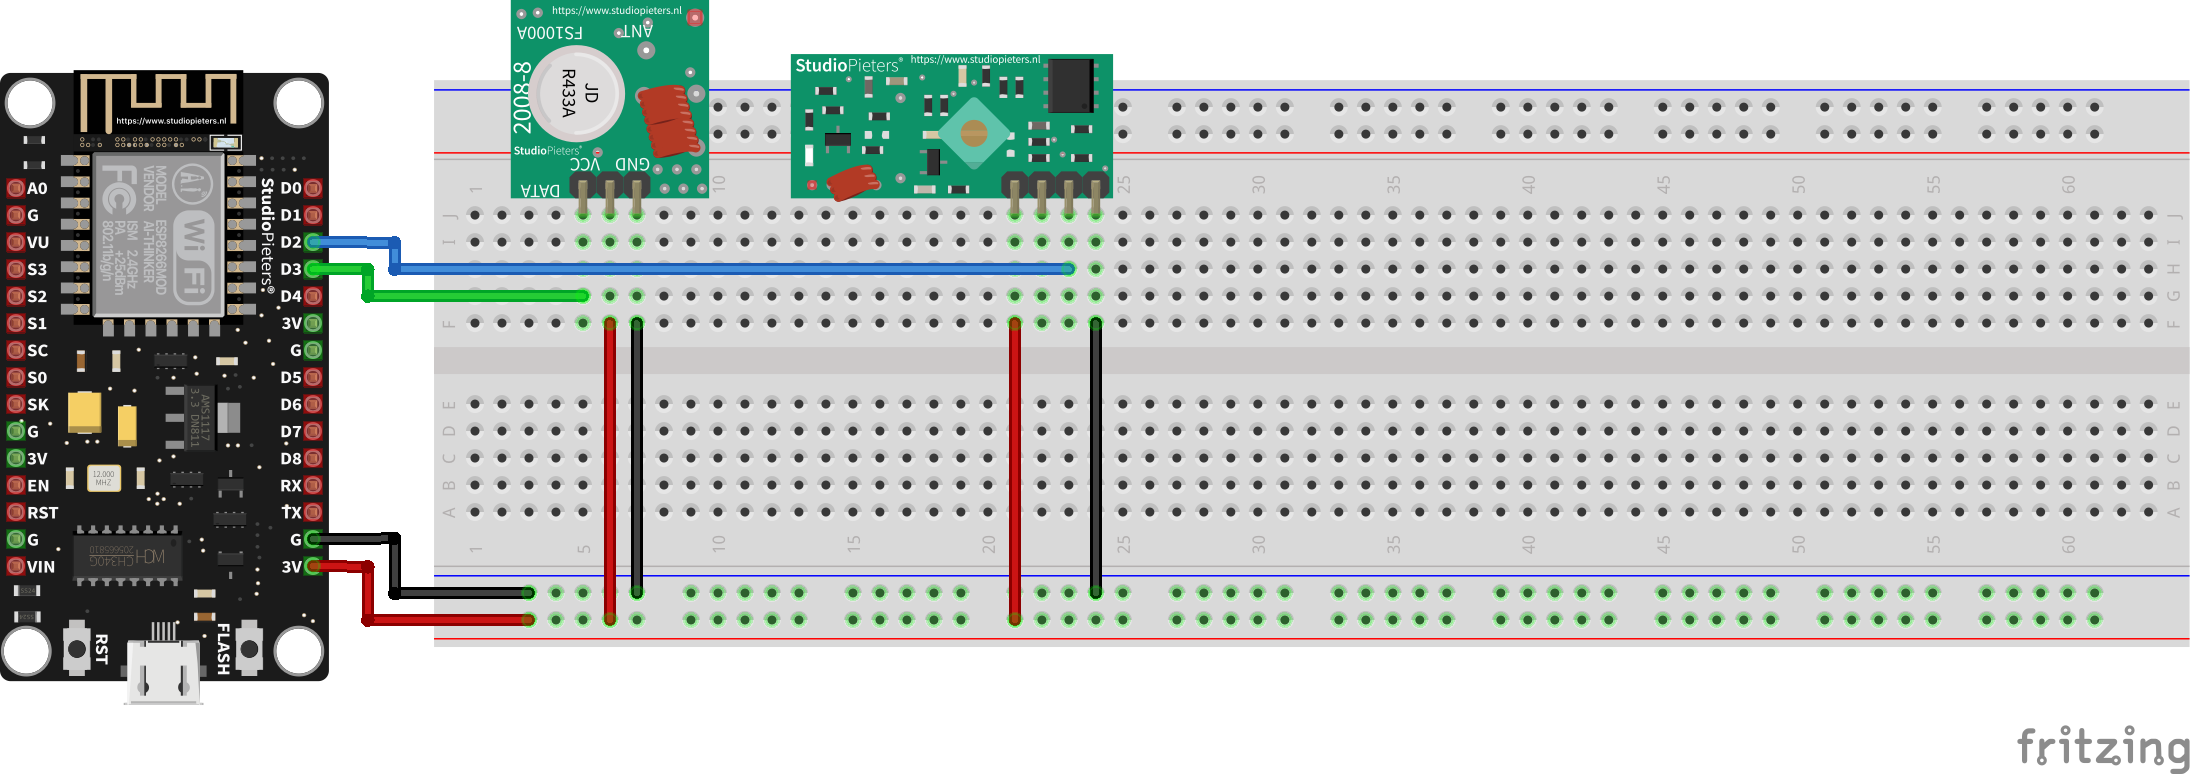
Setup1. Wire up the hardware according to schematic
2. Upload the Code from GitHub to the NodeMCU
- Hook Up the NodeMCU via USB-Cable
- Start Arduino IDE and go to preferences
- type in "Additional Boards Manager URLs" the following URL: http://arduino.esp8266.com/stable/package_esp8266com_index.json
- Install ESP8266 Boards with "Boards Manager"
- Select "Node MCU 1.0"
- Give your correct network information in "ZentorroHome.ino" (SSID and password)
- Import following libraries to your Arduino IDE: ArduinoJSON, RCSwitch, ESPMqttClient, Effortless-SPIFFS
- Upload Code
3. Home Assistant integration
- In HA, you need the file editor add-on installed.
- Open the config folder with file editor.
- Put zentorro-home.yaml into your config folder or create a new file and paste the content into it.
- Add the content from configuration.yaml to your own
configuration.yaml.Note that there can only be one parent element, e.g.buttonorinput_text, so if you have added your own elements before, you have to merge them. To do that, ignore the parent element and only copy the elements below, indicated by - dashes. - Add the content from automations.yaml to your own
automations.yaml - Reboot Home Assistant. Reboot is located under settings.
- Zentorro Home should appear in the left panel
4. MQTT Connection
- Install the MQTT add-on for Home Assistant.
- To fit the self-sufficiency criteria, a local MQTT broker must be implemented. An open online MQTT service (HiveMQ) is used for demonstration purposes for now.
Our knowledge about Home Assistant is limited. If you have suggestions or think you can improve the experience, feel free to contribute on GitHub!


Comments
Please log in or sign up to comment.