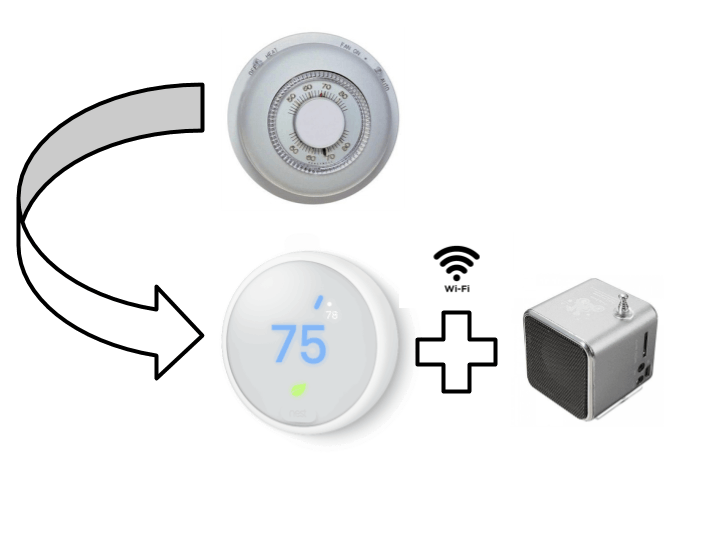
I designed this almost entirely out of cardboard. To keep the different pieces together though, I used notebook wire and thread. Certain parts had to be hot glued to ensure that they will not fall apart.
Remove Thermostat CoveringsFirst, remove the clear plastic covering of the thermostat. This can be done by locating the little slit at the perimeter of the covering (circled in yellow). Insert something flat like a flat screw driver head into this area and rotate it slightly to pop the covering off. This will allow you to attach a binder clip at the rim of the thermostat. For this project to work though, we will also have to remove the remaining piece of covering (shown in pic 2/3) as well.
Putting on the SupportsThe entirety of this project is held up using an uncoiled piece of notebook wire. Loop a piece of notebook wire around your thermostat as indicated. Each leg should be about eight inches below the bottom of the thermostat.
Designing the Pieces: Servo MountThe size of this piece is 3in by 6in. Cut out a piece of cardboard of this size. Also ensure that the zig zagging pattern of the cardboard is at the top of the piece as shown in pic 3. This is the unique thing about cardboard; I took advantage of this by sticking wires through the holes. Once your 3 by 6in piece of cardboard is prepared, slide the hanging wires on the thermostat through the holes. Be sure to center the piece below the thermostat, then hold your servo a good distance below the thermostat. Use a pen to trace out a rectangle using the servo onto the cardboard. Use a knife and cut along the inside area of your traced out rectangle.
Do the same with a smaller piece of cardboard. This piece will be wrapped around the servo and held down onto the big piece. Keep the cut out small; the smaller the rectangular cut outs are, the more stable your servo will be. I chose to sew the cardboard pieces together. You can also use hot glue instead.
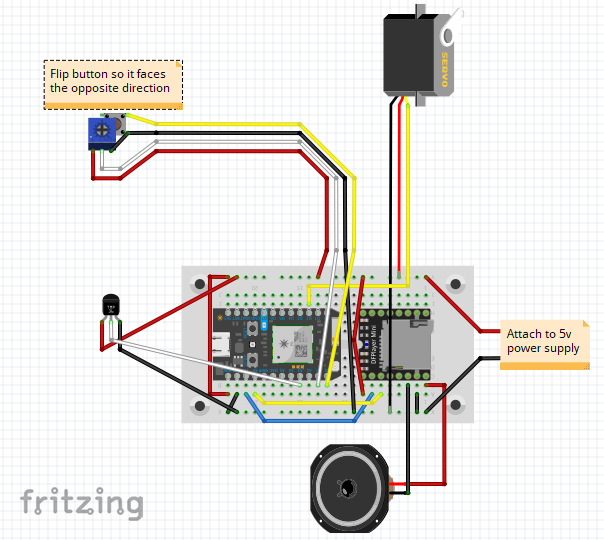
Designing the Pieces: Thermostat RotatorThis piece may be quite complicated to create. First, replicate the potentiometer/button dual shown in pic 4. Do that by hot gluing the button to the bottom of the potentiometer; be sure to keep the same orientation as shown. Next, bend the third leg of the potentiometer to the first leg of the button and solder header pins as shown. Now comes the complicated parts: trace out the designs on pics 5 and 6 using the potentiometer and button respectively. The other parts will require you to draw out the pathing for the wires. You can scroll down to the fritzing diagram to see how the wires are positioned for this piece. If done right, you will be able to sandwich the potenti/button dual and its wires together with hot glue. Finally, you can design a pointer of your choice to place on top of the potentiometer. Creating the covering is not required, you can simply wire the potenti/button dual and start turning your servo immediately.
Designing the Pieces: Servo HeadAlthough thread was used here, sticking with hot glue would be the best choice. First, trace and cut out three cardboard circles using the thermostat's outer covering as shown in pic 3. For the first circle, trace a servo horn onto the center. Cut that part out and fit the servo horn into the cut out. Hot glue a second circle below the first circle. Hot glue a Pringles can lid on top of the first circle. The design should start looking like pic 2. Finally, pierce the third circle with notebook wire and bend the wires to the positions shown in pic 1. Hot glue the wires down and the circle onto the circle stack.
Designing the Pieces: Speaker HolderCardboard circle cutout, toilet paper roll cylinder, and thread were used to create this. You can trace out a circle using the roll cylinder; the circle will be used as the base of the holder. Since speakers vary in size and weight, this design may not work for you. You can still create a holder using this method and other cylindrical material. The one thing that you may want to replicate is the thread hanger. This will be used to mount the speaker to the thermostat.
Designing the Pieces: PCB Board HolderSince I was able to compact the circuit to a small PCB Board, I created a cardboard holder for it. I also made it so I could slide the board in and out of the holder. On pic 3, you will notice wiring on the side of the holder. This is used to mount the holder. If you want to follow my design, but not sure how, feel free to contact me.
MountingPic 1: Rotate your thermostat so it points to 65 degrees. Cut out a thin sheet of cardboard (9in long) and tear a layer off. Attach the layer with the zig zags as shown. Be sure to center it when attaching so that both legs hang down the same length. You can use tape to hold the cardboard in place before you put on the binder clip. Pierce the ends of the cardboard legs with notebook wire and create rings. Once that is done, get two pieces of string and tie loops at the end of each. These loops will later be hooked onto the gear/servo head. Next, tie the strings to the rings. The length from the knot at the rings from the tip of the loops should be close to 2.75 in; if not, keep the two lengths the same at least(this part is important).
Pic 2: Mounting the servo holder you should already be familiar with. One thing to note though is you have to push the top of the cardboard piece all the way to the bottom of the thermostat although not shown. Before continuing, you will need to setup Blynk to adjust the position of the servo. Jump to "Blynk Setup" and "How to Use Blynk" before moving to the next step.
Pic 3: Now that the servo's position is adjusted, ensure that that actual thermostat is still pointing to 65 degrees. Attach your servo head as shown, with the hooks at the very bottom. Attach the string loops to the hooks as shown. Once that is done, grasp the bottom of the servo mount and slowly drag it down. This will allow the string to tension up. Finally, at the bottom of the servo mount, bend the remaining lengths of wires upward (Shown in Pic 5).
Pic 4: Since I wanted pieces that can be disassembled, I used notebook wiring again to hold the thermostat rotator piece in place. If you want to do what I did but not sure how to, you can contact me about suggestions.
Pic 5: An easier alternative would be to use hot glue instead of looping wires. Bend your colored wires/cables as shown. Then, apply hot glue to the white area, lift the servo mount a little, and slide the thermostat rotator into place.
Pic 6: With most of the wires in place, you can now hang your speaker holder in place. Also raise your servo wire a bit up before hanging speaker.
Pic 7: Finally, you can mount your PCB board holder onto the two bent notebook wires and attach you wires. Since your PCB board design may be different from mine, go to the fritzing diagram also attached to this project to see how to attach a temperature sensor (TMP36) to the project.
Blynk SetupAdd two buttons, a horizontal slider, a value display, and a terminal to your Blynk project. Move and resize until you get the configuration shown. The big button should be changed to switch mode and connected to pin V3. You should also change its name to "Mode". The round button should be connected to pin V0. The value display to V2, horizontal slider to V1, and terminal to V4. This will give you 1000 energy left over, which is just enough for you to share the project with a family member. Don't worry about the labels, the labels will change with the code.
How to Use BlynkTo use the app, simply upload the code to your photon and press the play button at the top right. Also, don't forget to copy the "Auth Token" to your code. Press the settings icon next to the play button to retrieve it. Once the app and your photon is connected, you can do the following.
Mode selector (Pic 1): Click on the big button switch to turn on Mode Selector. Slide the slider from left to right until the labels start changing. Sometimes it takes some time for Blynk's server to update. Once the labels change, you will notice temp mode, mp3 mode, and mp3 volume mode. Select the desired one and press the small button to lock in your choice. Then click on the big button to exit mode selection.
Temperature mode (Pic 2): Move the slider from left to right select the temperature you want to set your thermostat. Remember, as long as your photon is connected to the internet, you can control it from anywhere as long as your phone is connected to the wifi. Press the small button to set the temperature of your thermostat.
MP3 mode (Pic 3): Same as temperature mode, but for this mode to work, you will need to add your own songs using an SD card. Instructions on how to add your own songs are in the code. Setting slider to position 0 ("Not Selected") will stop songs from playing.
MP3 volume mode (Pic 4): Same as temperature mode. The volume of your songs can be set from 0 to 30.
Terminal: The only purpose of the terminal is to display temperature values of the room. Type in "temp" and press enter to see temperature.
***Important For Setup. Turn on temperature mode and set temperature to 65 degrees. Make sure that your servo is connected and turns. You may now return back to the "Mounting" section.


Comments
Please log in or sign up to comment.