Both of us like to tinker with electronics and the latest hard- and software. While most projects never get out of "early-Alpha", we wanted to create something with a prototype look&feel for quite a while now. Participating in The Alexa and Arduino Smart Home Challenge finally made us consider creating something worthy of publishing here.
Having used Alexa on a daily basis for controlling lights and music throughout our home, something that really bothered me was the timers we would regularly set for things like cooking and making tea. The initial request for setting up a timer was usually followed by a couple of "Alexa, how much time left on the tea-timer?" so we rather quickly had the idea of creating an additional device, that let you glimpse at your timers without having to interact with Alexa again. We basically wanted to create an egg-timer with a really fancy hard- and software stack. For additional fanciness, we added a temperature controlled cooking mode.
ConceptWhile there are other options, having Alexa communicate with an Amazon Lambda function is the quickest and easiest way to get started with development. You can either set up your own skill and lambda or activate our Smart Kitchen Cube skill from your Alexa App.
You can view and activate the skill here, or search for "Smart Kitchen Cube" in the Alexa App. For a quick start, we recommend trying our skill first and then switch to your own skill and lambda in case you want to tinker with the software-side of this project. For detailed instructions on how to duplicate our setup, refer to the last two chapters of this project to get started, then modify things to your need. But first off, the necessary steps to build your own cube and link it to our skill!
Particle CloudYou will need an account with particle.io to link the skill to. So head over there and either register as a new user or sign in to your existing account. Then go to build.particle.io, click on settings (the gearwheel in the lower left) and take note of your access token. You will need the token in your Arduino sketch so the Arduino can communicate with the particle cloud. While you are at it, flash the particle you will use for the cube with the software provided in the code section. If you haven't set up your particle yet, do so now via the particle app, it has great step-by-step instructions on how to do this.
Account LinkingWith your Particle account you can already set up our skill, so head over to alexa.amazon.com, log in with the account you have your Echo connected to, click on the Skills tab and search for "smart kitchen cube".
Click on the skill and then on "Enable". A window will open where you have to login with your Particle account. Press "Ok" when it asks you for permission to link the account. As of now, the device discovery will not yield any results unless you have flashed our code to the particle, but once you did that and add a device, it will show up in the "Smart Home" section of the alexa.amazon.com website. Lets build a device and hook it up now!
Hardware - The CubeAs we wanted to build more than just a breadboard prototype, creating our cube was as much about constructing the case as it was about building the circuit.
After gathering and testing the basic parts, i.e. microcontrollers and LEDs, we went to a local Plexi shop and went through (almost) all of the available color and opacity variations. We originally had planned on a greyish color with very light transparency but the glooming effect on the white Plexi depicted above just looked way too cool, so we went with it instead. We bought a 30cm by 30cm sheet. As we hadn't yet decided on the final design of the cube, and had 2 different sized rings and a huge 8 by 8 pixel matrix, the size of the sheet let us design three different cubes. We created the plans for the cubes at www.makercase.com, a great resource for creating custom sized cases. Our university fablab has a lasercutter so we paid them a visit and were lucky enough they had enough time to go over our design and cut it right away.
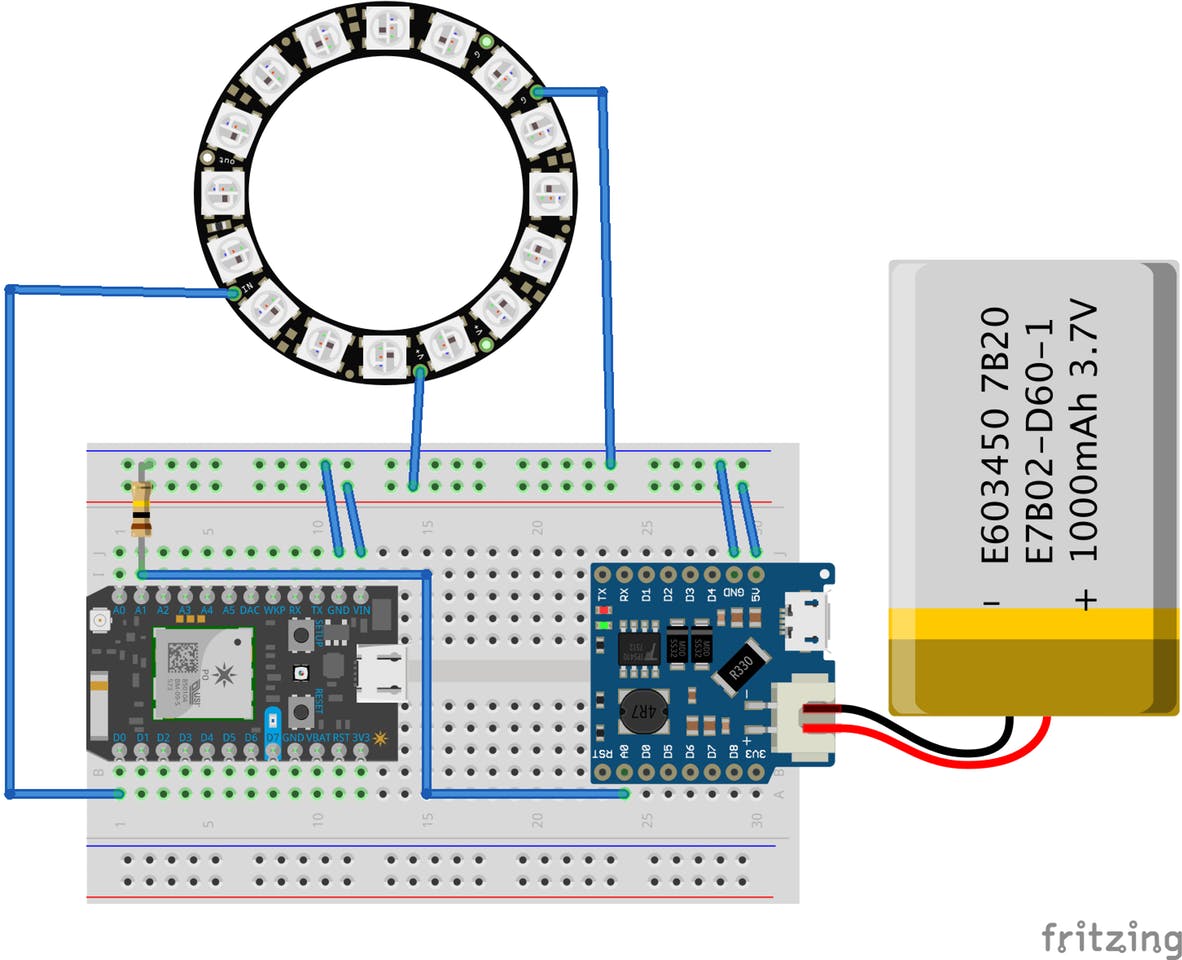
The following fritzing shows how to assemble the cube's internals. It doesn't matter whether you hook up 12, 16 or even 64 LEDs, because the WS2812b are easily controlled via an awesome Arduino library. You have to set the pixel count in the sketch however, so make sure you do this, otherwise not all of your LEDs might work and the calculation for the timer are off. Once you have the cube internals assembled and loaded with our coded, your LEDs should light up and start a countdown on a push of the reset button.
Check the components and the wiring on a breadboard with our code before you solder everything together as neatly as possible so you can make it fit your Plexi cube. We used lots of hot glue to keep everything in place and have nothing touch to prevent short circuiting.
When assembling your cube make sure to check the maximum distance your inductive charger will still transmit enough voltage for the particle to boot and the battery to charge. The smaller one we got didn't provide quite enough power, so we had to get a slightly bigger one that works like a charm (see our components list). Once you have the cube assembled it is time to move on to the base.
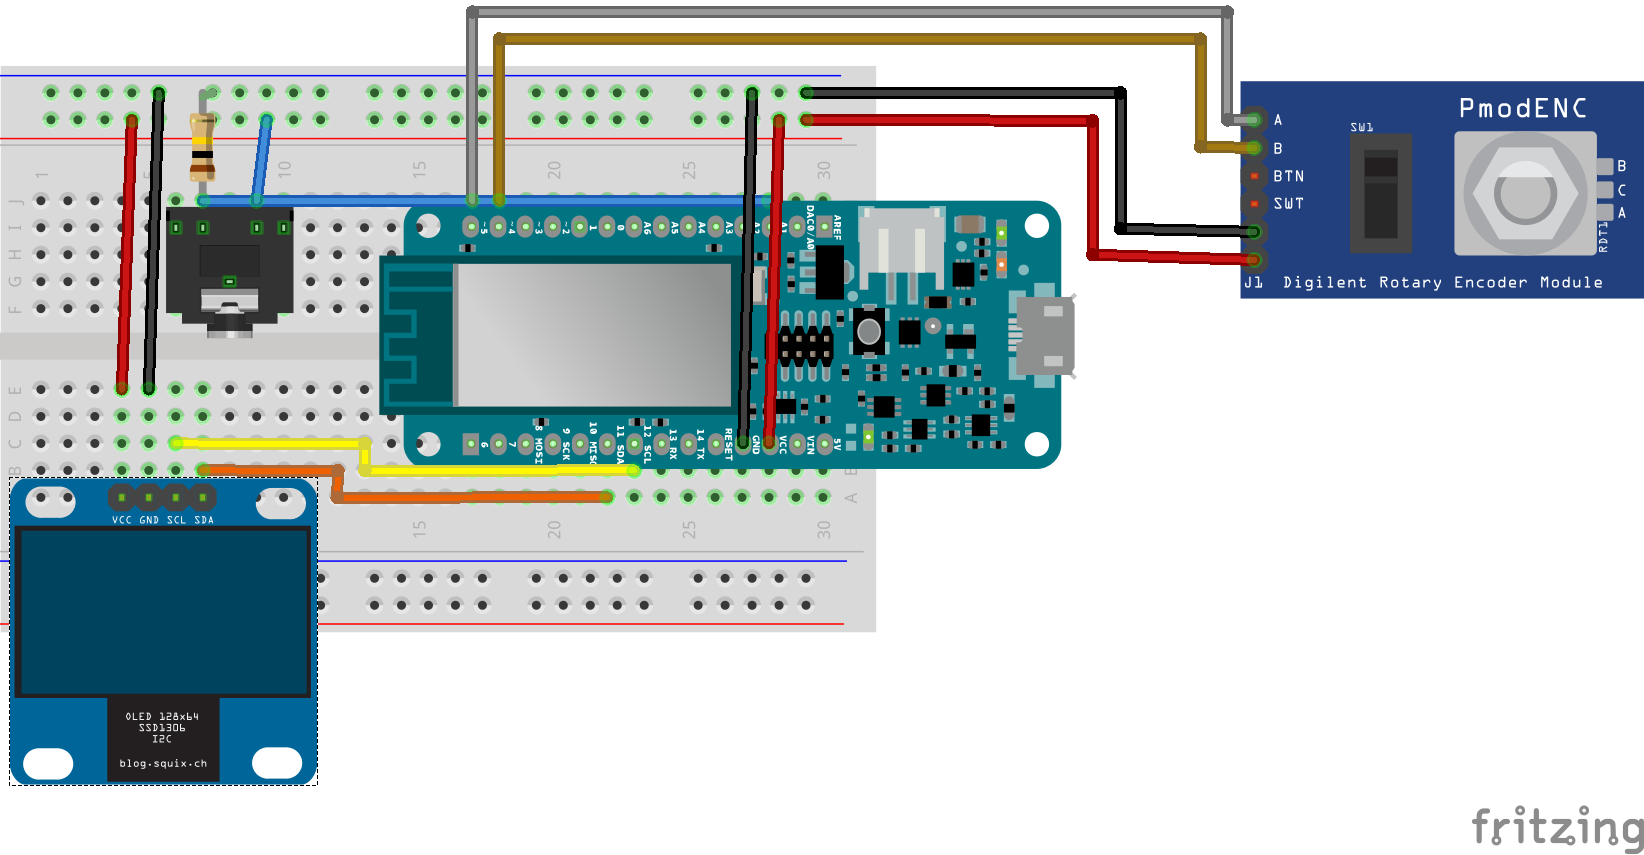
The base is where the cube charges and where you can hook up your thermometer. It houses an Arduino MKR1000 that sends the temperature data to the cloud and in our second revision also takes an input of the target temperature as well as have an OLED display to show the current and target temperatures.
Lets tackle something a little complicated first, we need to make sure our Arduino can talk to the Particle servers, which is a SSL secured connection, so we will have to let the Arduino know the servers certificate. Fire up the Arduino IDE and upload the Firmware Updater sketch located in the Sample Sketch, Wifi101 group. You can then go to Tools and start the Wifi101 Firmware Updater which is where you can download certificates to your Arduino. Click "Add domain" and enter api.particle.io:443 Then hit "Upload Certificates to Wifi Module". You are now set and can go ahead and flash the Arduino sourcecode attached to this project.
Again, wire everything up on a breadboard to make sure things are working as expected. Load up the Arduino with our sketch, after editing the code to your needs, i.e. entering the access token you took note of in the Particle Cloud step of this project. It will allow the Arduino to post data to your personal particle cloud. Additionally you will have to provide your wifi credentials, i.e. ssid and password to your personal wifi, so the Arduino can connect to the internet. Visit console.particle.io and check the event tab where you should see a temperature reading from your Arduino every ten seconds.
You can use the rotary encoder to set a target temperature and confirm via clicking the encoder. It will also show up as an event in your particle console.
After confirming everything works, solder the parts together or choose a base big enough to just fit your current build. For our first iteration we wanted to create a tiny base, so we ended up soldering everything together really neatly.
Hook up your inductive charger and place the cube on the base. We have hooked up the power from the inductive transmitter to the Arduino as well, so there is only one line going to the base. Make sure the Arduino powers on and the Particle is powered through the battery/conductive receiver. You can now go ahead and ask Alexa to set a timer on your cube ("Alexa, two minutes on [your device name]") or set a target temperature that is visualised by the cube via the rotary encoder on the Arduino. The base will display current and target temperature, the cube will slowly light more and more LEDs until the target temperature is reached and all LEDs are lit. You should be able to carry your cube to wherever you have a Wifi connection, so you can keep an eye on your timer and/or temperature.
Done!Thanks for making it through our little project, we hope you enjoyed reading and building and making things work. We surely enjoyed the build a lot and are awaiting your comments!
If you feel like extending the software, or even creating something completely different for that matter, go ahead and check out the project where we explain how to set up AWS Lambda and the Alexa Skill for this project, complete with source code for this build right here! It is right here on hackster.io.


Comments
Please log in or sign up to comment.