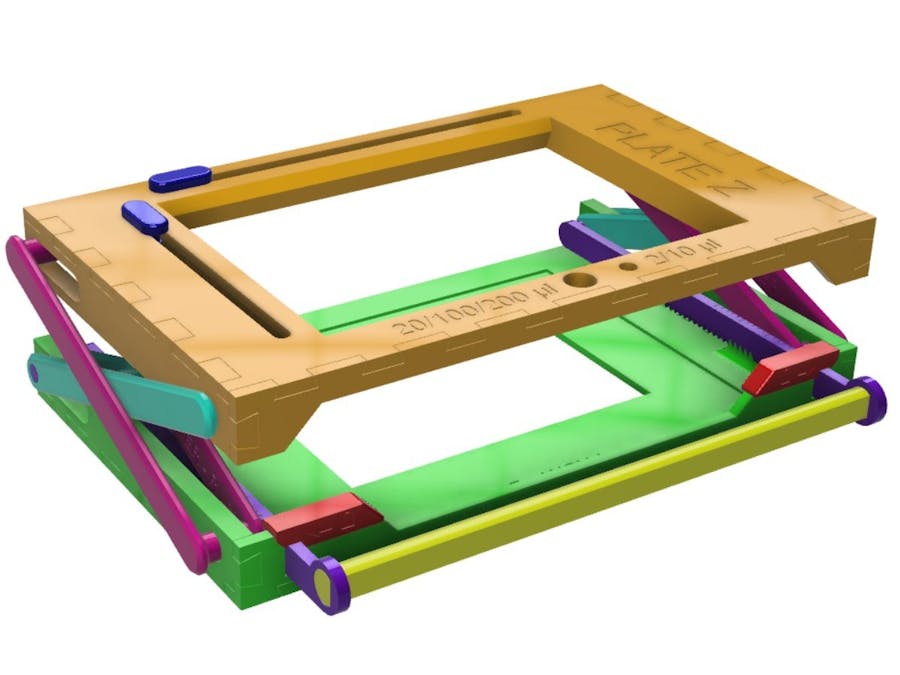
Sampling from a specific height using multiple channel pipettes is a challenge in many lab experiments. For example, when trying to sample from a specific height, users will be steadying the pipette in mid-air and gauging the height by eye, which introduces human error. This error is pronounced in repetitive tasks like the 96-well plates as users’ focus starts to wane after time. There is a lack of tools that assist users in performing this task consistently.
Plate Z is designed to solve that issue and give a user confidence to use the exact same height to aspirate and dispense samples. Plate Z can also be used as a low-cost alternative to liquid handling robots and in areas where robots are not available.
There are two parts to Plate Z - the tip holder and the height adjuster. We have two different tip holder sizes: the smaller holder fits 2/10 μl tips, and the larger holder fits 20/100/200 μl tips.
It is possible to adjust the angle to the pipette tips when using the large tip holder. This feature may come in handy when trying to avoid solid fragments at the bottom of the deep well plate. Simply slide the top piece along the rails, and the pipette tip angle can be adjusted up to 5 degrees.
As the name suggests, the height adjuster allows the user to control the height at which the pipette samples. The small height increments make Plate Z versatile for many different experiments. There have been many iterations of the height adjuster. Here is a compilation of all of them.
Halfway into the project, we spotted an opportunity for a thermocycler-friendly version of Plate Z. Fast, and accurate pipetting is more critical in temperature-sensitive experiments, so it was the perfect application for Plate Z.
The design of the thermo-adjuster was kept simple for both ease of use and straightforward 3D printing. The chamfered sides allow the thermo-adjuster to align on top of the 96-well plate effortlessly and are readily removable after samples are taken. It consists of layers of known thicknesses (2 mm and 3 mm) that users can stack to get their desired heights. Small cylindrical pins on the bottom of the layers help everything slot into one another. It also allows the tip holder to nest atop, similar to the height adjuster.
The people behind Plate Z hope that our solution inspires greater confidence in scientists when taking samples at different heights from a Deepwell plate.
Instructions:
There are twenty-three 3D printed components to the height adjuster, taking a total of 22 hours to print. Most of the parts are labelled for clarity when assembling.
The top and bottom covers are constructed like a puzzle. There are labels on the inner faces to indicate which other part the edge aligns with. As the pieces are designed to lay snugly, you will require a mallet (or any sturdy heavy object of your choosing) to fit them together.
Assembly steps:
Steps 1 to 4: Base sub-assembly (green)
Steps 5 to 8: Top sub-assembly (orange)
Steps 9 to 13: Inner arm assembly (teal)
Steps 14 to 17: Outer arm assembly (pink)
Steps 18 to 20: Teeth arm & handle assembly (purple & yellow)
Steps 21 to 22: Lock assembly (red)
Steps 23 to 24: X & Y slider assembly (blue)
The complete list of parts for the height adjuster is as follows (you will need to print one of each):
Base - B
Base - R
Base - L
Base - F
Top - T
Top - R
Top - L
Top - F
Inner arm - RI
Inner arm - RO
Inner arm - LI
Inner arm - LO
Outer arm - RI
Outer arm - RO
Outer arm - LI
Outer arm - LO
Teeth arm - R
Teeth arm - L
Handle
Lock - R
Lock - L
Slider - X
Slider - Y
Depending on your needs, you can either print the 10μl (1 part) or the 200μl (2 parts) tip holder.


Comments
Please log in or sign up to comment.