Traffic has the ability to irritate the best of us and it's getting worse. What if that can be changed with intelligent traffic lights? We created a Traffic Light Information System that lets the driver know at which speed he needs to drive in order to get at the junction and pass the green light without exceeding the maximum speed limit. And when the driver has to wait for the inevitable red light, it lets him know when the light is about to turn green.
A traffic light sends data about how long it will remain green or the time until the next green light etc. to an online database. A GPS or an application on your smartphone will retrieve data from the database and calculates the desired speed to pass the green light. It will display the remaining waiting time until the end of the red light phase when it's unavoidable that you will have to wait.
ExampleYou are driving in a 70 km/h zone, keeping to the limit. The traffic light up ahead of you is red and the light is about to turn green in 30 seconds. You are 500 meter away from the traffic light, so the system will recommend you to proceed towards the light at 60 km/h.
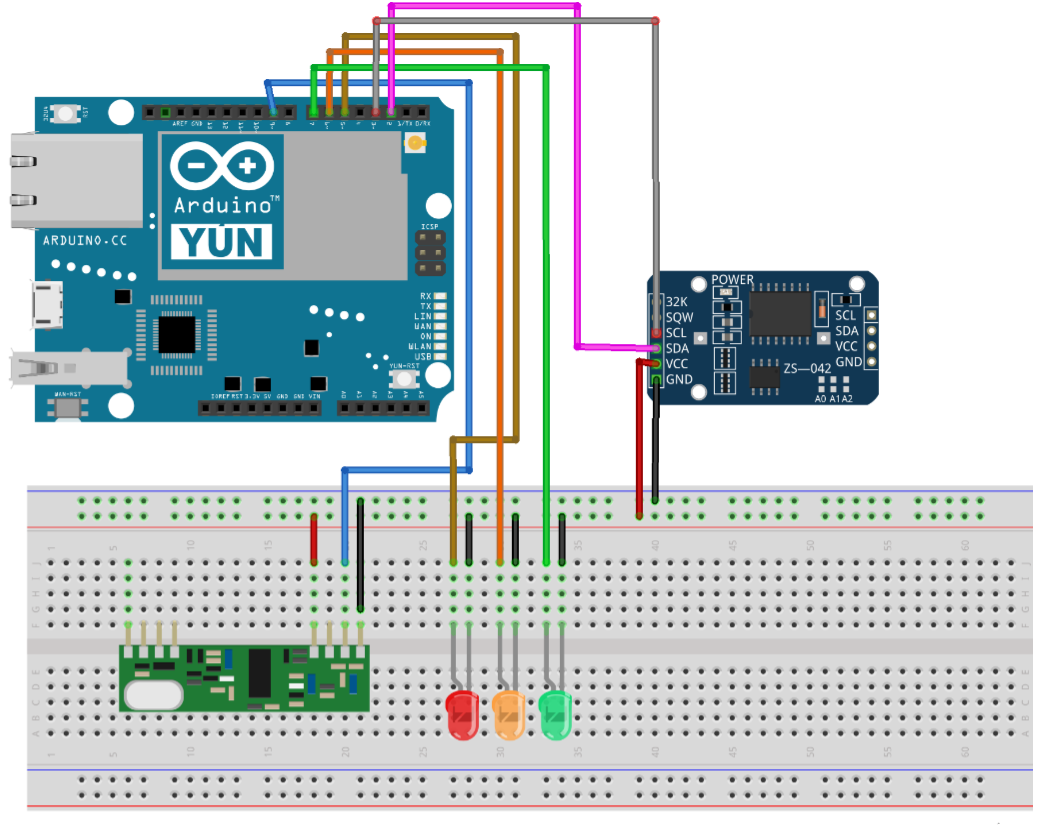
To demonstrate our project, we created a traffic light with the Arduino Yun. The traffic light consists of 3 LEDs and a Real-Time-Clock. The lights will change at a given interval. The Arduino Yun saves the time that the traffic light will turn green/red. Then, it runs a PHP file that makes a connection to the online MySQL database and inserts the data received from the Arduino Yun. An Android app (created with Android Studio) will retrieve the date from that database. This is done via another PHP file that returns the traffic light data in JSON format. The app calculates the desired speed and it will display a countdown timer when you're not able to pass the green light.
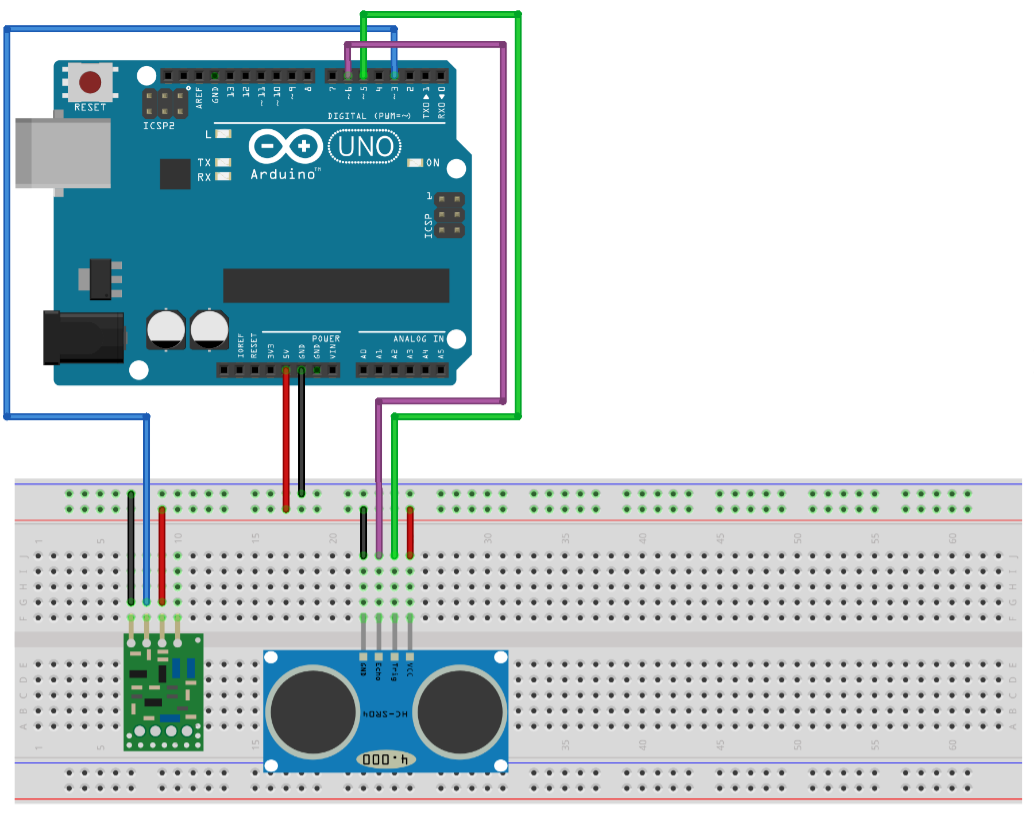
To calculate the desired speed, the app needs to know the distance to the traffic light. This is done by calculating the distance according to the GPS coordinates. But unfortunately, a GPS in a smartphone is not precise enough to prove our concept because we are working on a small scale. That's why we made use of the ultrasonic ranging module (HC-SR04). The Arduino Yun receives the distance between the car and the traffic light via 433 MHz RF modules. Every time the Yun receives a new measurement from the other Arduino, it updates the data in the database. Now, the app is able to calculate the desired speed.
1) Create an online MySQL database
(We used freemysqlhosting.net )
2) Add a table 'TrafficL_data' to the database:
3) Set up the hardware (transmitter)
You can find the schematic 'Arduino transmitter' here.
4) Upload 'Arduino Transmitter Code' to the Arduino
You can find the code here.
5) Connect the Arduino Yun to your WiFi network
6) Access Linux Server of Arduino YUN with Putty:
opkg update
opkg install php5-mod-mysqli
opkg install php5-cli
nano /mnt/sda1/MySQL_UpdateTrafficLData.php
You can find 'MySQL_UpdateTrafficLData.php' here.
If you see this error: '-ash: nano: not found', you have to install 'nano' (this is a basic text editor):
opkg install nano
chmod 755 /mnt/sda1/MySQL_UpdateTrafficLData.php
/mnt/sda1/MySQL_UpdateTrafficLData.php
nano /mnt/sda1/MySQL_UpdateDistance.php
You can find 'MySQL_UpdateDistance.php' here.
chmod 755 /mnt/sda1/MySQL_UpdateDistance.php
/mnt/sda1/MySQL_UpdateDistance.php
7) Set up the hardware (Arduino Yun receiver)
You can find the schematic 'Arduino Yun receiver' here.
8) Upload 'Arduino Receiver & MySQLdb' to the Arduino Yun
You can find the code here.
9) Open the Serial monitor
You should see something similar:
11) Android Studio files
*don't forget to change the URL
You can find 'EchoJSON.php' here.
12) Upload the Android Studio project to your smartphone
Instructions for ESP8266 [additional]It is possible to use an ESP8266 based module instead of the more expensive Arduino Yun:
1. Create an account on https://www.000webhost.com
2. Create a website
3. Create a new database
4. Upload ‘CreateTable.php’ and ‘PostDemo.php’ with File manager. Change ‘username’, ‘password’ and ‘dbname’ in both files.
CreateTable.php:
<?php
//Connect to database and create table
$servername = "localhost";
$username = "yourUsername";
$password = "yourPassword";
$dbname = "yourDBName";
// Create connection
$conn = new mysqli($servername, $username, $password, $dbname);
// Check connection
if ($conn->connect_error) {
   die("Connection failed: " . $conn->connect_error);
}
// trafficl_data_v2 is the name of the table
$sql = "CREATE TABLE trafficl_data_v2 (
       UnixTime_green_1 INT(12) NOT NULL,
       UnixTime_red_1 INT(12) NOT NULL,
       UnixTime_green_2 INT(12) NOT NULL,
       UnixTime_red_2 INT(12) NOT NULL,
       Distance INT(12) NOT NULL,
       id INT(6) UNSIGNED AUTO_INCREMENT PRIMARY KEY
	)";
if ($conn->query($sql) === TRUE) {
   echo "Table created successfully!";
} else {
   echo "Error creating table: " . $conn->error;
}
$conn->close();
?>
PostDemo.php:
<?php
//Connect to database and create new record as per request
$servername = "localhost";
$username = "yourUsername";
$password = "yourPassword";
$dbname = "yourDBName";
// Create connection
$conn = new mysqli($servername, $username, $password, $dbname);
// Check connection
if ($conn->connect_error) {
   die("Database Connection failed: " . $conn->connect_error);
}
if (!empty($_POST['UnixTime_green_1']) && !empty($_POST['UnixTime_red_1']) && !empty($_POST['UnixTime_green_2']) && !empty($_POST['UnixTime_red_2'])) {
   $UnixTime_green_1 = $_POST['UnixTime_green_1'];
   $UnixTime_red_1 = $_POST['UnixTime_red_1'];
   $UnixTime_green_2 = $_POST['UnixTime_green_2'];
   $UnixTime_red_2 = $_POST['UnixTime_red_2'];
   $sql = "UPDATE `trafficl_data_v2` SET `UnixTime_green_1`='5',`UnixTime_red_1`='6',`UnixTime_green_2`='7',`UnixTime_red_2`='8',`Distance`='99' WHERE 1";
   if ($conn->query($sql) === TRUE) {
       echo "Data inserted successfully!";
   } else {
       echo "Error: " . $sql . "<br>" . $conn->error;
   }
}
else {
   echo "FAILED: incorrect parameters";
}
$conn->close();
?>
5. Create a new table: Select 'CreateTable.php' and click on 'view'
6. Install the packages for the ESP8266 in arduino
Add this URL File--> Preferences:
http://arduino.esp8266.com/stable/package_esp8266com_index.json
7.
[UPDATE 9 February 2019]
Select your board, COM port ... and upload ESP8266PostDemo.ino to your ESP8266 based board. I am using a NodeMcu V3 ESP8266 12E. The code below should work for almost all ESP8266-based boards.
Because I no longer have a clock at hand, I have changed the code so that the database is updated every 10 seconds with random values.
ESP8266PostDemo.ino:
#include <ESP8266WiFi.h>
#include <WiFiClient.h>
#include <ESP8266WebServer.h>
#include <ESP8266HTTPClient.h>
#define ARRAYSIZE 4 // 4 arguments
const char* ssid     = "yourSSID";
const char* password = "yourPassword";
const char* dest = "http://xxxxx.000webhostapp.com/xxxxx/ ... /xxxxx.php"; // your request destination
const char* argument_names[ARRAYSIZE] = {"UnixTime_green_1","UnixTime_red_1","UnixTime_green_2","UnixTime_red_2"};
const String equals_sign = "=";
const String ampersand_sign = "&";
void setup() {
 delay(1000);
 Serial.begin(115200);
 WiFi.mode(WIFI_OFF);        //Prevents reconnection issue (taking too long to connect)
 delay(1000);
 WiFi.mode(WIFI_STA);        //This line hides the viewing of ESP as wifi hotspot
 WiFi.begin(ssid, password);
 Serial.println("");
 Serial.print("Connecting");
 while (WiFi.status() != WL_CONNECTED) {
   delay(500);
   Serial.print(".");
 }
 Serial.println("");
 Serial.print("Connected to ");
 Serial.println(ssid);
 Serial.print("IP address: ");
 Serial.println(WiFi.localIP());
}
void loop() {
 HTTPClient http;
 String parameter = "";
 parameter += argument_names[0] +equals_sign+ (int)random(100);
 for(int i=1; i<ARRAYSIZE; i++){
     parameter += ampersand_sign + argument_names[i] + equals_sign + (int)random(100);
   }
 http.begin(dest);
 http.addHeader("Content-Type", "application/x-www-form-urlencoded");    //Specify content-type header
 int http_code = http.POST(parameter);   //Send the request
 String payload = http.getString();    //Get the response payload
 Serial.println(http_code);   //Print HTTP return code
 Serial.println(payload);    //Print request response payload
 http.end();  //Close connection
 Serial.println(parameter);
 delay(10000);  //Update database every 10 seconds
}
php-file:
<?php
       //Connect to database
       $servername = "localhost";
       $username = "yourUsername";
       $password = "yourPassword";
       $dbname = "yourDBName";
       // Create connection
       $conn = new mysqli($servername, $username, $password, $dbname);
       // Check connection
       if ($conn->connect_error) {
           die("Database Connection failed: " . $conn->connect_error);
       }
       if (!empty($_POST["UnixTime_green_1"]) && !empty($_POST["UnixTime_red_1"]) && !empty($_POST["UnixTime_green_2"]) && !empty($_POST["UnixTime_red_2"])) {
           $UnixTime_green_1 = $_POST["UnixTime_green_1"];
           $UnixTime_red_1 = $_POST["UnixTime_red_1"];
           $UnixTime_green_2 = $_POST["UnixTime_green_2"];
           $UnixTime_red_2 = $_POST["UnixTime_red_2"];
           $sql = "UPDATE TrafficL_data SET UnixTime_green_1='$UnixTime_green_1', UnixTime_red_1='$UnixTime_red_1',UnixTime_green_2='$UnixTime_green_2', UnixTime_red_2='$UnixTime_red_2' WHERE id=1";
           if ($conn->query($sql) === TRUE) {
               echo "OK";
           } else {
               echo "Error: " . $sql . "<br>" . $conn->error;
           }
       }
?>
If you have succeeded in updating the database, you can modify the following procedures in the arduino code of 'Arduino Receiver & MySQLdb':
- void MySQL_UpdateTrafficLData()
- void MySQL_UpdateDistance()
Note that if you want to replicate the project, it is not a good idea to implement everything at once. First try to test each component separately. If they all work well you can start by combining the different components. Feel free to ask for help in the comment section and try to describe your problem as detailed as possible.


_m1denG9oTQ.JPG?auto=compress%2Cformat&w=40&h=40&fit=min&dpr=2)


_ztBMuBhMHo.jpg?auto=compress%2Cformat&w=48&h=48&fit=fill&bg=ffffff)


_m1denG9oTQ.JPG?auto=compress%2Cformat&w=60&h=60&fit=min&dpr=2)


Comments