

Hardware components | ||||||
| × | 1 | ||||
| × | 1 | ||||
| × | 1 | ||||
 |
| × | 1 | |||
 |
| × | 4 | |||
| × | 4 | ||||
| × | 1 | ||||
 |
| × | 18 | |||
Hand tools and fabrication machines | ||||||
 |
| |||||
Music has always been a massive part of my life. I am constantly engaging with it throughout my day, whether it is with earbuds in, playing it on speakers, or humming something to myself. It is my way to relax and take my minds of of things that are stressing me out, and to find inspiration from another's perspective. When thinking about my project and how I could relate it to music, I started thinking about older ways that I used to listen to music. In today's world, we have easy and convenient methods to stream and play any music that we want from wherever. However, I remember as a kid using an MP3 player, having to connect it to a computer to download and load music to it. There was something nostalgic about that, and I felt that I could achieve something similar within the scope of this project.
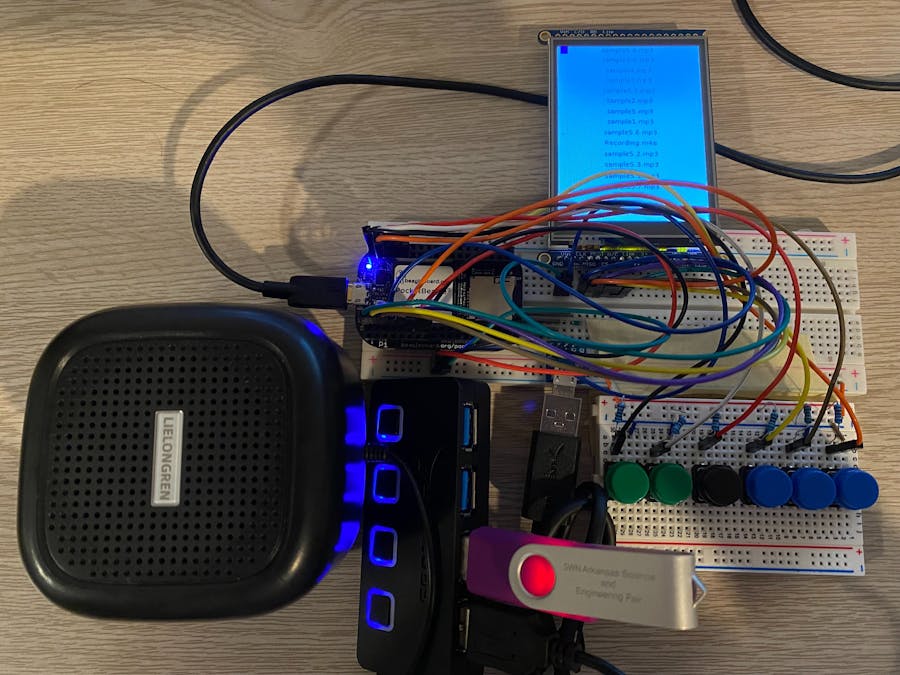
OverviewThis project consists of a device which is able to list the audio files of a USB drive onto an LCD display. The USB drive will then be plugged into a powered USB hub, which will have its contents read by the Pocket Beagle. Then, the LCD screen will display the songs on the USB, and the up/down selector buttons will allow the user to scroll through the song list to highlight and select songs. The user will then press the play button to play the highlights song through a USB speaker which is also connected at the USB hub.
System and Power Block DiagramsBefore beginning this project, I first made a list of major components, which included a powered USB hub, a USB speaker, a LCD screen, and 4 buttons. These are organized in the system and power block diagrams below:
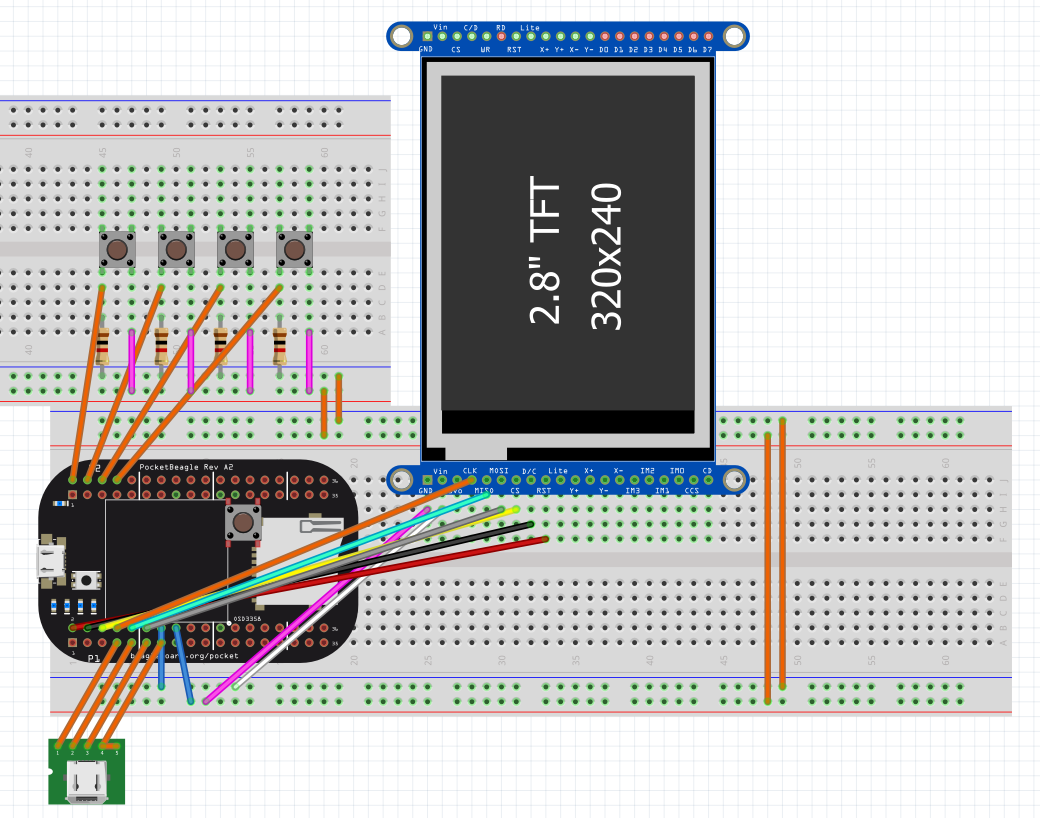
The Fritzing diagram showing the wiring of these components is shown below:
The first step is to wire the breadboard to add a USB Port. To do this, the ID (P1_13) and GND (P1_15) pins of the PocketBeagle must be soldered together. This should also be done with the VI (P1_7) to VB (P1_5) pins. Next, the four pin USB port is wired to connect VCC to P1_4, D- to P1_6, D+ to P1_8, ID to P1_10, and GND to ID, as shown below:
The next step is to wire the PocketBeagle to the SPI screen. First, the IM1, IM2, and IM3 pads need to be soldered, as shown below.
Then, connect the GND, Vin, CLK, MISO, MOSI, CS, D/C, and RST pins on the SPI screen to the GND bus, 3.3V bus, P1_08, P1_10, P1_12, P1_06, P1_04, and P1_02, respectively. This is also shown on the Fritzing Diagram, as well as the picture below.
The final step is to wire the PocketBeagle to the buttons. This is done by connecting P2_02, P2_04, P2_06, P2_08 to the down, up, play, and pause buttons, respectively. The buttons are wired so that a 1kOhm resistor bridged the 3.3V bus to one end of the button, and the other end of the button was connected to the Ground bus. This is shown in the next two photos:
Finally, simply plug the powered USB hub to the USB port. Then plug the USB with songs and the USB speaker to the powered USB hub. This is shown below:
After these steps, the hardware setup of this device is complete.
Code SetupTo run the code, one needs to use the latest PocketBeagle image, which can be downloaded from BeagleBoard.org. Then, download the project_01 folder found at this Github folder and move the folder into Cloud9 on your PocketBeagle. Then, install the VLC media player package with this command:
sudo pip3 install python-vlcThis package will create commands to play and pause audio files. Afterwards, run the following lines to install basic system tools and Adafruit libraries:
sudo apt-get update
sudo apt-get install build-essential python-dev python-setuptools python-smbus -y
sudo apt-get install python-pip python3-pip -y
sudo apt-get install zip

sudo pip3 install --upgrade setuptools
sudo pip3 install --upgrade Adafruit_BBIO
sudo pip3 install adafruit-blinka
Afterwards, open the folder and change the run permissions:
chmod 755 runNext, use Chron so that the project1.py program will start when the PocketBeagle turns on. To do this, enter "sudo chrontab -e" in the command line. Then, paste this line into the window:
@reboot sleep 30 && sh <path to 'run' script> > /var/lib/cloud9/logs/cronlog2>&1Next, create a place in Cloud9 for your USB to automatically act as extra storage. This will allow the PocketBeagle to retrieve the list of songs on the USB. This place will need to be at "/var/lib/cloud9/media/USB" in order for the program to work correctly. The steps to do this are in detail here. Briefly, the commands are listed below:
$ sudo mkdir /media/USB
$ sudo nano /etc/fstab
#copy paste the next line at the end of the fstab file
/dev/sda1 /media/USB vfat dmask=000,fmask=0111,user,auto,nofail 0 0

$ sudo reboot now
Finally, press the power button on the PocketBeagle twice to reboot and start the project1 program.
Operation Instructions1. Plug the USB into the powered USB hub. Note: the songs cannot be in a folder, but have to be flat on the USB for the program to function correctly.
2. Power on the PocketBeagle.
3. Use the selector buttons (green) to select between songs. The left moves the indicator up and the right moves the indicator down.
4. Press the black button to play the selected song.
5. Press the blue button to pause the selected song.
Here is a video demonstrating operation of the device:
Future WorkOriginally, this project also had a function where there were additional buttons that could be pressed to save songs onto the PocketBeagle and map these songs to these buttons. Therefore, songs could be played by pressing these buttons even if there was no USB drive plugged in. However, I decided against this function, since this device is not portable without the USB drive anyways, so it makes little sense to try to make it independent of the USB drive. However, this function could be included in future, more portable versions of this device.
Additionally, there needs to be work on failure conditions and error messages. One error message that needs to be implemented is an error when the indicator moves "off" of a song. Currently, the indicator is simply based on position, and will not stop if it moves past a song. Another error message that should exist in the code is if there is no USB connected to the device. These errors could be displayed on the SPI screen.
Also, there could be further work on the user interface. Originally, I had planned for a song's name to be shown alone when played, and have an indicator for the time that it had played as well as the total track time. However, I was not able to integrate these functions in the timespan of this project. Additionally, the interface could simply look better than it does currently.
Finally, there could be more functions of current music player added, such as skipping songs, queuing songs, and playing songs randomly.
AcknowledgementsI would like to thank Professor Erik Welsh for helping me through my first independent, electronics-based project.


Comments