


Hardware components | ||||||
 |
| × | 1 | |||
 |
| × | 1 | |||
 |
| × | 1 | |||
Software apps and online services | ||||||
 |
| |||||
 |
| |||||
| ||||||
Our imagination is the only limitation to the possibilities of Global Positioning System (GPS) technologies. To list a few, geographic surveys and mapping, vehicle navigation, help farmers harvest their fields and various military applications etc. In spite of its vast applications there is still a challenge to build a network reliable and power effective GPS tracker that can be used by the masses without the dependency of other devices. monoZ ecosystem simplifies this task to a great extent.
The monoZ ecosystem provides a powerful development kit designed for swift prototyping of cellular IoT projects. Loaded with LTE-M / NB-IoT cellular modem and low power STM32 MCU, monoZero is an ideal platform for building such applications as GPS that has both reliability and cost effectiveness. It hosts 5 different types of peripherals for allowing users to easily connect and control variety of sensors and other devices.
This guide will walk through the following:
1. Hardware setup of GPS tracker using monoZero BG96 hardware board,
2. Embedded firmware to read and send GPS data via MQTT using monoZ SDK
3. monoZ Cloud OSS configuration to receive the GPS data via MQTT and display it on a dashboard.
Hardware Description:monoZero BG96 Board:
monoZero BG96 variant hosts globally available Quectel BG96 modem that supports internet service protocols like TCP, UDP, and PPP. The onboard STM32L4 Arm® Cortex®-M4 can be programmed via SWD (Serial Wire Debug). monoZero BG96 hosts 23 I/O peripherals with 1 x USB, 1 x LPUART, 2 x UART, 3 x I2C, 3 x SPI and 1 x CAN for external communication.
monoZero BG96 can be configured using monoZ SDK for modem, protocol and peripheral configuration. Find more details of monoZero BG96 at docs.monoz.io
monoZero Grove Board
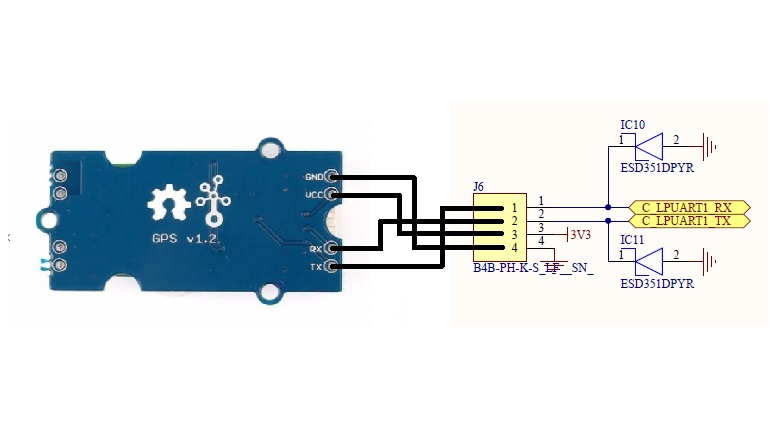
monoZero Grove board allows user to access the pin-based peripherals(LPUART, SPI, I2C, etc.) through grove ports (QWICC ports) thereby simplifying the hardware setup process. When Grove board is connected to monoZero BG96 v2 or v3, grove port 3 corresponds to LPUART peripheral.
GPS sensor:
Seeed Studio - GPS (Air530) GPS module has been used to determine the GPS data. The module communicates through LPUART port and hence can be connected to monoZero board via the LPUART grove port.
Other components- LTE-M / NB-IoT nano Sim: We have used 1NCE global sim in our setup.
- Antenna: RP SMA Male type antennas that can be used for high frequency from 2.4GHz - 2.6GHz.
- SWD Connector: STLink V2 debugger for firmware flash.
Connect GPS tracker to grove board and stack grove board on monoZero BG96 board. Connect SMA antenna to main board and power on via USB-B cable.
monoZ SDK is a user-friendly tool that reduces user effort to build embedded application on monoZero HW. Download the working project file built using monoZ SDK from our github(https://github.com/Meritech-monoZ/GPS_NEO6M) and edit as per your setup.
Note: Refer to docs.monoz.io for STM32CubeIDE operations, CLI setup, SWD flashing.
1. Open the project file in STM32CubeIDE.
2. Go to Lib -> tool_gen -> MZ_GPSSensor and change the mqtt client config as per your setup.
static void send_payload_to_server(st_mqtt_message * pmsg)
{
	/* Set the Object 19/0/0 Data and send the Notify request to MonoZ_Lib */
	//mz_error_t status = mz_mqtt_pub(pmsg);

	mz_error_t status = MZ_init_cmd_direct("AT+QMTDISC=0\r\n",AT_TIME_15SEC, AT_TIME_15SEC);
	status |= MZ_init_cmd_direct("AT+QMTOPEN=0,\"cloud.monoz.io\",1883\r\n",AT_TIME_15SEC, AT_TIME_15SEC);
	status |= MZ_init_cmd_direct("AT+QMTCONN=0,\"GPSTest\",\"GPSTest\",\"GPSTest\"\r\n",AT_TIME_15SEC, AT_TIME_15SEC);
	status |= MZ_init_cmd_direct("AT+QMTPUB=0,0,0,0,\"v1/devices/me/telemetry\"\r\n",AT_TIME_15SEC, 0);
	status |= MZ_init_cmd_direct(payload_string,AT_TIME_15SEC, AT_TIME_15SEC);


	/* Check the status of the request */
	if(MZ_OK == status)
	{
		/* print success on CLI */
		mz_puts("Data send to MonoZ_Lib\r\n");
	}
	else
	{
		/* print of error string on CLI */
		mz_puts("Data send to MonoZ_Lib FAILED\r\n");
		//mz_puts(mz_error_to_str(status));
	}
}
3. Go to Lib -> tool_gen -> MZ_modemconfig and change the apn settings as per your setup.
void bg96_setup(void)
{
	mz_raw_at_exe_csq();
	mz_raw_at_read_cops();
	mz_raw_at_exe_CGNAPN();
	mz_raw_at_write_CNACT(0,0);
	mz_raw_at_write_CNCFG(0,1,"\"iot.1nce.net\"","\"\"","\"\"",0);
	mz_raw_at_write_CNACT(0,1);
	mz_raw_at_read_CNACT();
}
4. Build the code and directly flashed to the board.
5. Following is the expected CLI screen upon successful flashing.
Login to Cloud Platform:
1. Get monoZ Cloud OSS instance or ThingsBoard instance and login to your account.
Create device:
2. Go to "Device group" and click in the (+) icon to add a new device.
3. In the dialog that opens enter a name for the device, leave the rest as default and click on “Add” to add the device
4. Once the device has been added it will be shown in the list. Now click on the Shield icon to Manage Credentials for the device.
5. In the Device Credentials Dialog select “MQTT Basic” as the Credential Type. Enter your Client ID, Username and Password and then click Save. The credentials entered here should be the same as provided in the MQTT settings of the Firmware.
Test if telemetry data is received by the device:
6. Turn on monoZero and send telemetry data to cloud.
7. Open the device in Centra-IoT Cloud Platform, click on the row in the device list to open property window of the device. Go to “Latest Telemetry” tab and you should be able to view the data.
Create a dashboard to visualize telemetry data:
8. On the Property window in the “Latest Telemetry” Tab as opened in the above step, select the latitude and longitude checkboxes and click on "Show on Widget" button.
9. Select the map widget from the "Current bundle”.
10. Click on "Add to dashboard" button.
11. Select an existing dashboard if you have it or create a new one if you don't have an existing dashboard.
12. Click on the "Add" button to add the widget to the dashboard.
13. Go to dashboard you created, select Dashboard Groups à All and select your Dashboard from the list. Then click on the “Open Dashboard” icon to open the Dashboard.
14. You can click on the Edit icon on the Dashboard and adjust the size of the map view.
ResultThe telemetry data can be visualized on the dashboard.


Comments
Please log in or sign up to comment.